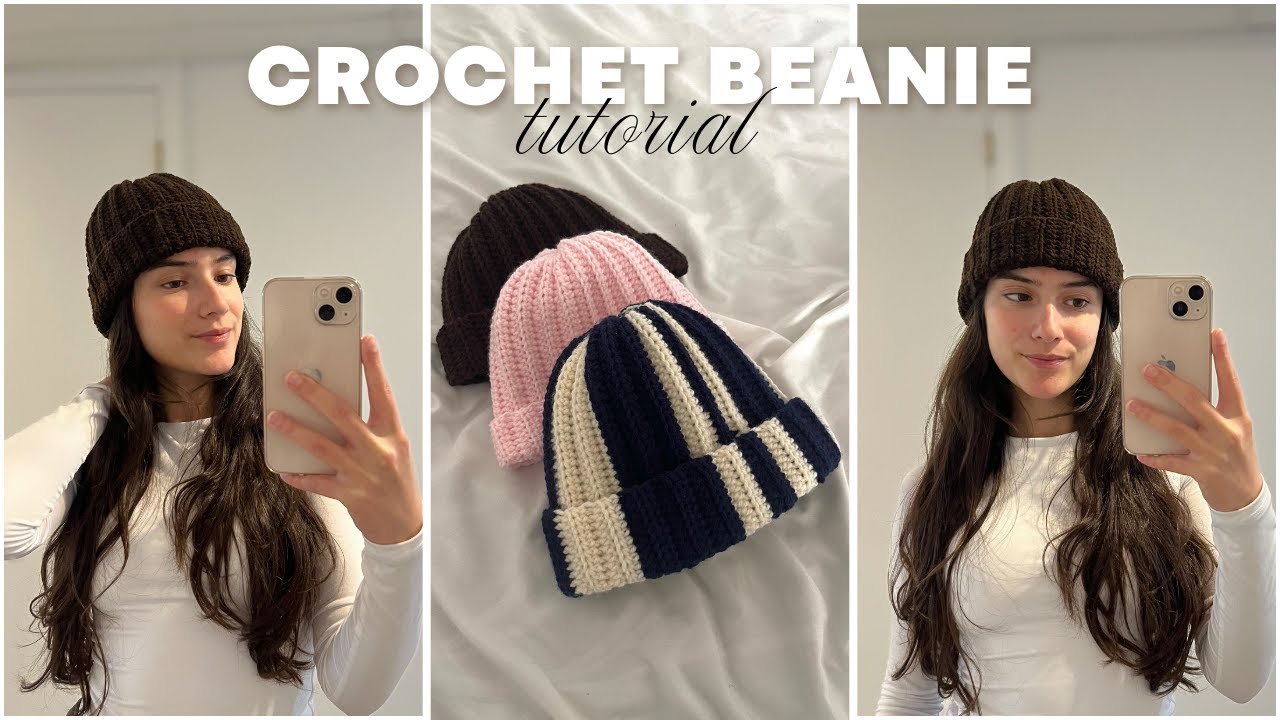
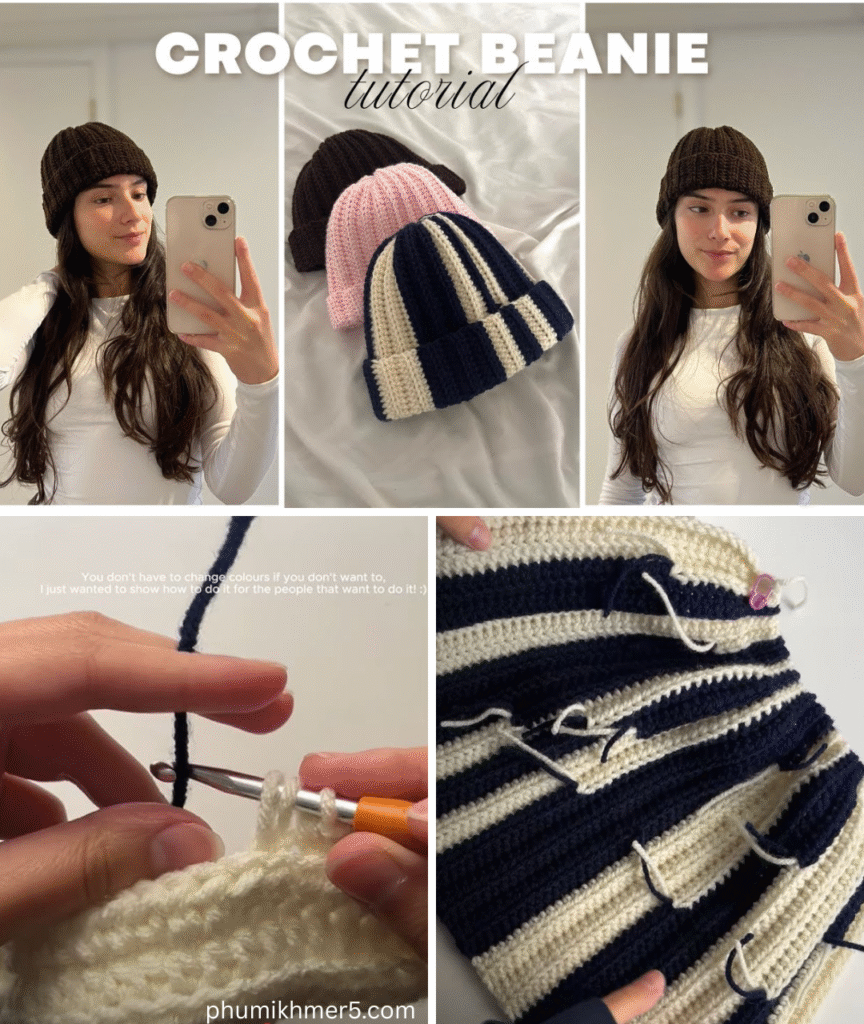
Easy Crochet Beanie Tutorial: Your Go-To for Cozy Headwear!
A crochet beanie is a quintessential project for anyone learning to crochet. It’s practical, stylish, and incredibly satisfying to make! While beanies can range from simple to complex, this tutorial focuses on a super easy pattern that’s perfect for beginners. You’ll learn how to create a cozy, stretchy beanie using basic stitches and a straightforward construction method. Get ready to crochet your new favorite hat or a thoughtful gift for a friend!

Why This Beanie is Perfect for Beginners
- Simple Construction: We’ll work in continuous rounds, building the beanie from the crown down, with minimal shaping.
- Basic Stitches: Relies primarily on half double crochet (hdc), a versatile stitch that works up quickly and creates a lovely, dense fabric.
- Quick to Make: Using hdc and a larger hook means your beanie will grow fast, keeping you motivated.
- Customizable: Easily adaptable for different sizes and yarn weights once you grasp the basic principles.
- Practical & Wearable: You’ll end up with a useful, stylish item you can wear right away!
1. Planning Your Easy Beanie: Size & Style
A little planning helps ensure your beanie fits perfectly.
- Sizing: This pattern is written for an Adult Medium (fits head circumference 21-23 inches / 53-58 cm).
- To adjust for other sizes: You’ll primarily adjust the number of stitches in your starting flat circle (the crown of the beanie) and the number of rounds for the height. We’ll cover how to figure this out in the “Gauge” section.
- Yarn Choice:
- Fiber: Choose a yarn that’s soft and comfortable against the skin. Acrylic or a wool/acrylic blend is highly recommended for beginners. They are affordable, widely available, and easy to care for. Wool offers great warmth.
- Weight: Worsted Weight (#4) yarn is ideal for this pattern. It provides warmth and works up quickly.
- Quantity: You’ll need approximately 150-200 yards (137-183 meters) for an adult-sized beanie. One standard skein is usually enough.
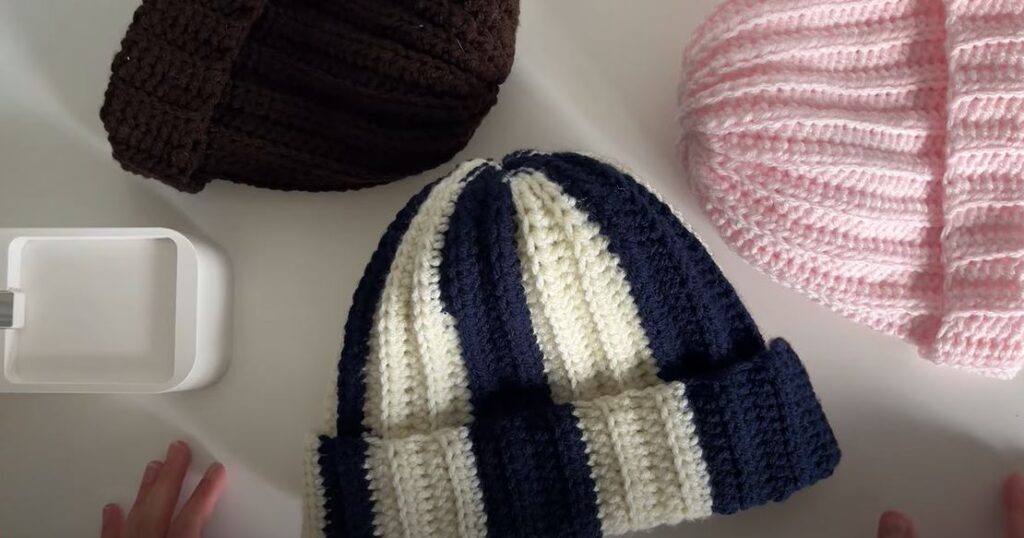
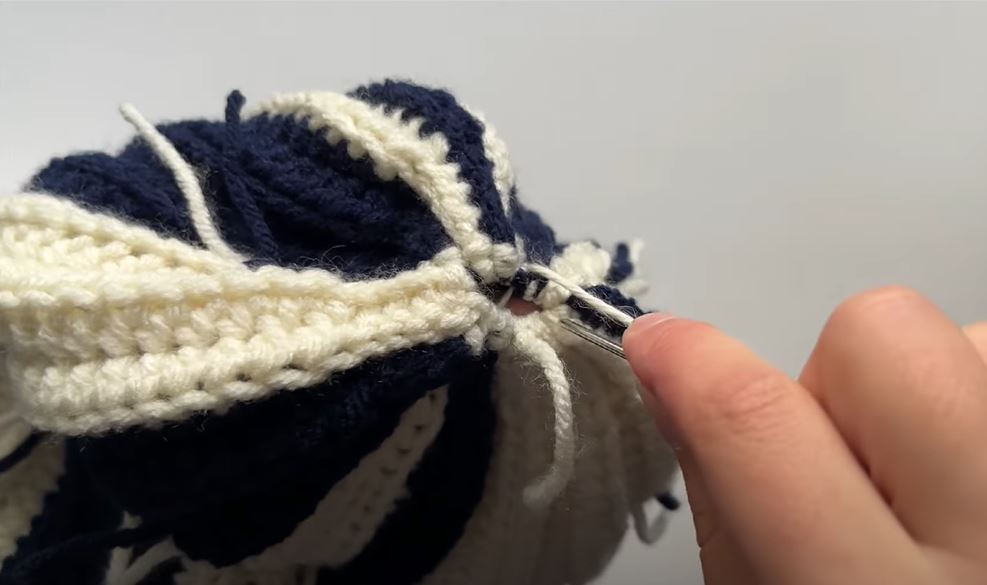
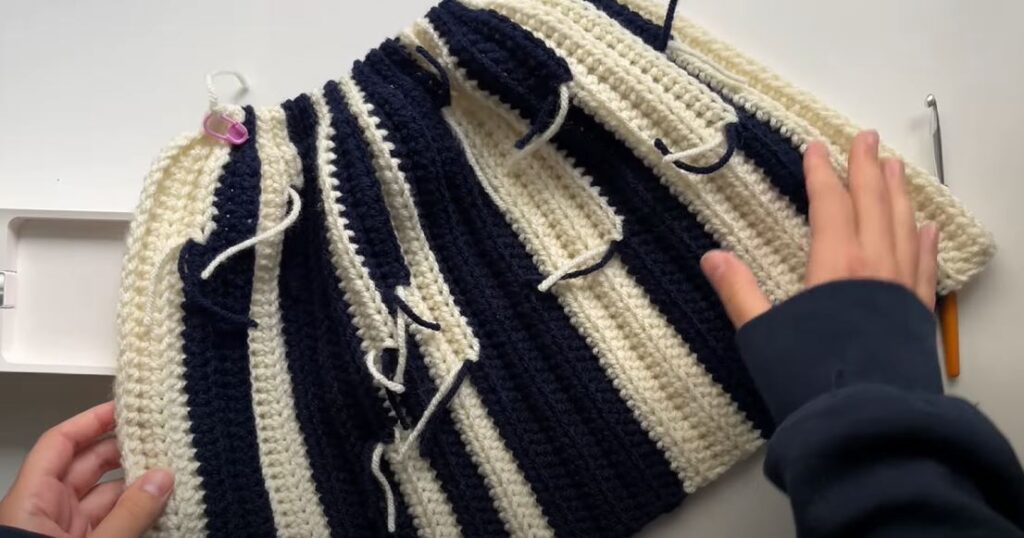
- Style: This tutorial creates a basic, fitted beanie. You can add a pom-pom for extra flair!
2. Materials You’ll Need
- Yarn: Approximately 150-200 yards (137-183 meters) of Worsted Weight (#4) yarn (e.g., acrylic or a wool blend).
- Crochet Hook: 5.0 mm (H-8 US). (Or the size needed to achieve your gauge – see next section.)
- Scissors: For cutting yarn.
- Yarn Needle (Tapestry Needle): A large, blunt-tipped needle for weaving in ends.
- Stitch Marker (Essential!): To mark the beginning of each round when working in continuous spirals.
- Measuring Tape: Crucial for checking gauge and beanie dimensions.
- Pom-pom Maker (Optional): If you want to add a fluffy pom-pom.
3. Essential Crochet Stitches (Review)
Before you begin, make sure you’re comfortable with these fundamental stitches:
- Slip Knot: The first knot to start your chain.
- Chain (ch): The basic foundation of crochet.
- Magic Ring (or Adjustable Ring): The best way to start a beanie for a tight, closed top. (If new, practice this!)
- Half Double Crochet (hdc): Our primary stitch.
- To make a HDC: Yarn over (YO), insert hook into stitch, YO, pull up a loop (3 loops on hook), YO, pull through all 3 loops on hook.
- Slip Stitch (sl st): Used for joining rounds if not working in a continuous spiral, or for finishing.
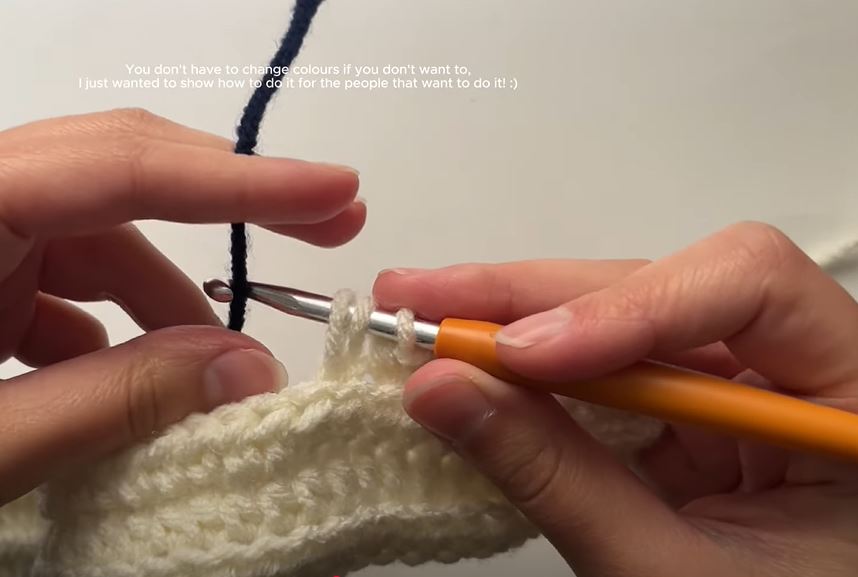
- Working in Continuous Rounds: This means you don’t join with a slip stitch at the end of each round or make turning chains. You simply continue crocheting into the first stitch of the previous round. This creates a seamless fabric.
4. Understanding & Achieving Gauge (Crucial for Fit!)
Your gauge (the number of stitches and rows per inch/cm) is paramount for ensuring your beanie fits correctly.
- Make a Gauge Swatch (using HDC):
- Chain 17.
- Row 1: HDC in the 3rd chain from the hook, and in each chain across. (15 HDC)
- Row 2: Ch 2 (does NOT count as first HDC), turn. HDC in the next HDC and in each HDC across. (15 HDC)
- Repeat Row 2 until your swatch measures about 4 inches (10 cm) tall.
- Measure: Lay your swatch flat. Using a ruler, count how many HDC stitches you have in 4 inches (10 cm) horizontally, and how many rows you have in 4 inches (10 cm) vertically.
- Target Gauge for this pattern: Approximately 13-14 HDC stitches in 4 inches (10 cm) and 9-10 rows in 4 inches (10 cm).
- Adjust:
- If you have more stitches/rows per 4 inches, your tension is too tight; go up a hook size (e.g., to 5.5 mm).
- If you have fewer stitches/rows per 4 inches, your tension is too loose; go down a hook size (e.g., to 4.5 mm).
- Remake your swatch until you match the target gauge as closely as possible.
Calculating Your Crown Size:
The crown (flat top) of your beanie should ideally measure about 1/3 to 1/2 the finished circumference of the hat. For an adult medium (21-23 inch head), aim for a flat crown diameter of 6.5 – 7.5 inches (16.5 – 19 cm). You’ll measure this as you crochet the initial increasing rounds.
5. Let’s Crochet Your Easy Beanie! (Step-by-Step)
We’ll work from the top (crown) down to the brim.
Part 1: The Crown (Increasing Rounds to Form the Flat Top)
- Start: Make a Magic Ring.
- If you don’t know how to do a magic ring, alternatively: Ch 3, sl st to first ch to form a ring.
- Rnd 1: Ch 2 (does NOT count as a st). Work 10 hdc into the magic ring. Pull the tail of the magic ring tightly to close the hole.
- If using Ch 3 ring: Work 10 hdc into the ring. Sl st to the top of the first hdc.
- Place your stitch marker in the 1st hdc of this round. This marks the beginning of your rounds.
- Rnd 2: Work 2 hdc in each hdc around. [20 hdc]
- Move your stitch marker to the 1st hdc of this round.
- Rnd 3: (Hdc in next st, 2 hdc in next st) repeat around. [30 hdc]
- Move your stitch marker.
- Rnd 4: (Hdc in next 2 sts, 2 hdc in next st) repeat around. [40 hdc]
- Move your stitch marker.
- Rnd 5: (Hdc in next 3 sts, 2 hdc in next st) repeat around. [50 hdc]
- Move your stitch marker.
- Rnd 6: (Hdc in next 4 sts, 2 hdc in next st) repeat around. [60 hdc]
- Move your stitch marker.
- Rnd 7: (Hdc in next 5 sts, 2 hdc in next st) repeat around. [70 hdc]
- Move your stitch marker.
- Check Crown Diameter: Lay your work flat. Measure across the center. It should be approximately 6.5 – 7 inches (16.5-18 cm) in diameter for an Adult Medium.
- If your diameter is too small: Add one more increase round (Rnd 8: (Hdc in next 6 sts, 2 hdc in next st) repeat around. [80 hdc]).
- If your diameter is too large: You might have to go down a hook size and restart, or accept a slightly looser beanie.
- For a smaller head (e.g., child): Stop increasing when the diameter is appropriate for their head size (e.g., 5-6 inches for a child).
Part 2: The Body (Straight Sides)
Now we stop increasing and work even rounds to create the height of the beanie.
- Rnd 8 (or next round after your final increase): Hdc in each hdc around. [70 hdc]
- Move your stitch marker to the first hdc of the round.
- Continue working in a spiral, without joining or chaining.
- Repeat Rnd 8: Continue working even rounds of hdc (no increases) until your beanie reaches your desired length.
- For an Adult Medium, aim for about 7.5 – 8.5 inches (19-21.5 cm) from the very top center of the crown to the bottom edge. This will give you a standard fitted beanie.
- For a slouchy beanie, add 1-2 more inches (2.5-5 cm) to the height.
- For a child’s beanie, stop when it measures about 6.5-7.5 inches (16.5-19 cm) depending on age.
Part 3: The Brim (Optional but Recommended)
A simple brim can be added for a neat finish or extra warmth around the ears.
- Rnd 1 (Brim): Ch 1 (does NOT count as a st).
- Close-up: Work this entire round in hdc in the third loop (aka “camel stitch”). This creates a knit-like ridge that looks great as a brim and provides extra stretch.
- To find the “third loop”: Look at the top of an hdc stitch. You’ll see the regular ‘V’ (front loop and back loop). Just below the back loop, on the back side of your work, there’s a horizontal bar. That’s the third loop! Work your hdc into this loop.
- Hdc in the 3rd loop of each hdc around.
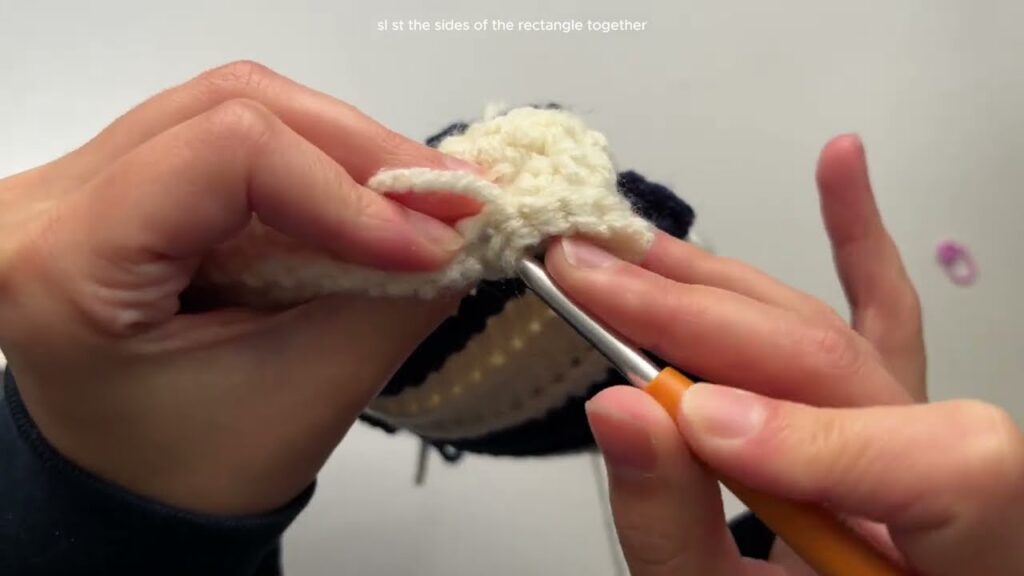
- Join with a sl st to the first hdc of the round.
- This will bring the top of your stitches to the outside, creating a nice defined edge.
- Close-up: Work this entire round in hdc in the third loop (aka “camel stitch”). This creates a knit-like ridge that looks great as a brim and provides extra stretch.
- Rnd 2 (Brim): Ch 1 (does NOT count as a st). Sc in each hdc around. Join with a sl st to the first sc.
- This creates a neat, snug edge.
- Fasten Off, leaving a 6-8 inch (15-20 cm) tail.
6. Finishing Your Easy Beanie
- Weave in All Ends: Use your yarn needle to neatly weave in all loose yarn tails (especially the one from the magic ring and the final tail). Go back and forth a few times in different directions to secure them well.
- Add a Pom-Pom (Optional): Make a yarn pom-pom (or use a faux fur one) and securely attach it to the very top center of your beanie.
- For a secure attachment, thread the pom-pom tails through the top of the beanie, tie them tightly inside, and weave in the remaining tails.
- Blocking (Optional but Recommended): While not strictly necessary for a simple acrylic beanie, a light steam block can help even out stitches and improve drape.
- Lay the beanie flat or place it over a bowl/head-form the size of your head. Gently steam with an iron (do not touch iron to acrylic yarn, just hover) or spritz with water, then gently shape and let dry.
7. Care for Your Crocheted Beanie
Always refer to your yarn label for specific care instructions. For most acrylic or wool blend yarns:
- Machine Washable: Usually machine wash on a gentle cycle in cool water.
- Drying: Tumble dry on low heat or, ideally, lay flat to air dry to help maintain its shape.
- Avoid Bleach: Do not use bleach unless specifically instructed by the yarn label.
Congratulations! You’ve just crocheted your very own easy and cozy beanie. This project is a fantastic stepping stone for more complex crochet endeavors, and you’ll love the satisfaction of wearing something you made with your own hands!
Video tutorial:


