
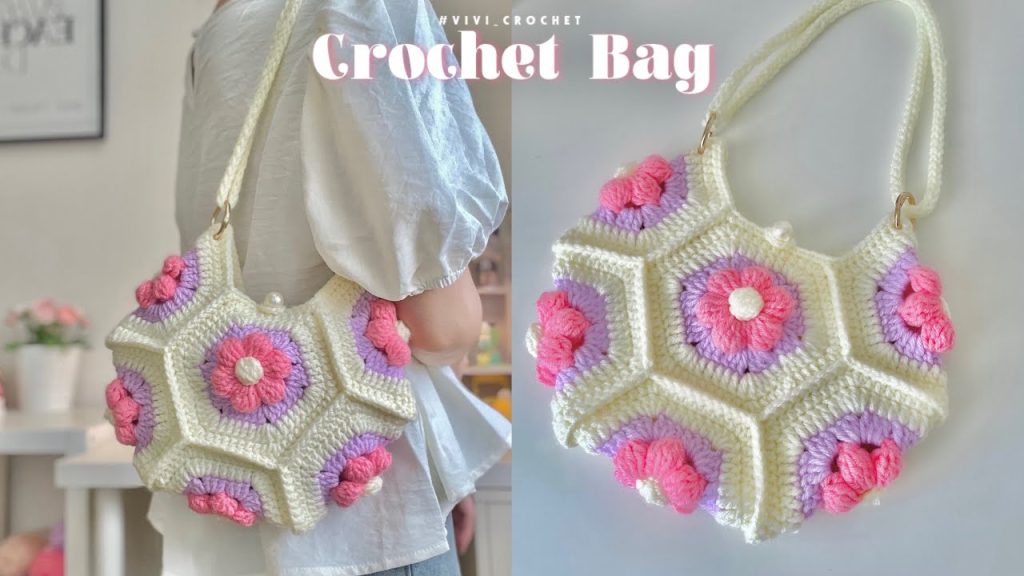
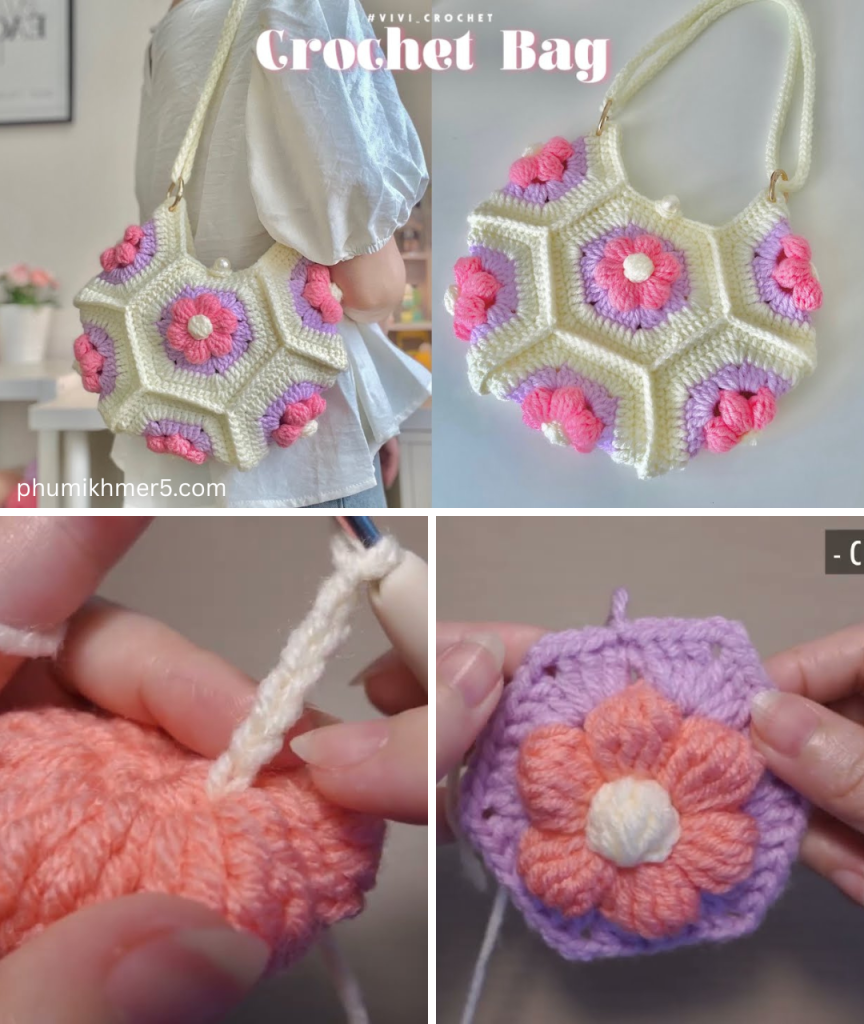
Crocheting is not only a relaxing and rewarding hobby but also a fantastic way to create beautiful, handmade items that are both functional and stylish. One of the most charming projects for crochet lovers is the Flower Granny Hexagon Crochet Bag—a small bag made by joining floral hexagons into a lovely and practical accessory.
In this article, we’ll walk through the step-by-step process of making your own flower granny hexagon crochet bag. Whether you’re a beginner or an experienced crocheter, this guide provides everything you need to complete the project: materials, techniques, assembly instructions, and customization tips.
🧶 What is a Flower Granny Hexagon?
The granny hexagon is a variation of the traditional granny square, but with six sides instead of four. In this design, each hexagon begins with a flower motif in the center, making it visually appealing and dimensional. These motifs are then joined together to form the structure of the bag.
This pattern is ideal for using leftover yarn and allows for endless color combinations, which means each bag can be unique.
🧵 Materials You’ll Need
To make your flower granny hexagon crochet bag, gather the following:
Yarn:
- Cotton or acrylic yarn (Worsted/Aran weight – Category 4)
- Choose at least 2–3 colors (e.g., one for the flower center, another for the petals, and one for the outer hexagon)
- Example colors: White (center), Pink (petals), Green or Beige (outer edges)
Tools:
- Crochet hook (Size 4.0 mm or appropriate for your yarn)
- Yarn needle (for sewing and weaving in ends)
- Scissors
- Stitch markers (optional)
- Magnetic snap or button (for closure)
- Lining fabric and sewing needle (optional for inner lining)
🧷 Stitches & Abbreviations
Here’s a quick refresher on the stitches used (US terms):
- ch – chain
- sl st – slip stitch
- sc – single crochet
- dc – double crochet
- tr – treble crochet
- sp – space
- st(s) – stitch(es)
Make sure you’re comfortable with these stitches before beginning.
🌸 How to Crochet the Flower Granny Hexagon
Each hexagon is worked in the round and consists of three parts: the flower center, petals, and the surrounding hexagon shape.
🪷 Round 1 – Flower Center
- Start with a magic ring or ch 4 and sl st to form a ring.
- Ch 2 (counts as first dc), work 11 dc into the ring. (12 dc total)
- Sl st to the top of the starting ch 2 to join.
- Fasten off and change color.
🌺 Round 2 – Petals
- Join new color in any dc.
- Ch 2, 2 dc in same st, ch 2, sl st in same st – first petal made.
- In next stitch: sl st, ch 2, 2 dc, ch 2, sl st in same st – second petal.
- Repeat around (12 petals).
- Sl st to join and fasten off.

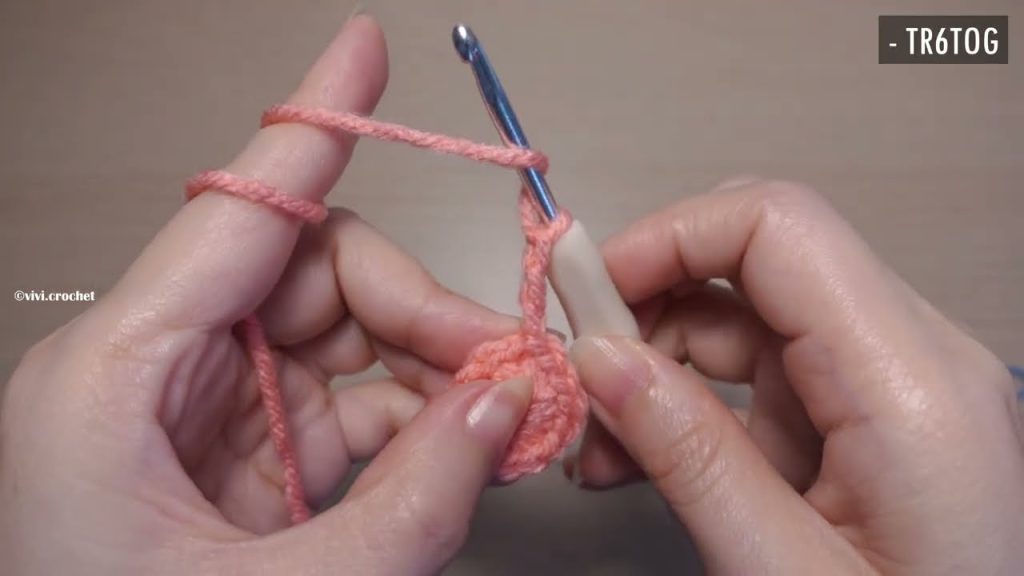
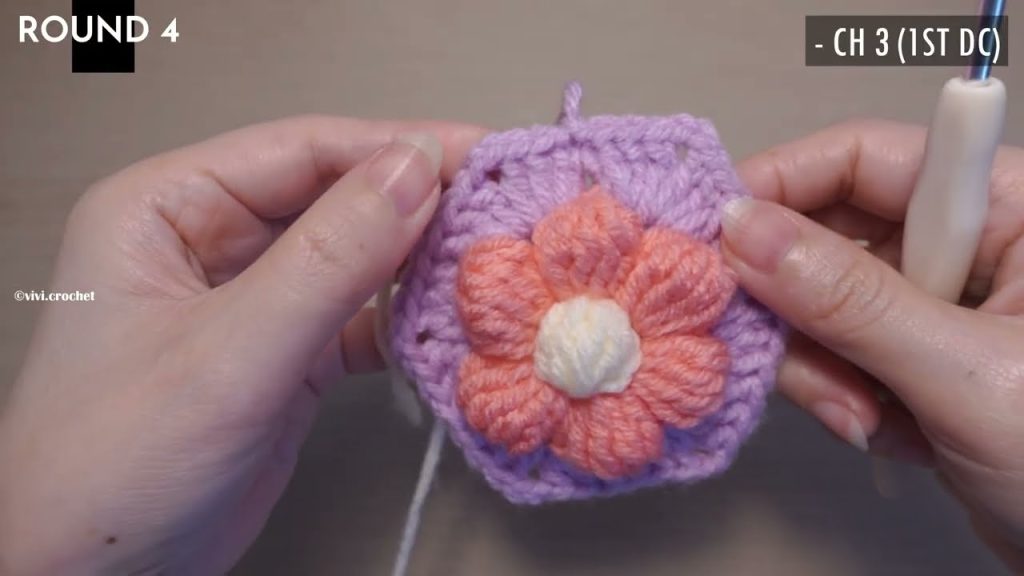
🍃 Round 3 – Turning Flower into a Hexagon
- Join new yarn in the ch-2 space of any petal.
- Ch 3 (counts as dc), 2 dc in same sp.
- In next petal: 3 dc in ch-2 sp.
- In the third petal: (2 dc, ch 2, 2 dc) – this forms a corner.
- Continue around alternating between 3 dc in each petal and (2 dc, ch 2, 2 dc) at every third petal to create six corners.
- Join with sl st to first dc.
- Optional: Add one more round of dc to make the hexagon slightly larger.
👉 Make 14 hexagons in total.
🧳 Assembling the Bag
Now that all your hexagons are complete, it’s time to arrange and stitch them into a bag.
🧩 Layout (Classic Hexagon Bag Assembly):
Use 14 hexagons:
- Front and back panels: 3 hexagons each
- Sides: 2 hexagons
- Bottom: 2 hexagons
- Flap: 1 hexagon
- Straps (optional): Made from chains or extra hexagons
🪡 Step-by-Step Joining:
- Block your hexagons if they are curling or uneven.
- Use whip stitch or mattress stitch with yarn and a needle to join hexagons on the wrong side.
- Join 3 hexagons in a row (front panel), and repeat for the back panel.
- Attach 2 hexagons between front and back to form the sides.
- Attach 2 hexagons to the bottom edges of front and back panels.
- Attach 1 hexagon to the top-back panel to serve as a flap.
- For a more structured bag, you can insert a lining inside.
🎒 Making the Strap
You can make the strap in various ways:
Option 1: Simple Strap
- Ch a long chain (about 80–100 chains)
- Sc in each ch across, turn, repeat for 2–3 rows
- Sew ends of strap securely to the inside of the bag
Option 2: Hexagon Strap
- Make 3–4 mini hexagons and join them end-to-end
- Attach both ends to the bag
🧵 Optional: Add a Lining and Closure
A fabric lining enhances the durability and polish of your bag.
Steps:
- Cut fabric slightly larger than the bag dimensions.
- Sew sides of fabric together to mimic the bag shape.
- Place lining inside the crochet bag.
- Sew top edge of lining to the inside of the bag.
- Sew in a magnetic snap or button under the flap for closure.
🎨 Customization Tips
- Use gradient yarn for a magical ombré effect.
- Add beads or buttons to flower centers.
- Make it a crossbody, handbag, or mini pouch by adjusting the strap.
- Line with vibrant printed fabric for contrast.
🧼 Care Instructions
- Hand wash with mild detergent
- Lay flat to dry
- Avoid machine drying to prevent stretching or warping
✅ Conclusion
The Flower Granny Hexagon Crochet Bag is a charming blend of floral aesthetics and geometric design. It’s a delightful project for crocheters looking to make something both beautiful and practical. Whether you carry it as a fashion accessory or gift it to a loved one, this small bag showcases your craftsmanship and creativity.
Now that you know how to make one, why stop at just one? Try experimenting with colors, sizes, and shapes to create a collection of handmade bags.
Happy Crocheting! 🧶💐
Video tutorial:


