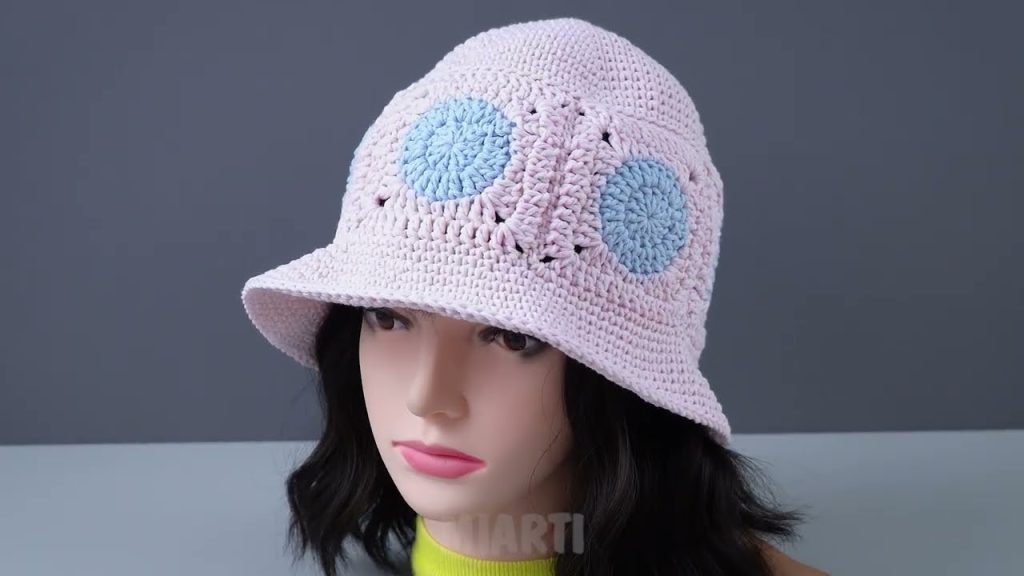
The granny square is a timeless crochet motif that has been reinvented countless times, and its latest resurgence in fashion makes it perfect for a stylish bucket hat! The “Retro Bloom” Crochet Granny Square Bucket Hat is a fantastic project for any crocheter, blending classic charm with a modern, trendy accessory. This detailed tutorial will guide you through creating a sturdy, vibrant, and fun bucket hat that is perfect for sunny days and expressing your unique, handmade style.
This project is an excellent choice for a confident beginner who wants to learn how to make and join granny squares, or for an experienced crocheter looking for a fast and fun project to use up yarn scraps. The modular nature of granny squares makes this project highly customizable and an enjoyable way to explore color combinations.
Why Crochet the Retro Bloom Bucket Hat?
- Classic & Trendy: Granny squares are always in style, and a bucket hat is a fashionable way to wear them.
- Modular Design: Create individual squares and then join them, making it a portable and manageable project.
- Sturdy & Unique: The hat’s construction ensures it holds its shape while showcasing the beautiful granny square pattern.
- Skill Building: You’ll master the art of crocheting and joining granny squares, and learn how to create a top-down hat structure.
- Customizable: Easily adjust the size by changing hook size or adding/subtracting squares, and use a variety of colors for a truly personalized look.
- Stash Buster: A perfect project for using up those leftover yarn bits and bobs!
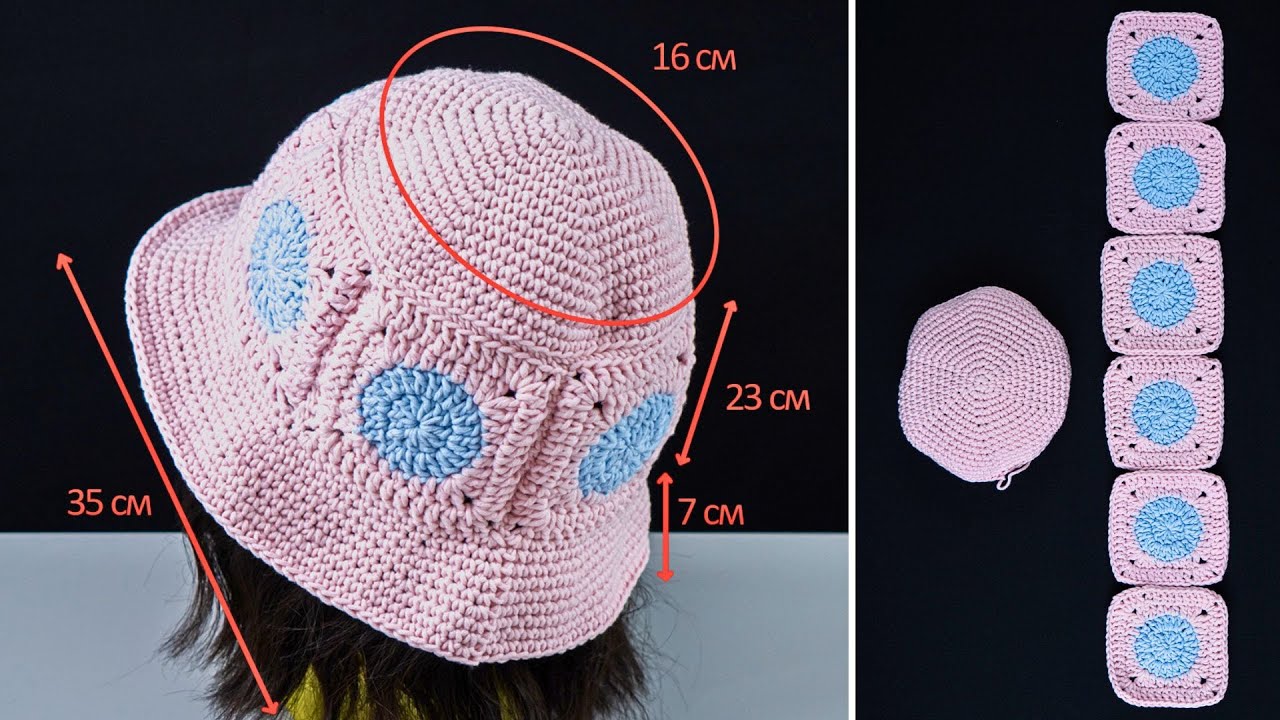
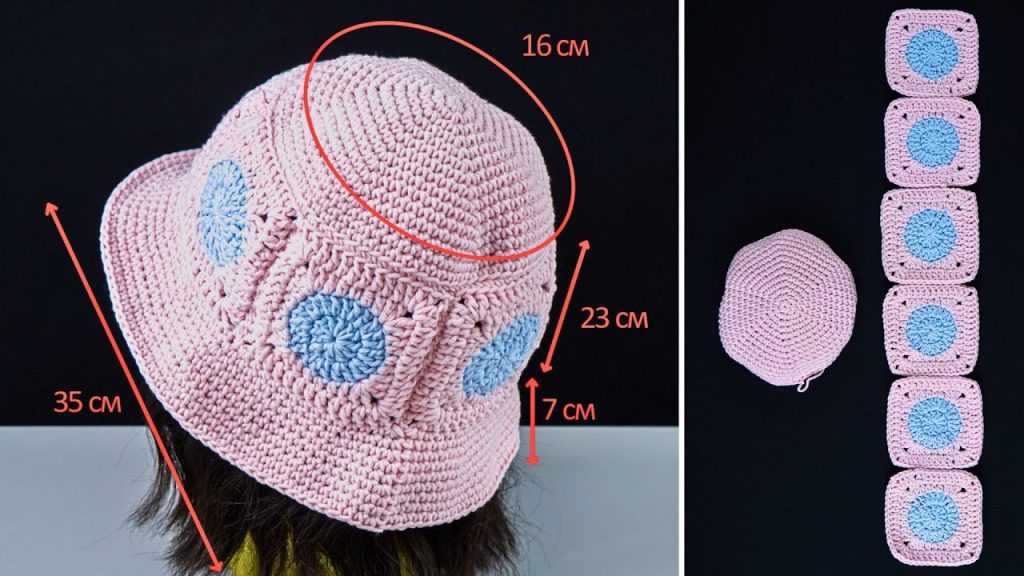
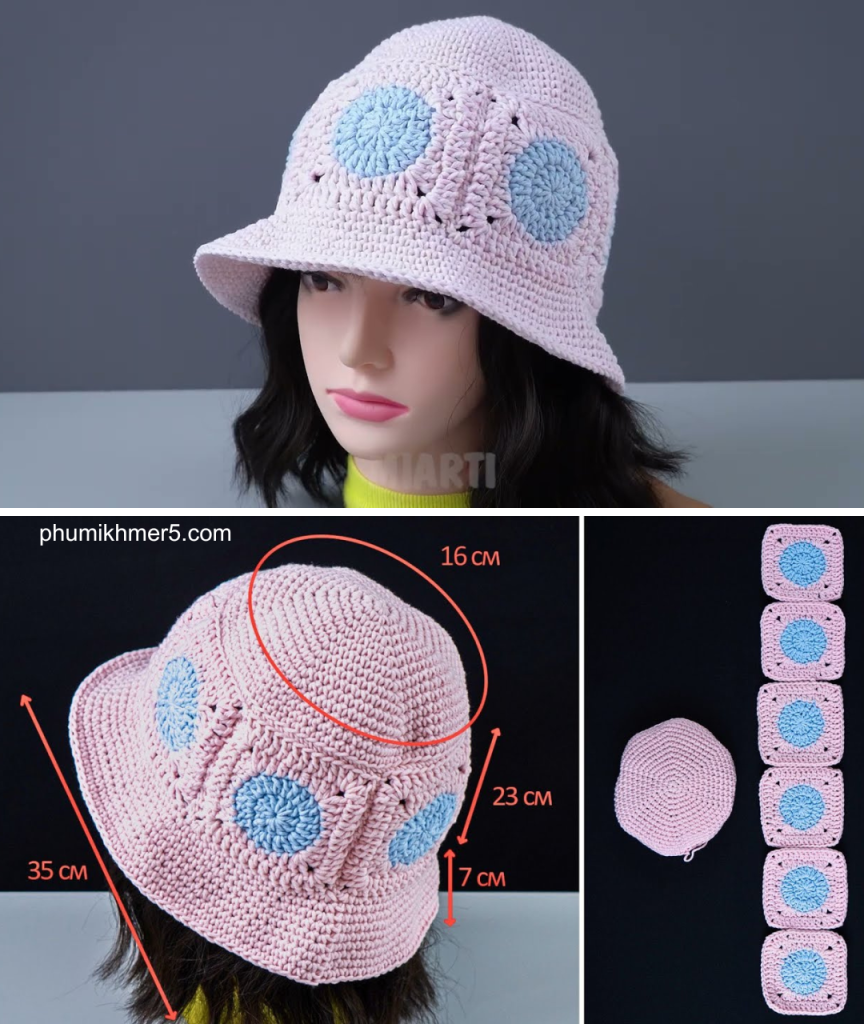
1. Planning Your Hat: Size & Materials
- Finished Size: This pattern is designed for a versatile one-size-fits-most adult head (approx. 22-23 inches / 56-58 cm). You can adjust the size by changing your hook size, yarn weight, or by adding/subtracting rounds to your granny squares, or even adding an extra square for a larger circumference.
- Yarn Choice: Choose a yarn that is durable and holds its shape well.
- Fiber: A sturdy, medium-weight yarn like Worsted Weight (#4) in Cotton or a Cotton Blend is a great choice. These fibers will give the hat structure and breathability.
- Color: This is where the fun begins! You can use a single color for a minimalist look, two contrasting colors, or multiple colors for each round of your granny squares to create a vibrant “scrappy” hat.
- Quantity: This will depend heavily on your color choices and size, but generally, you will need approximately 150-250 yards (137-230 meters) of yarn in total.
2. Materials You’ll Need
- Yarn: Your chosen quantity of Worsted Weight (#4) yarn in your preferred colors.
- Crochet Hook: 4.0 mm (G-6 US) or a size that gives you a dense but flexible fabric with your yarn.
- Scissors: For cutting yarn.
- Yarn Needle (Tapestry Needle): For weaving in ends and joining squares.
- Stitch Markers (Optional): To mark the corners or beginning of rounds.
3. Essential Crochet Stitches & Techniques
- Slip Knot
- Chain (ch)
- Slip Stitch (sl st): For joining and neatening.
- Single Crochet (sc)
- Double Crochet (dc)
- Triple Crochet (tr)
- Granny Cluster: (3 dc in same space)
- Working in the Round: For the brim.
- Joining Squares: Method of choice (slip stitch, single crochet, or whip stitch).
4. Let’s Crochet the Retro Bloom Bucket Hat!
The hat is constructed by first making individual granny squares, then joining them to form the crown and sides, and finally adding a brim.
Part 1: The Classic Granny Square (Make 5-6 squares, depending on desired hat circumference)
Each square will typically measure about 4-5 inches. Adjust hook size or number of rounds to reach your desired square size.
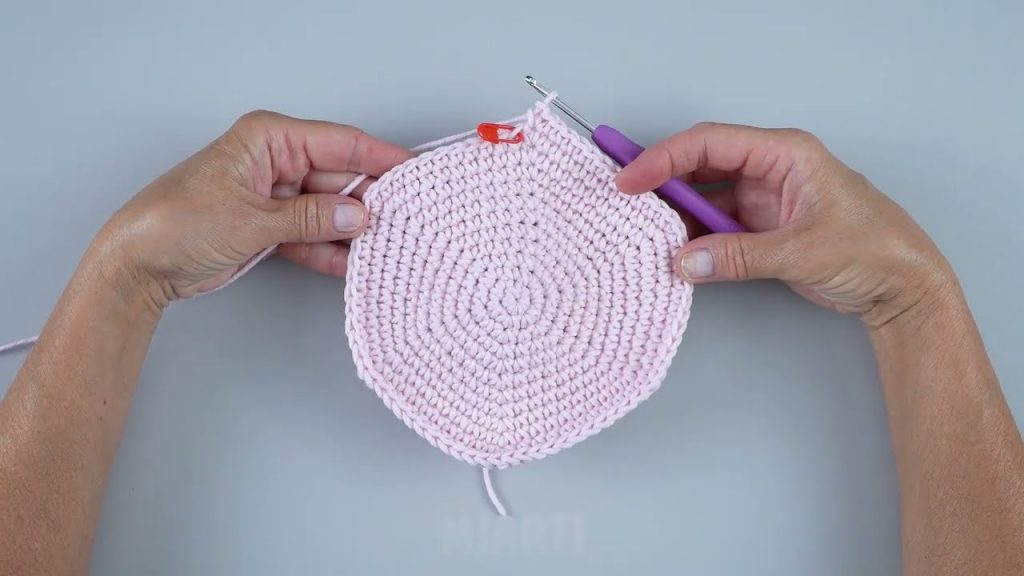
- Start with a Magic Ring (or Ch 4, sl st to first ch to form a ring).
- Round 1: Ch 3 (counts as 1st dc). Work 2 dc into the ring. (Ch 3, 3 dc into ring) 3 times. Ch 3, sl st to top of beginning Ch 3.
- You now have four 3-dc clusters separated by ch-3 spaces.
- Round 2: Sl st into the first ch-3 space. Ch 3 (counts as 1st dc). Work (2 dc, ch 3, 3 dc) into the same ch-3 space (first corner). Ch 1. Work (3 dc, ch 3, 3 dc) into the next ch-3 space (next corner). Repeat from * to * 2 more times. Ch 1, sl st to top of beginning Ch 3.
- Round 3: Sl st into the first ch-3 space. Ch 3 (counts as 1st dc). Work (2 dc, ch 3, 3 dc) into the same ch-3 space (first corner). Ch 1. Work 3 dc into the next ch-1 space. Ch 1. Work (3 dc, ch 3, 3 dc) into the next ch-3 space (next corner). Repeat from * to * 2 more times. Ch 1, sl st to top of beginning Ch 3.
- Continue: For a standard bucket hat, 3 rounds are often sufficient for the main squares. You can add more rounds for larger squares, ensuring your final hat fits your head circumference. Fasten off and weave in ends for each square.
Part 2: Assembling the Hat Body
You will need a minimum of 5 squares to form the sides of the hat, and one more for the top. For a larger hat, you might need 6 squares for the sides.
- Top Square: Take one granny square. This will be the flat top of your bucket hat.
- Side Squares: Take the remaining 5 or 6 squares. Join these squares edge-to-edge to form a band. Use your preferred joining method (e.g., slip stitch, single crochet, or whip stitch) for a neat seam. Ensure this band is the correct circumference for your head.
- Join Top to Sides: Now, join the top square to the top edge of the side band. Again, use your preferred joining method, working around the perimeter of the top square and the corresponding edge of the side band.

Part 3: The Brim
Now that the main body of the hat is assembled, we’ll create the brim.
- Round 1 (Brim Base): Attach your yarn to any corner of the bottom edge of your joined granny squares. Ch 1 (does not count as a stitch). Work 2 sc in each ch-1 space and 1 sc in each dc stitch along the bottom edge of the hat. When you reach a corner, work 3 sc into the corner space. Repeat around, ensuring you have an even number of stitches. Join with a sl st to the first sc.
- This round aims to create a solid, even base for the brim.
- Round 2: Ch 1. Work 1 sc in each stitch around. Join with a sl st.
- Round 3 (Increase Round): Ch 1. Work 1 sc in the next 5 stitches, 2 sc in the next stitch. Repeat from * to * around. Join with a sl st.
- This increase helps the brim to start flaring out.
- Rounds 4-6: Ch 1. Work 1 sc in each stitch around. Join with a sl st.
- Round 7 (Increase Round): Ch 1. Work 1 sc in the next 6 stitches, 2 sc in the next stitch. Repeat from * to * around. Join with a sl st.
- Continue alternating increase rounds (e.g., every 3-4 rounds) and regular sc rounds until the brim reaches your desired length and flare. Typically, a bucket hat brim is 2-3 inches long.
- Final Touches: Work a round of slip stitches or reverse single crochets (crab stitch) around the very edge for a clean, sturdy finish. Fasten off and weave in all remaining ends.
Enjoy your beautiful, handmade “Retro Bloom” Crochet Granny Square Bucket Hat! It’s a labor of love that is a perfect addition to your warm-weather wardrobe.
Video tutorial:


