🌵 Introduction: Embrace the Structure
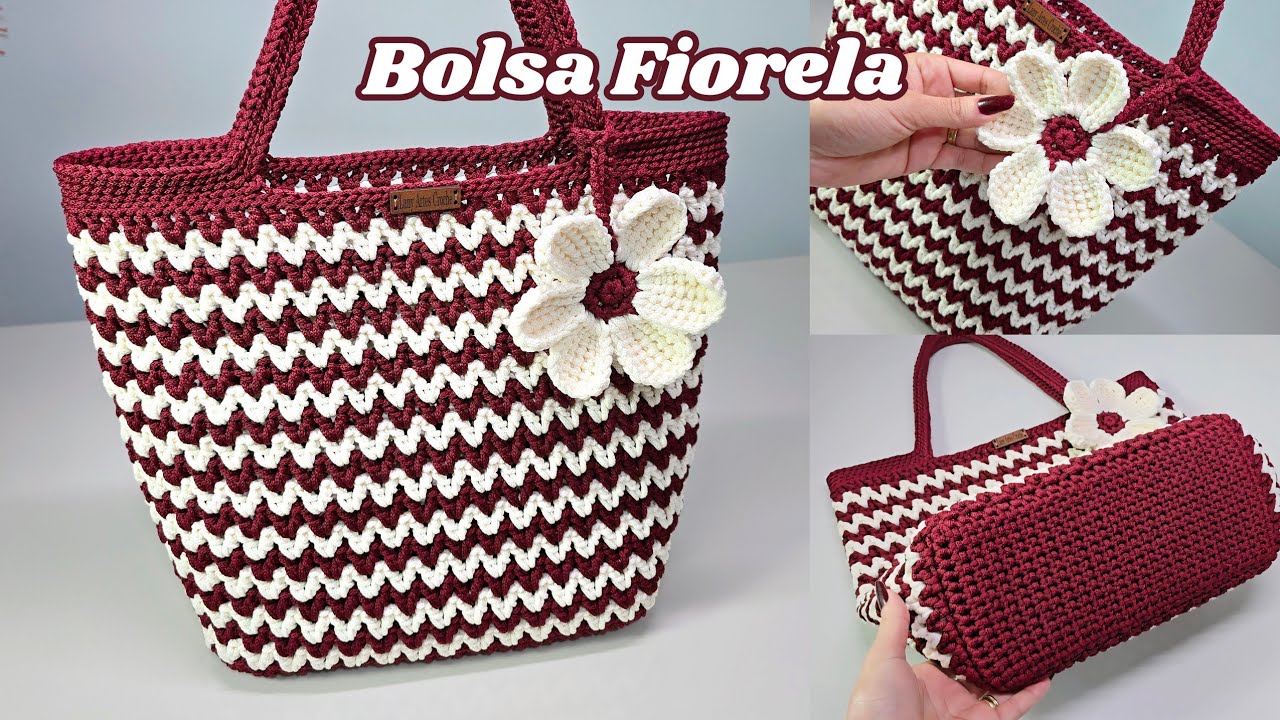
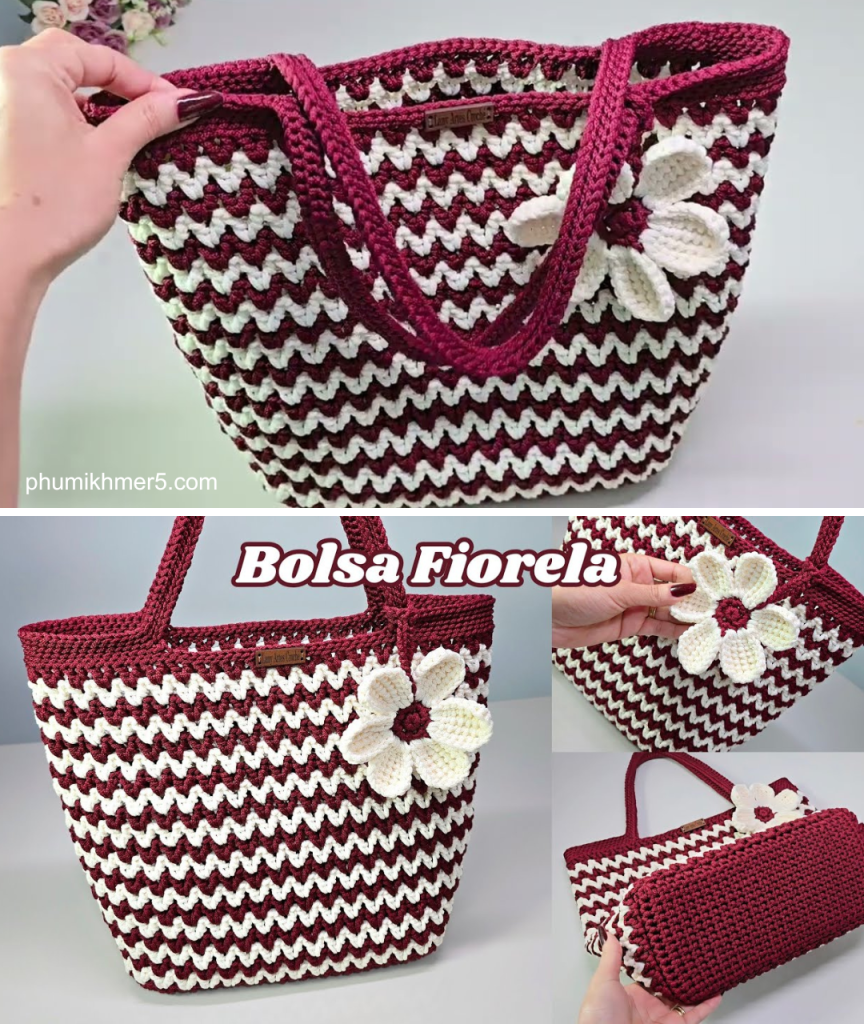
Welcome to the newest pattern drop! If you were inspired by the beautiful structure, clean lines, and trending zigzag texture of the “Bolsa Fiorela” tutorial you saw, you are ready to create The Oasis Weave Tote.
This pattern is a nod to modern crochet design, focusing on creating a sturdy, professional-looking bag with a striking textured body. We achieve this firmness—much like the tutorial showcased—by using a small hook for the base and incorporating the unique Alpine V-Stitch (our variation on the zigzag V-Stitch seen in the video) and a tight slip-stitch rim.
The finished tote is large and sturdy, perfect for everything from groceries to beach essentials. Grab your polyester cord or cotton yarn and let’s build a masterpiece that stands on its own!

📋 Project Quick Details
| Feature | Detail |
| Skill Level | Advanced Beginner / Intermediate |
| Finished Size (Approx.) | 15.5 inches wide x 12 inches tall (excluding handles) |
| Foundation Stitch Count | 84 stitches around the perimeter |
| Main Body Stitch | Alpine V-Stitch (worked in joined rounds) |
| Yarn Recommendation | Polyester Cord (5mm), or Sturdy Cotton/T-Shirt Yarn |
🧶 Materials & Tools Checklist
- Yarn: Approx. 600–700 yards of Heavy Worsted/Aran or Bulky (Category 4 or 5) Polyester Cord or Sturdy Cotton Yarn.
- Color A (MC): Main Body Color (Approx. 550 yards).
- Color B (CC): Contrast Color for texture rows (Approx. 100 yards).
- Hook 1 (Base): US Size F/5 (3.75 mm) hook (or one full size smaller than your main hook, essential for firmness).
- Hook 2 (Body): US Size G/6 (4.0 mm) hook (or size needed to meet gauge).
- Notions:
- Scissors.
- Tapestry needle for weaving ends.
- 8 Stitch markers (essential for marking corners and handle placement).
📘 Essential Abbreviations (US Terms)
| Abbreviation | Meaning |
| CH | Chain |
| SL ST | Slip Stitch (used for joining and the rim) |
| SC | Single Crochet |
| DC | Double Crochet |
| ST(S) | Stitch(es) |
| MC | Main Color (Color A) |
| CC | Contrast Color (Color B) |
| FLO/BLO | Front Loop Only / Back Loop Only |
| SC-BLO | Single Crochet in the Back Loop Only |
| V-ST | V-Stitch: (DC, CH 1, DC) into the same space |
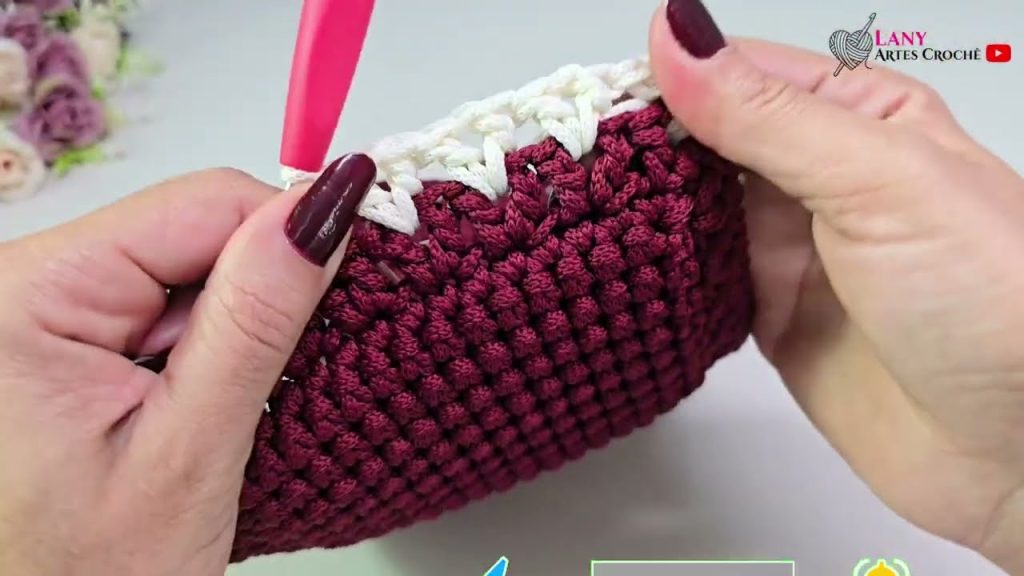
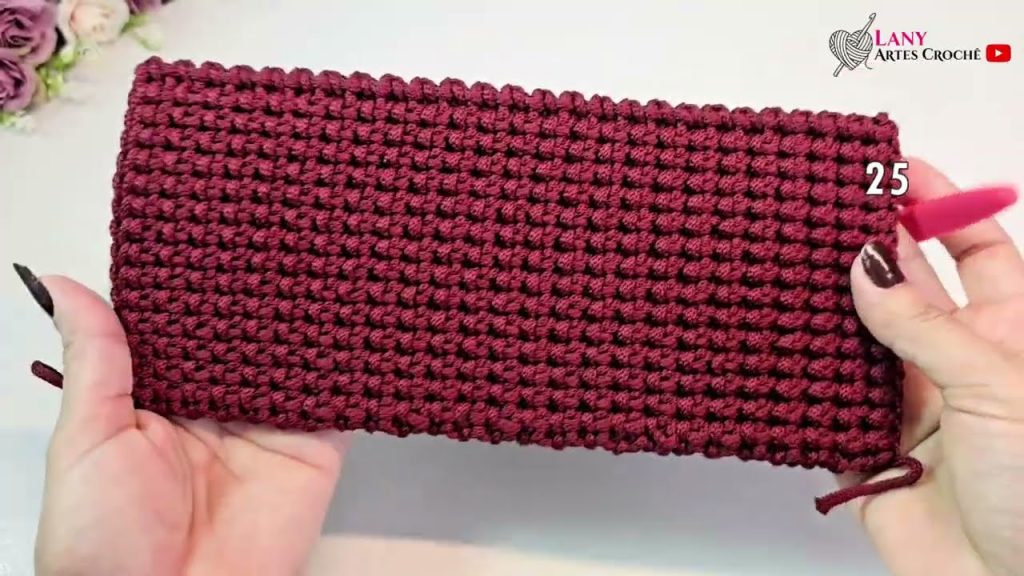
Part 1: The Foundation — Structured Base (Hook 1: 3.75mm)
This method ensures a dense, firm base that allows the bag to stand upright. We work back and forth in rows using a sturdy stitch, then finish by contouring the perimeter.
Starting Chain: Use Color A (MC) and Hook 1 (3.75mm).
- CH 16. (This gives you a base 15 stitches wide, as seen in the inspiration video).
- Row 1 (Foundation): SC in the 2nd CH from the hook and SC in each CH across. (15 SC)
- Row 2 (Structured Stitch): CH 1, turn. SC-BLO in each ST across. (15 SC-BLO)
- Rows 3–25: CH 1, turn. SC-BLO in each ST across. (15 SC-BLO)
- (You should have 25 rows total, forming a sturdy rectangle of approximately 4.7 in x 10 in.)
- Finishing the Edge: Do not fasten off. CH 1. We will now work an SC border around the entire base.
- Side 1 (Long Edge): Work 26 SC evenly down the side of the 25 rows, placing one SC into the side of each row.
- Side 2 (Short Edge): SC in the FLO of the 15 stitches from Row 25.
- Side 3 (Long Edge): Work 26 SC evenly up the side of the 25 rows, ensuring symmetry with Side 1.
- Side 4 (Short Edge/Starting Edge): SC in the unworked loops of the starting chain (15 SC).
- Total perimeter stitch count: 82 SC.
- SL ST to the first SC to join. Fasten off Hook 1 and weave in the tail.
Part 2: The Oasis Weave Body (Hook 2: 4.0mm)
Switch to Hook 2 (4.0mm). This section uses the V-Stitch, worked in alternating colors to create the signature zigzag texture.
Round 1 (Setup for Body):
- Join MC into the first SL ST of the foundation round. CH 3 (counts as first DC), DC in the same ST.
- *Skip 1 ST, 2 DC in the next ST.* REP from * to * around. SL ST to the top of the beginning CH 3. (41 x 2 DC Clusters)
- Fasten off MC.
Round 2 (The Alpine V-Stitch – CC):
- Join CC into the space between the first two DC clusters from the previous round.
- CH 4 (counts as DC + CH 1). DC in the same space (first V-ST made).
- *Skip 2 DC (the cluster), work a V-ST (DC, CH 1, DC) into the space between the next two clusters.* REP from * to * around.
- SL ST to the 3rd CH of the beginning CH 4 to join. (41 V-STs)
- Fasten off CC.
Round 3 (Alpine V-Stitch – MC):
- Join MC into the CH 1 space of the first V-ST from the previous round.
- CH 4 (counts as DC + CH 1). DC in the same CH 1 space (first V-ST made).
- *Work a V-ST (DC, CH 1, DC) into the CH 1 space of the next V-ST.* REP from * to * around.
- SL ST to the 3rd CH of the beginning CH 4 to join. (41 V-STs)
- Fasten off MC.
Rounds 4–22 (Continuing the Weave):
- Rnd 4: REP Round 2 (Join CC, V-ST in each V-ST space).
- Rnd 5: REP Round 3 (Join MC, V-ST in each V-ST space).
- Continue alternating CC and MC rounds, repeating the pattern of Rnd 2 and Rnd 3 until the bag is approximately 11.5 inches tall (or desired height). Finish with an MC round.
(The body should now be firm and tall, showcasing the contrasting zigzag texture.)
Part 3: The Defined Rim & Handles
We use an invisible join and tight SL STs to create a professional, non-stretchy rim, followed by the chain-loop handle method.
The Rim:
- Rnd 23 (SC Prep – MC): Do not fasten off. CH 1 (does not count as ST). SC in the first ST (the DC post). SC in the next CH 1 space. *SC in the next 2 DC posts, SC in the next CH 1 space.* REP from * to * around. SL ST to the first SC to join. (123 SC)
- Rnd 24 (The Tight Rim): CH 1 (does not count as ST). Work a SL ST in the FLO of every ST around. SL ST to the first SL ST to join. (123 SL STs)
- Rnd 25: REP Rnd 24.
- Fasten off MC, leaving a long tail for an invisible join. Secure and weave in.
Handle Placement:
The total stitch count is 123. For even handle placement, we need to divide the front and back sections. We will use 4 markers (A, B, C, D) to section the bag:
- Section 1 (Front): 40 sts
- Section 2 (Handle Span): 21 sts
- Section 3 (Back): 41 sts (One extra stitch to compensate for the invisible join)
- Section 4 (Handle Span): 21 sts
- Total: 123 sts
The Handle Construction (MC):
- Rnd 26 (Starting the Handles): Join MC with a SL ST one stitch to the left of your final join. Work SL ST in the BLO for the next 21 STs (up to Marker A).
- Handle 1: CH 120 (for a long shoulder strap, adjust the chain length for a shorter handle).
- Skip 41 STs (Markers A to B). Join the chain with a SL ST in the BLO into the stitch at Marker B.
- Body Bridge: Work SL ST in the BLO for the next 41 STs (Markers B to C).
- Handle 2: CH 120.
- Skip 41 STs (Markers C to D). Join the chain with a SL ST in the BLO into the stitch at Marker D.
- Final Bridge: Work SL ST in the BLO across the final 20 STs back to the start. SL ST to the first SL ST to join.
Rnd 27–29 (Finishing the Handles):
- Rnd 27: CH 1. SL ST in the BLO of each of the 21 bridge stitches. When you reach the handle chain, SL ST into the back bump of each of the 120 chains. SL ST into the BLO of the 41 back bridge stitches, then the 120 chains of the second handle. SL ST in the BLO of the final 20 stitches. SL ST to join.
- Rnds 28 & 29: CH 1. SL ST in the BLO of every stitch around the entire rim and handles. This will create a super-sturdy, clean, rope-like handle similar to the video’s finish.
- Fasten off after Rnd 29, weave in the tail using an invisible join.
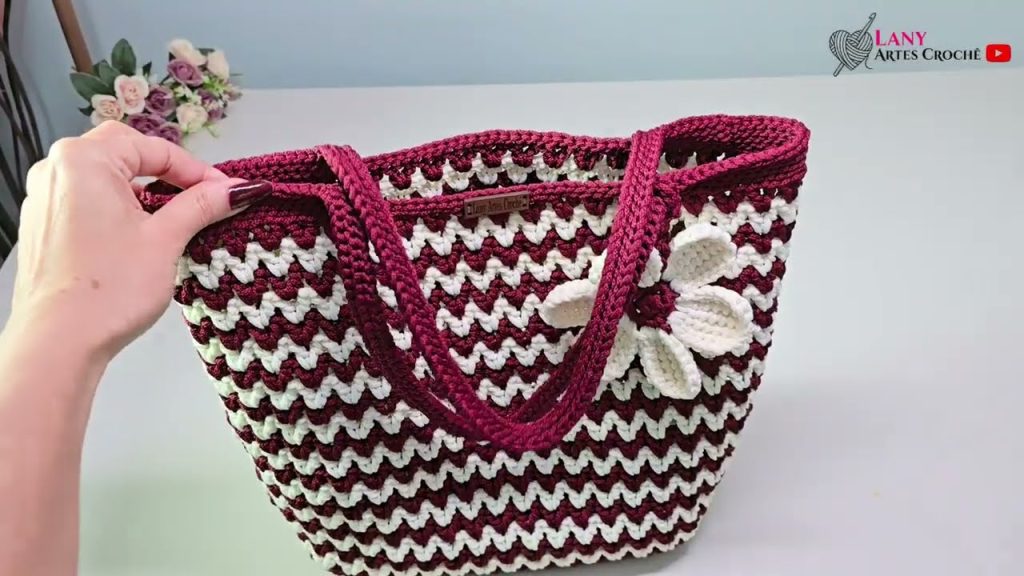
🌸 Finishing Touch: The “Desert Bloom” Flower Charm (Optional)
This is a decorative flower meant to be attached to the handle as a charm, similar to the accent in the video.
Materials: Small amount of CC (Color B) and Hook 1 (3.75mm).
- Center: Make a Magic Ring. CH 1. SC 6 into the ring. SL ST to the first SC to join.
- Petal Base: CH 1. SC-FLO in each of the 6 stitches around. SL ST to join. (6 SC)
- Petals (Work one petal over every two SC):
- Petal 1: CH 1. SL ST into the next SC. CH 3.
- In the same SC, work: (DC, TR, TR, DC).
- SL ST into the next SC. CH 3.
- In the same SC, work: (DC, TR, TR, DC).
- SL ST into the next SC to finish the first petal.
- Petal 2: SL ST into the next SC. REP instructions for Petal 1.
- Petal 3: SL ST into the next SC. REP instructions for Petal 1.
- Finishing: You should have 3 ruffled petals. Fasten off, leaving a long tail for attachment. Use the starting tail to cinch the center tighter if needed. Attach the flower to a small chain and hang it from one of the handles.
💡 Pro-Tips for the Structured Tote
- Yarn Tension is Key: To achieve the structure seen in the tutorial, maintain a tight, firm tension, especially with the smaller hook on the base.
- Invisible Color Change: When changing colors, use the Invisible Join method (similar to the final seam) or join the new color on the last yarn over of the previous stitch to ensure a seamless color transition.
- Weaving Ends: Weave the ends into the body of the SC base, not the V-stitch body, for maximum invisibility and security.
Happy crafting! Be sure to share your #OasisWeaveTote with us!
Video tutorial:


