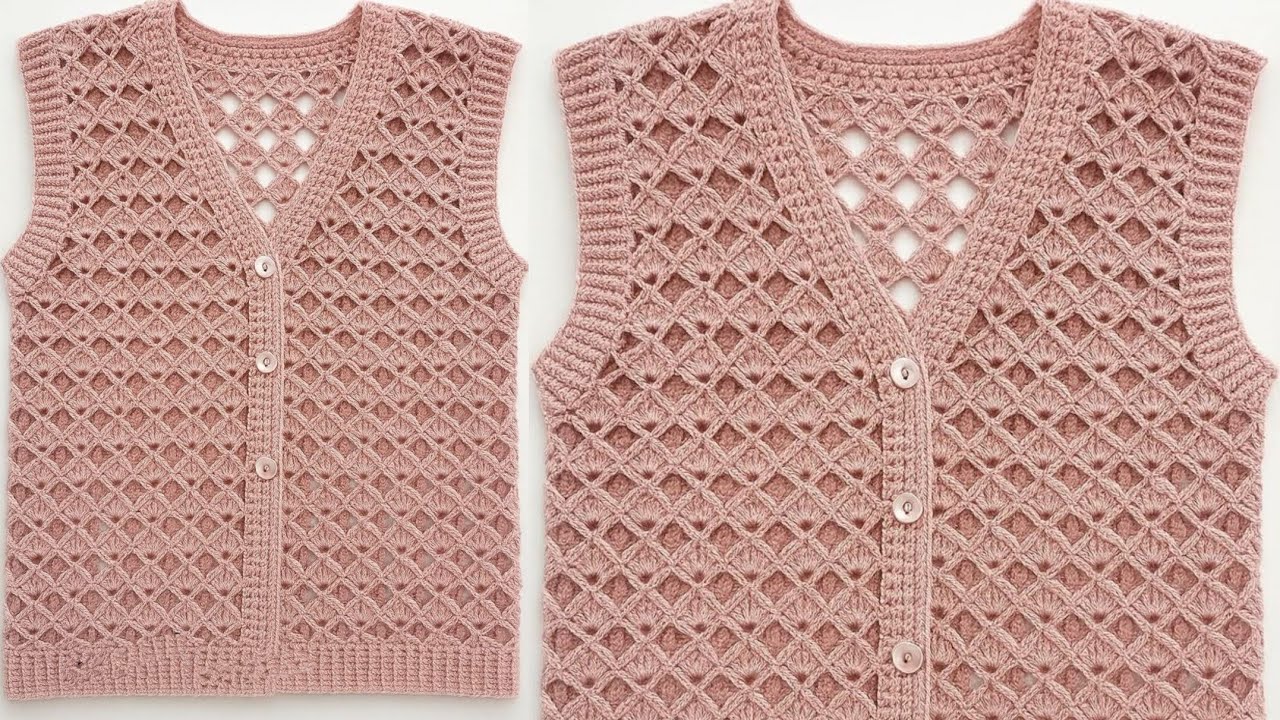
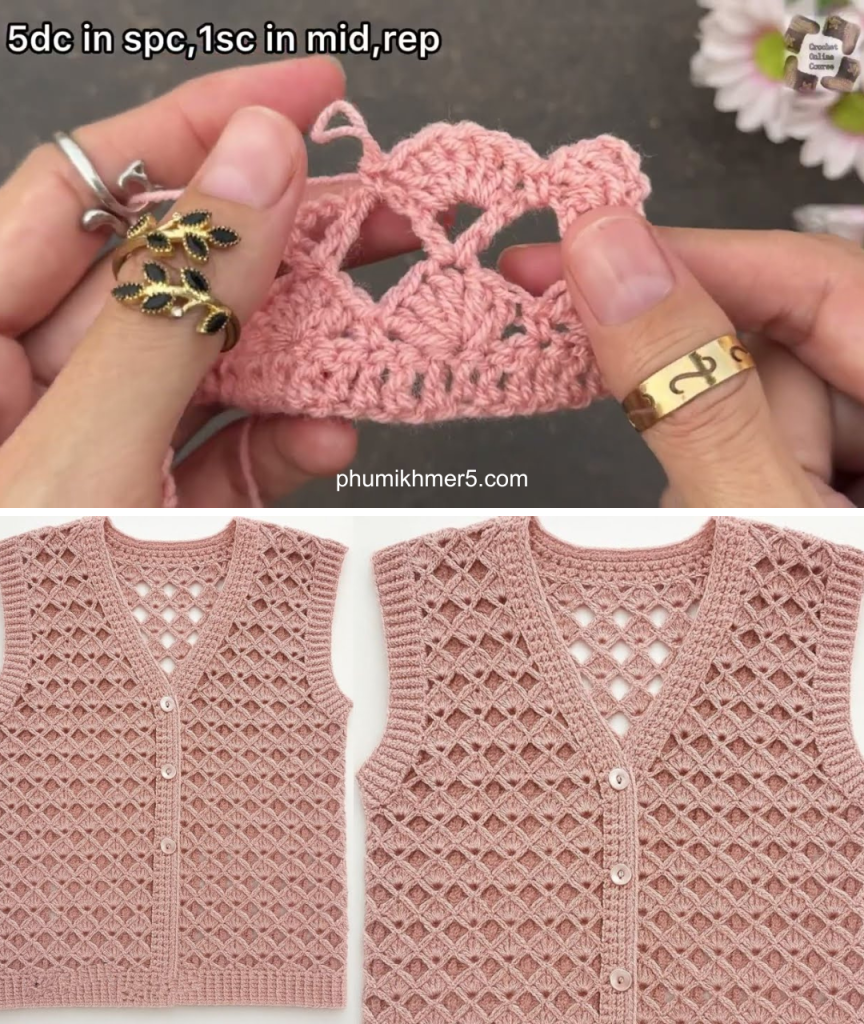
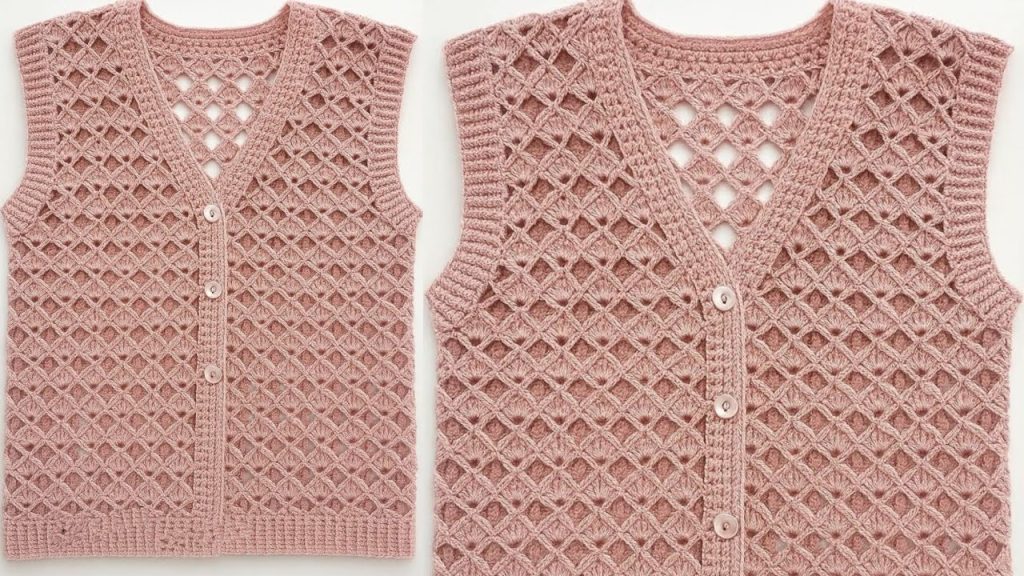
Welcome to the pattern for the Serene Cascade Vest! This chic, sleeveless cardigan/vest is perfect for year-round layering. It features a simple, airy two-row repeat that creates a beautiful, cascading shell texture, making it lightweight and fast to work up. It truly is an “easy stitch only” project that yields stunning results.
Project Snapshot
- Design: Open-front vest with dropped shoulders and a modern, draped fit.
- Skill Level: Easy/Beginner-Friendly (Relies solely on basic stitches).
- Yarn Weight: DK Weight (Category 3) or Sport Weight (Category 2).
- Key Stitch: The “Whisper Shell Stitch” (WSS).
- Construction: Worked in three separate panels (Back, Left Front, Right Front) and then seamed.

Sizing and Fit
This pattern is written for size Small/Medium (S/M) with instructions for adjusting to Large/Extra Large (L/XL). The fit is relaxed and slightly oversized.
| Size | Finished Bust Circumference (Approx.) | Finished Back Panel Width | Hook Size |
| S/M | 38–42 inches | 19 inches | 4.0 mm (G-6) |
| L/XL | 46–50 inches | 23 inches | 4.5 mm (7) |
Customizing Size
- Width: The Whisper Shell Stitch requires a starting chain that is a multiple of 4 + 1. To adjust the width, simply chain to your desired panel width, ensuring your final stitch count for the width is a multiple of 4, then add 1 for the turning chain.
- Length: The length can be adjusted by adding or subtracting repeat rows.
Materials & Gauge
| Item | S/M Quantity (Approx.) | L/XL Quantity (Approx.) |
| Yarn | 900 – 1000 yards | 1200 – 1400 yards |
| Hook | 4.0 mm (G-6) | 4.5 mm (7) |
| Notions | Tapestry needle, scissors, measuring tape. |
Gauge Check (Crucial!)
In Whisper Shell Stitch (WSS), using a starting chain of 37:
4 WSS rows (2 Pattern Repeats) should measure 3 inches in height.
10 WSS Repeats (groups of DC, Ch 1, DC) should measure 4 inches in width.
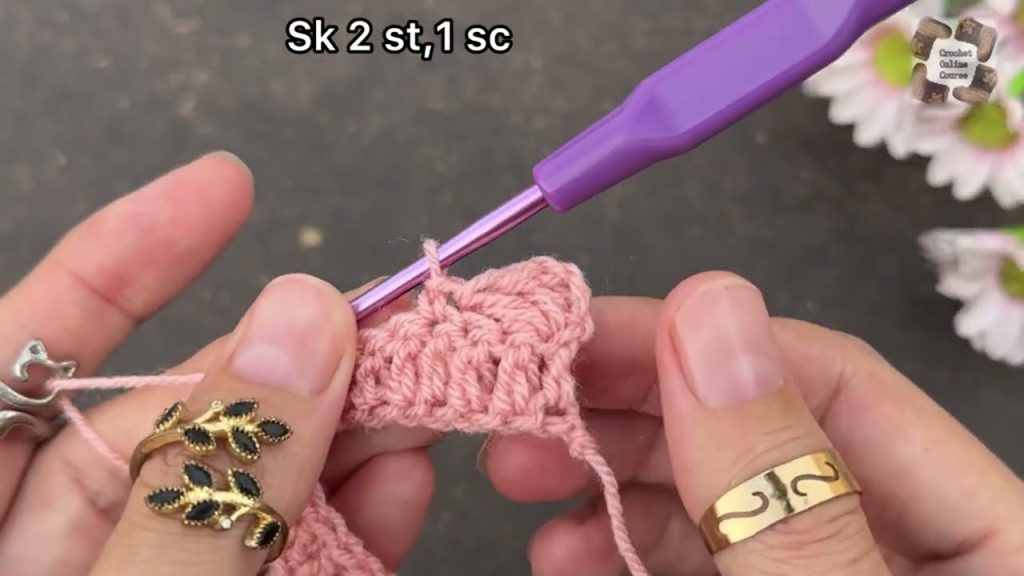
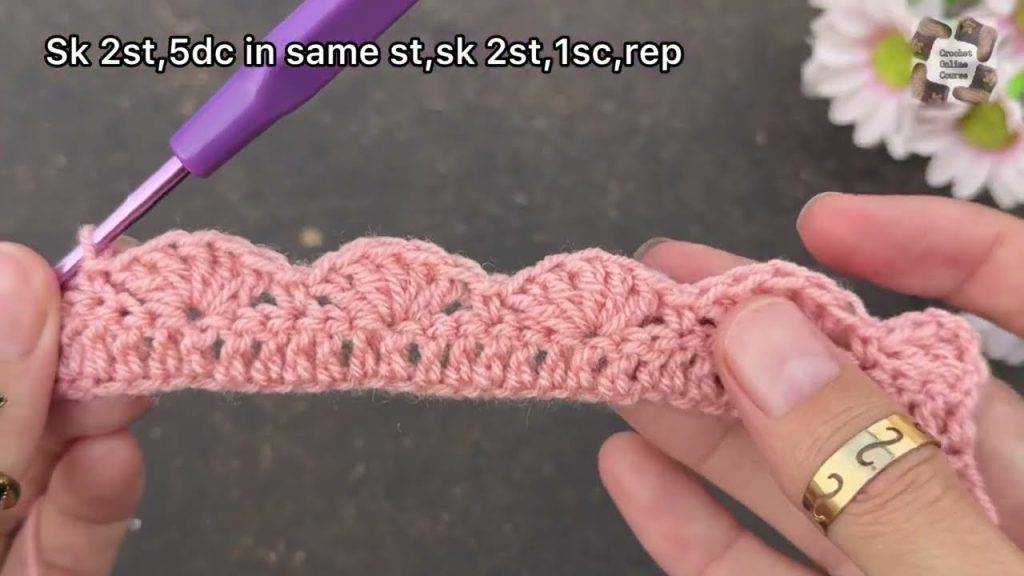
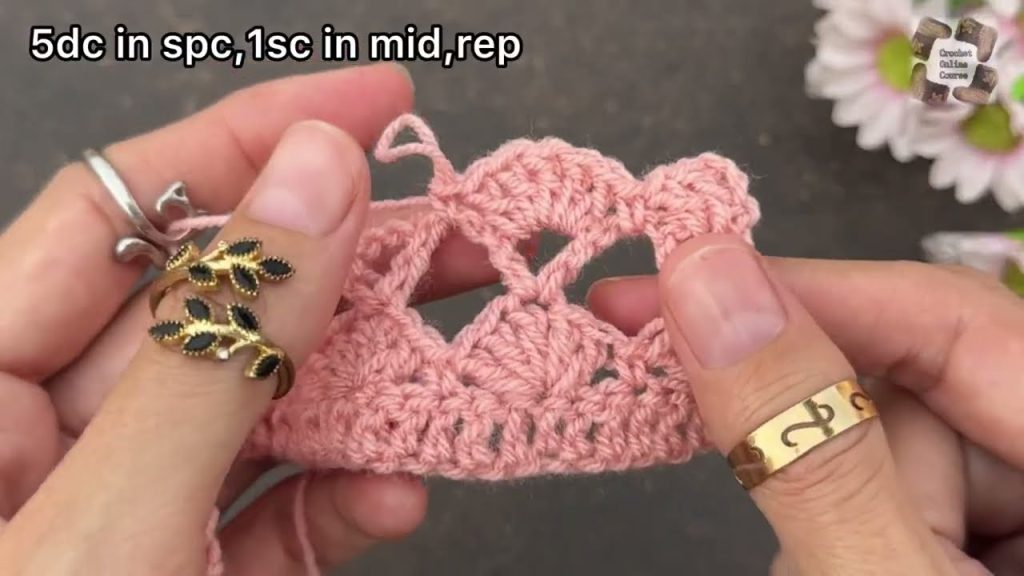
The Whisper Shell Stitch (WSS) Tutorial
The WSS is a simple two-row repeat that creates a lightweight, lace-like fabric.
Stitch Abbreviations:
- ch: Chain
- st(s): Stitch(es)
- sc: Single Crochet
- dc: Double Crochet
- shell: (DC, Ch 1, DC) all worked into the same space or stitch.
Chain Multiple: Start with a multiple of 4 + 1 (plus 2 for the turning chain).
Row 1 (Shell Row):
- Ch 3 (counts as first DC). DC into the first st.
- *Skip 2 sts, work shell (DC, Ch 1, DC) into the next st.*
- Repeat from * across the row until 3 sts remain.
- Skip 2 sts, work 2 DC into the last st.
- (Turn. The pattern is now established.)
Row 2 (SC Row):
- Ch 1 (does not count as st). SC into the first st.
- SC into the next DC.
- *Work SC into the Ch-1 space of the shell below, SC into the next DC.*
- Repeat from * across the row. The last 2 sts should be SC into the final 2 DC stitches from Row 1.
- (Turn. This sets up the spaces for the next shell row.)
Row 3 (Repeat Shell Row):
- Ch 3 (counts as first DC). DC into the first st.
- *Skip 2 sts, work shell (DC, Ch 1, DC) into the SC st that falls in the center of the shell from Row 1.*
- Repeat from * across the row until 3 sts remain.
- Skip 2 sts, work 2 DC into the last st.
- (The pattern is now simply repeating Row 2 and Row 3 until the desired length.)
Construction Instructions
The vest is made of a Back Panel and two mirrored Front Panels.
Panel 1: Back Panel
S/M: Initial Chain 77 (74 + 1 + 2) | L/XL: Initial Chain 93 (90 + 1 + 2)
- Row 1: Work the Whisper Shell Stitch (WSS) Row 1 across your initial chain. (18 Shells + Edges for S/M; 22 Shells + Edges for L/XL).
- Row 2: Work the WSS Row 2 across.
- Row 3: Work the WSS Row 3 (Repeat Shell Row) across.
- Repeat Rows 2 and 3 until the panel measures 26 inches (66 cm) from the starting edge (or desired length).
- Next Row (Straight Edge for Shoulder): Ch 1, turn. SC into the first st and SC into every st and Ch-space across. Fasten off, leaving a 30-inch tail for seaming.
Panel 2 & 3: Front Panels (Make 2)
S/M: Initial Chain 37 (34 + 1 + 2) | L/XL: Initial Chain 45 (42 + 1 + 2)
- Note: These panels are worked identically until the shoulder shaping.
- Row 1–Repeat: Work the Whisper Shell Stitch (WSS) pattern (Repeating Rows 2 and 3) until the panel measures 22 inches (56 cm) from the starting edge. This is the start of the neck/lapel shaping.
- Neck/Lapel Shaping (All Sizes): You will now decrease 1 stitch at the inner neck edge over the next 8 rows to create the curve.
| Row | Edge to Work Decrease | Decrease Instruction |
| Row 1 (Shell) | Neck Edge (Inner) | Work WSS pattern, ending with a regular DC instead of the 2 DC edge. |
| Row 2 (SC) | Neck Edge (Inner) | Ch 1, turn. Skip 1st st, SC into the next st and across. |
| Repeat 6 more times |
- Final Straight Rows: After the 8 decreases, continue working the WSS pattern without decreasing until the panel measures 27 inches (68.5 cm) from the starting edge (the same length as the back panel).
- Final Row (Shoulder Edge): Ch 1, turn. SC into the first st and SC into every st and Ch-space across. Fasten off the left panel. Leave a 30-inch tail on the right panel for seaming.
Finishing and Assembly
1. Shoulder Seams
- Lay the Back Panel flat, right side up.
- Place one Front Panel on top, aligning the shoulder SC row with the top edge of the Back Panel, right sides together.
- Using the long tail and your tapestry needle, seam the two panels together across the top shoulder edge for approximately 3.5 inches (9 cm) from the outer edge.
- Repeat for the second Front Panel. Leave an opening of 12–14 inches in the center for the neck.
2. Side Seams
- Fold the vest in half along the shoulder seam, aligning the side edges of the front and back panels.
- Measure down 8.5 inches (21.5 cm) from the shoulder seam and place a stitch marker. This is your armhole opening.
- Starting at the bottom edge, whipstitch or slip stitch the Front and Back Panels together up to the stitch marker.
- Repeat on the opposite side.
3. Bottom Hem and Armhole Edging (Optional)
To give the vest a clean, structured finish, add a simple single crochet border:
- Bottom Hem: Join yarn at a side seam. Ch 1, SC evenly around the entire bottom circumference of the vest. Join with sl st. Fasten off.
- Armhole Edging: Join yarn at the bottom of the armhole opening. Ch 1, SC evenly around the entire armhole edge. Join with sl st. Fasten off.
- Front Opening/Neck Edging: Join yarn at the bottom front edge. Ch 1, SC evenly up the entire front opening, around the neck opening, and down the other side. This stabilizes the open front and gives it a clean, continuous look. Fasten off.
4. Final Touches
Weave in all remaining loose ends using your tapestry needle. Gently block the finished vest by wetting it, shaping it to the correct dimensions, and allowing it to dry flat.
Your Serene Cascade Vest is ready for cozy layering! Enjoy the light drape and beautiful texture of your new handmade garment.
Video tutorial: