Crochet a Cute Baby Hat: A Perfect Project for Little Heads
A crocheted baby hat is a delightful project for so many reasons. It’s quick to make, uses minimal yarn, and results in an incredibly adorable and practical accessory for the newest little ones. Whether you’re making a gift, preparing for a photoshoot, or simply want to keep a baby’s head cozy, a cute crochet baby hat is a go-to.
This detailed article will guide you through crocheting a charming, simple baby hat, perfect for beginners and seasoned crocheters alike. We’ll focus on a classic top-down construction that creates a seamless, comfortable fit, and offer ideas to personalize it for extra cuteness!
Why Crochet a Baby Hat?
- Quick to Make: Most baby hats can be completed in just a few hours, making them ideal for last-minute gifts.
- Yarn Buster: They use very little yarn, perfect for utilizing those leftover skeins from larger projects.
- Practical & Cozy: Keeps little heads warm and protected from the elements.
- Adorable Photo Prop: Adds an extra touch of charm to newborn and baby photos.
- Perfect Gift: Handmade baby hats are always cherished and appreciated by new parents.
- Skill Building: Practice working in the round, increases, and basic shaping.
1. Planning Your Cute Baby Hat: Size & Materials
A well-fitting hat starts with good planning.
- Sizing (Crucial!): Baby heads grow quickly! While measurements are best, here are approximate sizes for a fitted hat:
- Newborn (0-3 Months): 13-14 inches (33-35.5 cm) circumference, 5-5.5 inches (12.7-14 cm) height.
- 3-6 Months: 14-17 inches (35.5-43 cm) circumference, 6-6.5 inches (15-16.5 cm) height.
- 6-12 Months: 17-18.5 inches (43-47 cm) circumference, 6.5-7 inches (16.5-17.8 cm) height.
- Toddler (1-3 Years): 18.5-20 inches (47-51 cm) circumference, 7-7.5 inches (17.8-19 cm) height.
- This tutorial will focus on Newborn (0-3 Months), with notes for adjusting for larger sizes.
- Yarn Choice (Key for Baby Comfort!):
- Fiber: Opt for super soft, hypoallergenic, and machine-washable yarn.
- Baby-specific Acrylic: Labeled “baby yarn,” these are designed to be extra soft, durable, and easy to care for.
- Superwash Merino Wool: Incredibly soft and breathable, but often more expensive. Ensure it’s truly superwash for easy cleaning.
- Soft Cotton or Cotton Blends: Good for warmer climates, ensuring it’s a soft variety to prevent stiffness.
- Weight: DK (Light Worsted / #3) or Worsted Weight (#4) are most common. DK creates a daintier hat, while Worsted makes a cozier, faster-to-make one. This tutorial uses Worsted Weight.
- Quantity: Very little! Usually less than 100 yards (90 meters) per hat.
- Fiber: Opt for super soft, hypoallergenic, and machine-washable yarn.
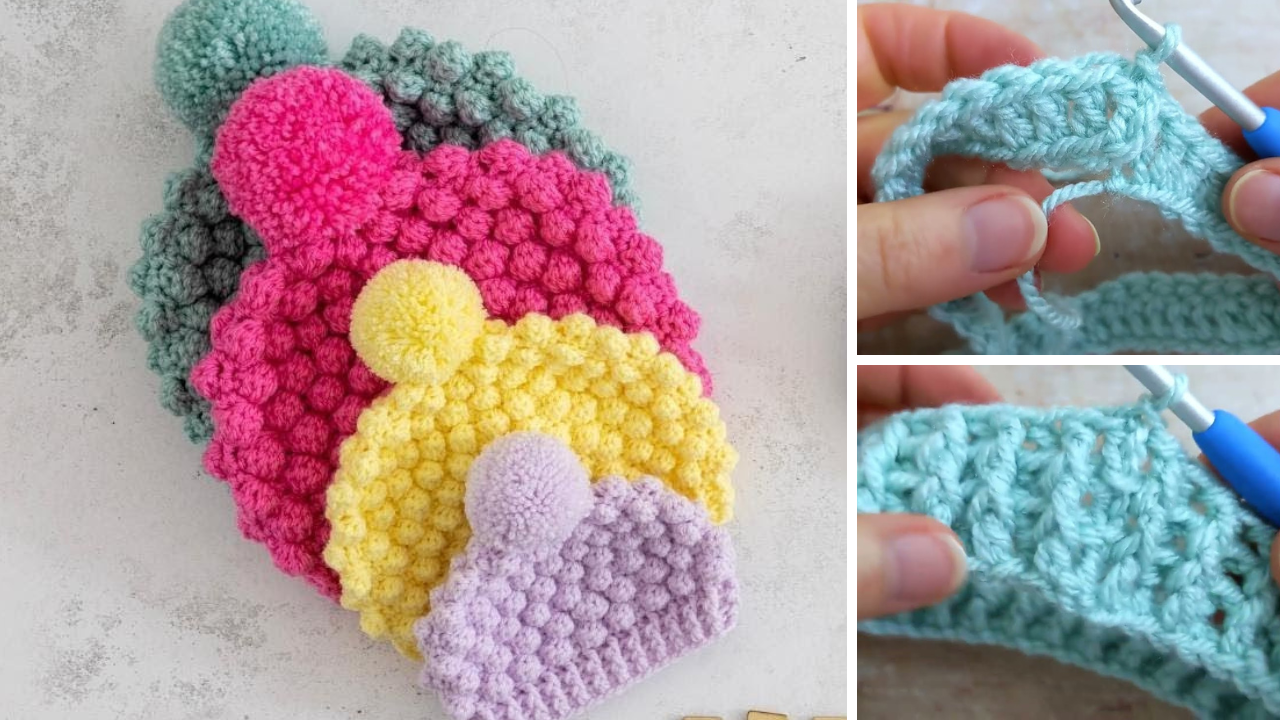
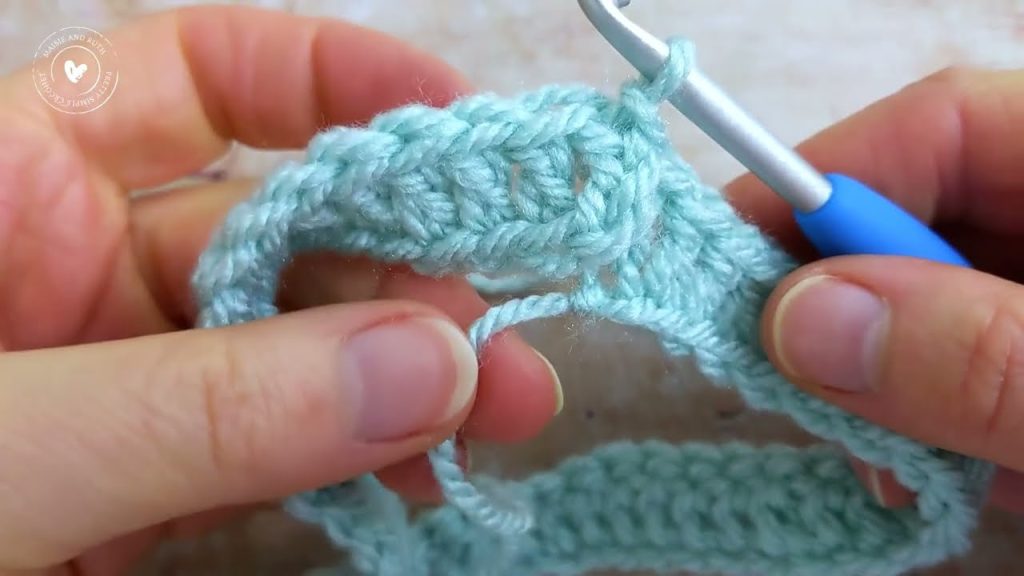
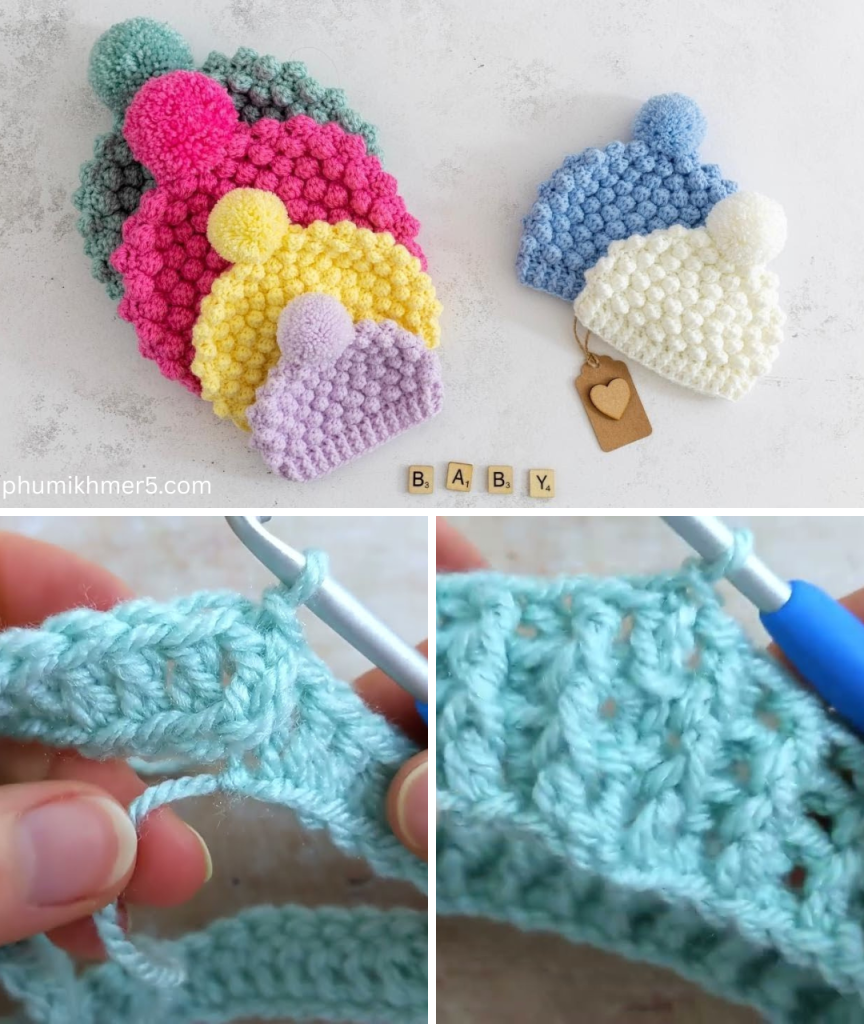
- Stitch Pattern: We’ll use the Double Crochet (DC) stitch for the body of the hat, as it works up quickly and creates a lovely, soft fabric. For the brim, we’ll use Front Post Double Crochet (FPDC) and Back Post Double Crochet (BPDC) for a stretchy, comfortable rib.

2. Materials You’ll Need
- Yarn: Approximately 70-100 yards (65-90 meters) of Worsted Weight (#4) soft baby yarn.
- Crochet Hook: 5.0 mm (H-8 US). (Or the size needed to obtain your gauge for a snug but not stiff fabric.)
- Scissors: For cutting yarn.
- Yarn Needle (Tapestry Needle): A blunt-tipped needle for weaving in ends.
- Stitch Marker (Optional but Recommended): For marking the beginning of rounds.
3. Essential Crochet Stitches (Review for Confidence)
Ensure you’re comfortable with these fundamental stitches:
- Slip Knot
- Chain (ch)
- Slip Stitch (sl st): For joining rounds.
- Double Crochet (dc): Our primary stitch for the hat’s body.
- To make a DC: Yarn over (YO), insert hook, YO, pull up a loop (3 loops on hook), YO, pull through 2 loops, YO, pull through last 2 loops.
- Front Post Double Crochet (FPDC):
- YO, insert hook from front to back around the post of the specified stitch in the previous row, YO, pull up a loop (3 loops on hook), YO, pull through 2 loops, YO, pull through last 2 loops.
- Back Post Double Crochet (BPDC):
- YO, insert hook from back to front around the post of the specified stitch in the previous row, YO, pull up a loop (3 loops on hook), YO, pull through 2 loops, YO, pull through last 2 loops.
- Magic Ring (or Adjustable Ring): The best way to start a top-down hat for a neat, closed center. (Alternatively, Ch 2, then work stitches into the 2nd ch from hook).
4. Gauge Swatch (Do Not Skip for Perfect Fit!)
Gauge is paramount for hats to ensure they fit snugly but comfortably.
- Make a Gauge Swatch (using DC):
- Chain 17.
- Row 1: Dc in the 4th ch from hook, and in each ch across. (15 dc)
- Row 2: Ch 3 (counts as first dc), turn. Dc in each dc across. (15 dc)
- Repeat Row 2 until your swatch measures about 4 inches (10 cm) tall.
- Measure: You should have approximately 13-14 DC stitches in 4 inches (10 cm) and 8-9 rows in 4 inches (10 cm).
- Adjust:
- If you have more stitches/rows per 4 inches, your tension is too tight; go up a hook size.
- If you have fewer stitches/rows per 4 inches, your tension is too loose; go down a hook size.
- Remake your swatch until you match the target gauge as closely as possible.
5. Let’s Crochet Your Cute Baby Hat! (Step-by-Step)
We’ll start at the crown and work downwards in rounds.
Part 1: The Crown (Increasing for the Top of the Head)
This flat circle forms the very top of your hat.
- Rnd 1: Make a Magic Ring. Ch 3 (counts as 1st dc). Work 11 dc into the magic ring. Join with a sl st to the top of the beginning Ch 3. Pull the magic ring tight to close.
- [12 dc]
- If not using Magic Ring: Ch 3. Work 11 dc in the 2nd ch from hook. Join with sl st to top of beg Ch 3. [12 dc]
- Rnd 2: Ch 3 (counts as 1st dc). Dc in the same stitch. 2 dc in each dc around. Join with a sl st to the top of the beginning Ch 3.
- [24 dc]
- Rnd 3: Ch 3 (counts as 1st dc). Dc in the same stitch. Dc in next dc, 2 dc in next dc. Repeat from * to * around. Join with a sl st to the top of the beginning Ch 3.
- [36 dc]
- Rnd 4: Ch 3 (counts as 1st dc). Dc in the same stitch. Dc in next 2 dc, 2 dc in next dc. Repeat from * to * around. Join with a sl st to the top of the beginning Ch 3.
- [48 dc]
- Rnd 5 (For 3-6 Months and up, continue increasing): Ch 3 (counts as 1st dc). Dc in the same stitch. Dc in next 3 dc, 2 dc in next dc. Repeat from * to * around. Join with a sl st to the top of the beginning Ch 3.
- [60 dc]
- For Newborn (0-3 Months), your crown is likely wide enough at 48 stitches (approx. 4 inches / 10 cm diameter). Proceed to Part 2.
- For larger sizes, continue increasing by 12 stitches per round until your crown diameter is roughly:
- 3-6 Months: 5.5 inches (14 cm) diameter (approx. 60-66 stitches)
- 6-12 Months: 6 inches (15 cm) diameter (approx. 66-72 stitches)
- 1-3 Years: 6.5 inches (16.5 cm) diameter (approx. 72-78 stitches)

Part 2: The Body of the Hat (No Increases)
Once your crown is the correct diameter, you’ll stop increasing and work straight rounds to create the height of the hat.
- Rnd 6 (Newborn): Ch 3 (counts as 1st dc). Dc in each dc around. Join with a sl st to the top of the beginning Ch 3.
- [48 dc]
- Repeat Rnd 6: Continue repeating this round until your hat reaches the desired height for your chosen size, before adding the brim.
- Newborn (0-3 Months): Total height of 5-5.5 inches (12.7-14 cm) from crown to bottom edge (including brim). So, stop here when the hat measures about 4 inches (10 cm) from the crown. This will typically be 6-8 rounds of straight DC.
- For other sizes, stop when the hat body is approximately 1-1.5 inches (2.5-3.8 cm) shorter than the final desired height.
Part 3: The Brim (Ribbed Edge)
This creates a stretchy, comfortable band around the baby’s forehead.
- Brim Rnd 1: Ch 2 (does NOT count as a stitch).
- To create ribbing: (FPDC around the next dc, BPDC around the next dc). Repeat from * to * around.
- Join with a sl st to the first FPDC.
- Ensure you have an even number of stitches in your final DC round from Part 2 for this ribbing to work out evenly.
- Brim Rnd 2 (Optional, for wider brim): Ch 2 (does NOT count as a stitch).
- (FPDC around the next FPDC, BPDC around the next BPDC). Repeat from * to * around.
- Join with a sl st to the first FPDC.
- Repeat this round once more if you want a thicker brim.
- Fasten Off, leaving a 6-inch (15 cm) tail.
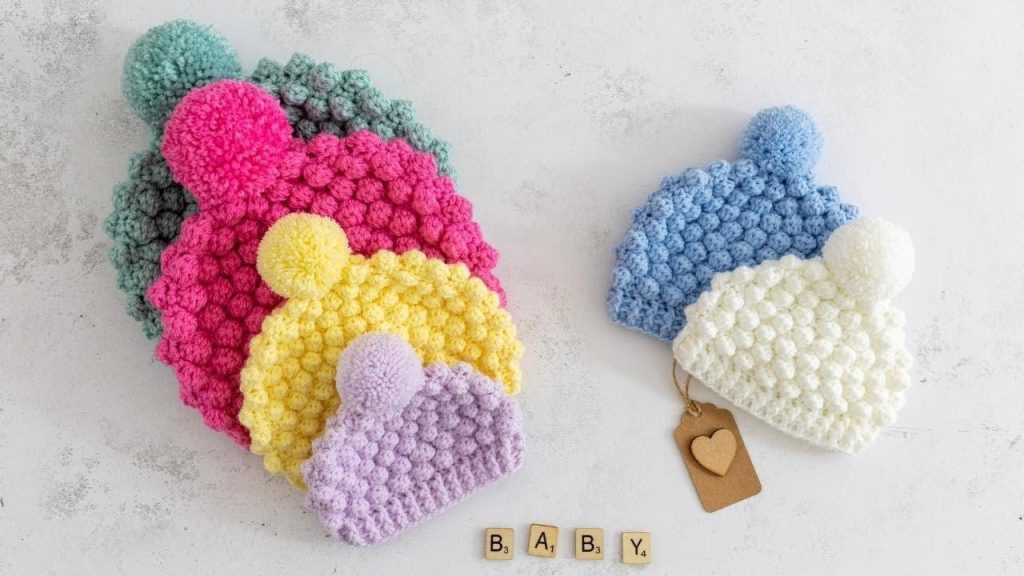
6. Finishing Touches & Embellishments
This is where you make your cute baby hat truly adorable!
- Weave in All Ends: Use your yarn needle to neatly weave in all loose yarn tails. For baby items, ensure they are very secure and won’t unravel.
- Add a Pom-Pom (Classic Cute!):
- Make a small to medium-sized yarn pom-pom using a pom-pom maker or by wrapping yarn around your fingers.
- Securely attach it to the very top center of the hat with the yarn tails from the pom-pom, weaving them through the crown stitches and tying a knot inside.
- Add Animal Ears (Bunny, Bear, Kitty):
- Crochet two small, triangular or rounded ears (e.g., using single crochet or half double crochet worked in rows, then sewn together).
- Sew them securely to the crown of the hat, equidistant from the top.
- Embroider Details:
- For an animal hat, you can embroider eyes, a nose, or whiskers directly onto the hat or on felt cutouts.
- Flower or Bow Appliqué:
- Crochet a small flower or bow and securely stitch it to the side or front of the hat.

7. Care for Your Crocheted Baby Hat
Always refer to your yarn label for specific care instructions. For most baby-friendly yarns:
- Machine Washable: Usually machine wash on a gentle cycle in cool water. Place in a mesh laundry bag to prevent snagging or damage, especially if you’ve added embellishments.
- Drying: Tumble dry on low heat or, ideally, lay flat to air dry to help maintain its shape.
- Avoid Bleach: Do not use bleach unless specifically instructed by the yarn label.
Congratulations! You’ve just crocheted a wonderfully cute and cozy baby hat. This handmade accessory is sure to bring smiles and keep a little head warm and stylish. What kind of cute embellishment will you add to your next baby hat?
Video tutorial:


