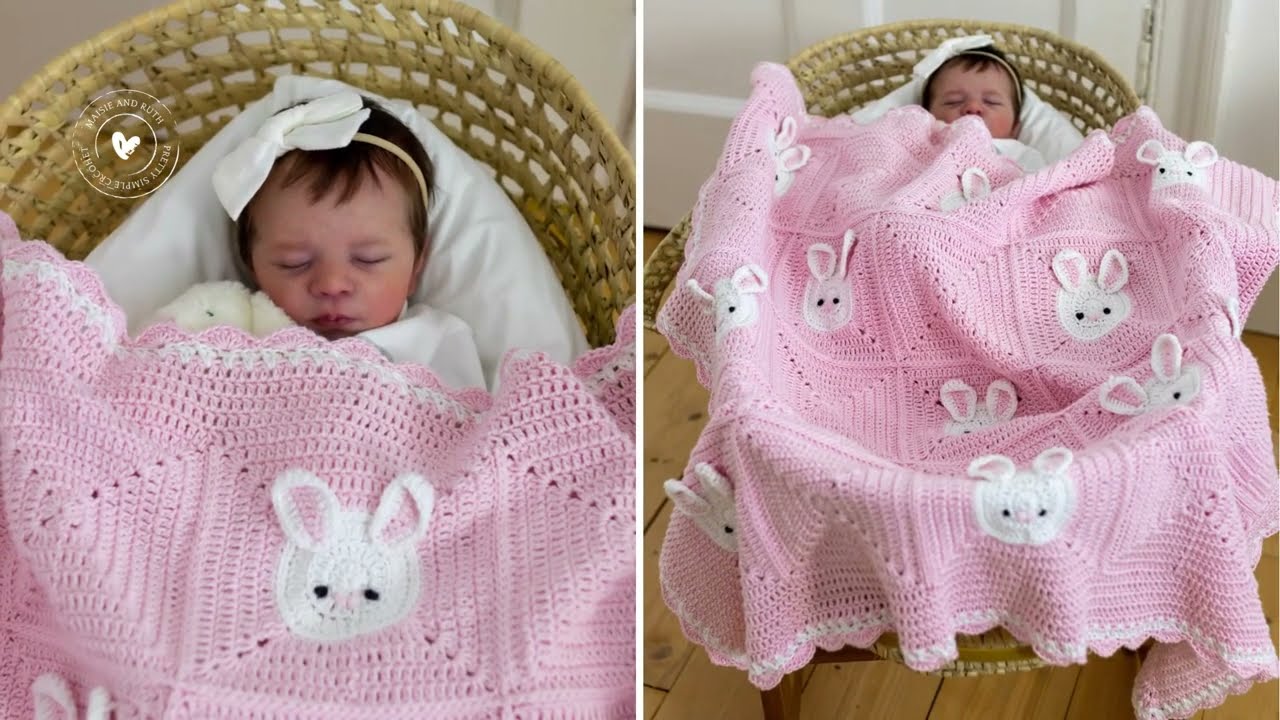
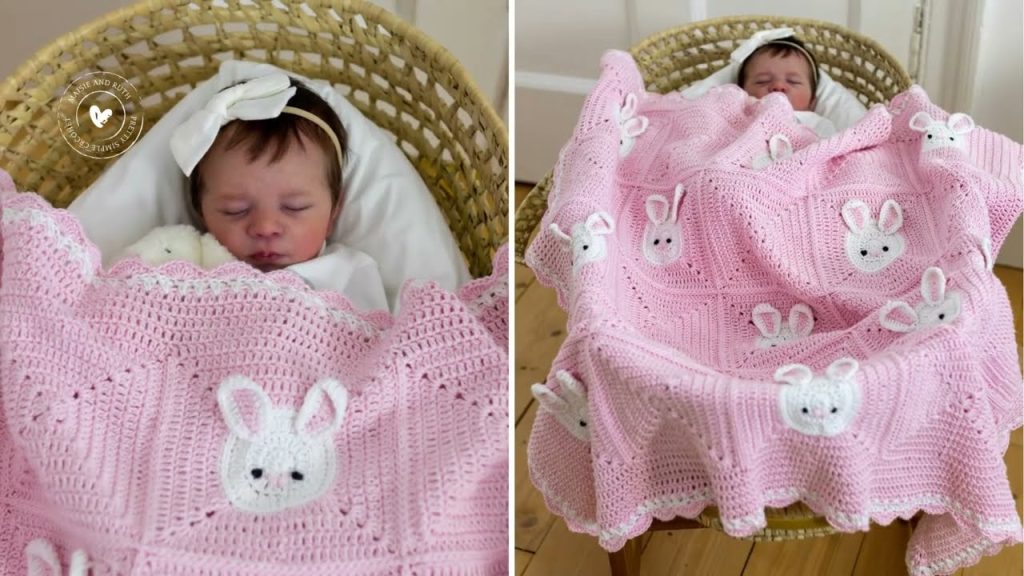
There’s nothing quite as heartwarming as wrapping a precious baby in a handmade blanket, especially one with an adorable touch of whimsy. A bunny crochet baby blanket is the perfect blend of cozy comfort and playful charm, making it an ideal gift for a baby shower or a cherished addition to any nursery. Imagine those tiny hands reaching for the soft ears or the sweet face peeking out from the folds!
This detailed tutorial will guide you through crocheting a beautiful and unique bunny baby blanket, featuring a soft, textured blanket body and an integrated or appliquéd bunny head and ears that bring the design to life. Get ready to create a truly special and memorable blanket that will be treasured for years to come.
Why Crochet a Bunny Baby Blanket?
- Irresistible Cuteness: The bunny design adds a unique and delightful element that stands out from a plain blanket.
- Sensory Engagement: The textured stitches and dimensional ears provide tactile stimulation for baby.
- Personalized Gift: Handcrafting a blanket shows immense love and care, making it a deeply personal present.
- Versatile: Perfect for tummy time, stroller rides, nursery decor, or simply snuggling.
- Skill Building: Practice various stitches, shaping techniques, and potentially appliqué work.
- Heirloom Potential: A cherished handmade item often becomes a family keepsake.
1. Planning Your Bunny Baby Blanket: Size & Materials
Careful planning ensures your blanket is the perfect size and incredibly soft for baby’s delicate skin.
- Size: This tutorial focuses on a Lovey/Small Receiving Blanket (approx. 24 x 24 inches / 61 x 61 cm), which is a versatile size for cuddles, stroller use, or tummy time. You can easily adjust the size by chaining more stitches for the width and adding more rows for the length.
- Common Baby Blanket Sizes:
- Lovey/Security Blanket: 12×12 to 18×18 inches (30×30 to 46×46 cm)
- Receiving Blanket: 24×24 to 30×30 inches (61×61 to 76×76 cm)
- Stroller Blanket: 30×35 inches (76×89 cm)
- Crib Blanket: 36×48 inches (91×122 cm)
- Common Baby Blanket Sizes:
- Yarn Choice (Crucial for Baby Comfort!):
- Fiber: Opt for super soft, hypoallergenic, and machine-washable yarn.
- Baby-specific Acrylic: Often labeled “baby yarn,” these are designed to be extra gentle, durable, and easy to clean.
- Superwash Merino Wool: Incredibly soft, breathable, and warm, but ensure it’s specifically “superwash” for easy care.
- Cotton or Cotton Blends: Good for a slightly lighter blanket, especially for warmer climates. Choose soft, mercerized cotton for good drape and stitch definition.
- Weight: DK (Light Worsted / #3) or Worsted Weight (#4) are ideal. DK creates a lighter fabric, while Worsted makes a cozier, faster-to-make blanket. This tutorial uses Worsted Weight.
- Color:
- Main Blanket Color: A soft pastel (mint, lavender, baby blue, light pink) or a neutral (cream, white, light grey, tan).
- Bunny Color: Typically white, cream, light grey, or a contrasting pastel that complements the main blanket.
- Accent Color: A small amount of pink for inner ears/cheeks, and black for embroidered eyes/nose.
- Quantity (Worsted Weight):
- For a 24×24 inch blanket with bunny head: Approx. 600-800 yards (550-730 meters) for the main color, and 100-150 yards (90-137 meters) for the bunny color.
- Fiber: Opt for super soft, hypoallergenic, and machine-washable yarn.
- Stitch Pattern for Blanket Body: We’ll use the Granny Stripe Stitch or Lemon Peel Stitch (alternating SC and DC). Both create a lovely texture, work up relatively quickly, and are classic choices for baby blankets. This tutorial will use the Lemon Peel Stitch for a dense, even texture.
2. Materials You’ll Need
- Yarn:
- Main Color: 600-800 yards of Worsted Weight (#4) soft baby yarn.
- Bunny Color: 100-150 yards of Worsted Weight (#4) soft baby yarn.
- Small amounts of pink and black embroidery floss or thin yarn for details.
- Crochet Hook: 5.0 mm (H-8 US). (Or the size needed to obtain your gauge for a soft but not overly loose fabric.)
- Scissors: For cutting yarn.
- Yarn Needle (Tapestry Needle): For weaving in ends, seaming the bunny head, and embroidering details.
- Stitch Markers (Optional): For marking rows or specific stitches.
- Measuring Tape: Crucial for checking gauge and blanket dimensions.
- Stuffing: A small amount of hypoallergenic poly-fil or similar fiberfill for the bunny head.
3. Essential Crochet Stitches & Techniques (Review & Practice)
Ensure you’re comfortable with these before you begin:
- Slip Knot
- Chain (ch)
- Single Crochet (sc)
- Double Crochet (dc)
- Slip Stitch (sl st): For joining and neatening.
- Working in Rows: Turning your work at the end of each row.
- Working in the Round (for bunny head): Continuous spirals or joined rounds.
- Magic Ring (or Adjustable Ring): For starting amigurumi/circular pieces.
- Invisible Decrease (for amigurumi): Insert hook into FLO of first st, then FLO of second st, YO, pull through both loops (2 loops on hook), YO, pull through both remaining loops.
4. Gauge Swatch: Ensure the Right Size and Drape
Gauge is important for blankets to ensure they meet your desired dimensions and yarn usage. For baby items, a soft but not too gappy fabric is best.
- Make a Gauge Swatch (using Lemon Peel Stitch):
- Chain 21.
- Row 1: Sc in 2nd ch from hook, dc in next ch. Sc in next ch, dc in next ch. Repeat from * to * across. (20 stitches)
- Row 2: Ch 1, turn. Sc in first dc, dc in next sc. Sc in next dc, dc in next sc. Repeat from * to * across. (20 stitches)
- Repeat Row 2 until your swatch measures about 6 inches (15 cm) tall.
- Measure: Lay your swatch flat. Count how many stitches you have (each sc/dc counts as one) in 4 inches (10 cm) horizontally, and how many rows you have in 4 inches (10 cm) vertically.
- Target Gauge (approximate for Worsted Weight Lemon Peel): Approximately 14-16 stitches in 4 inches (10 cm) and 12-14 rows in 4 inches (10 cm).
- Adjust:
- If you have more stitches/rows, your tension is too tight; go up a hook size.
- If you have fewer stitches/rows, your tension is too loose; go down a hook size.
- Remake your swatch until you match the target gauge as closely as possible.
5. Let’s Crochet Your Adorable Bunny Blanket!
We’ll start with the main blanket body, then crochet the separate bunny head and ears to attach.
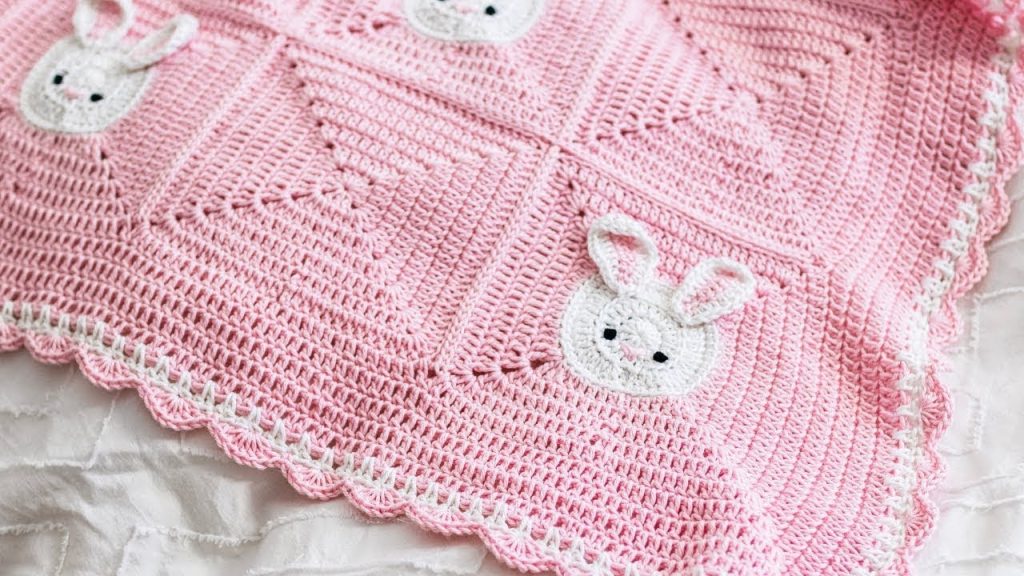
Part 1: The Blanket Body (Lemon Peel Stitch)
This creates the soft, textured base of your blanket.
- Foundation Chain: Using your Main Color yarn, Ch 98 (for approx. 24-inch width).
- (To adjust width, chain any even number of stitches.)
- Row 1: Sc in 2nd ch from hook, dc in next ch. Sc in next ch, dc in next ch. Repeat from * to * across.
- [97 stitches] (If you chained 98, you’ll have 97 stitches in the row).
- Row 2: Ch 1, turn. Sc in first dc, dc in next sc. Sc in next dc, dc in next sc. Repeat from * to * across. (You’ll be working sc into dc and dc into sc).
- [97 stitches]
- Repeat Row 2: Continue repeating Row 2 until your blanket reaches the desired length, approximately 60 rows for a 24-inch length.
- Regularly measure your blanket to ensure it reaches your target dimensions.
- Fasten Off, leaving a tail for weaving.
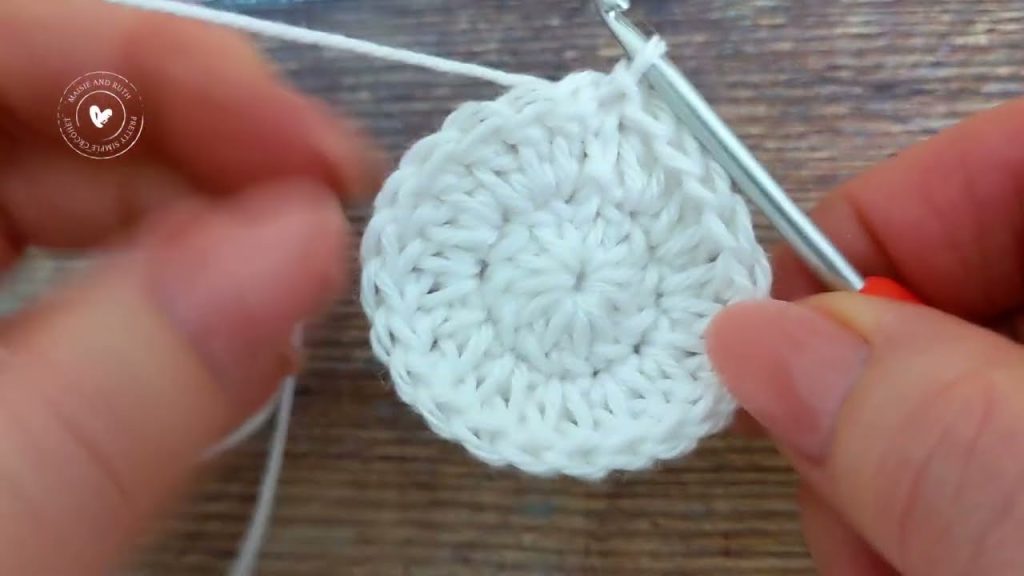
Part 2: The Bunny Head (Amigurumi Style)
This creates the cute, slightly stuffed head for your bunny. Use your Bunny Color yarn.
- Rnd 1: 6 sc in a Magic Ring. (6 sc)
- Rnd 2: 2 sc in each sc around. (12 sc)
- Rnd 3: (Sc in next sc, 2 sc in next sc) 6 times. (18 sc)
- Rnd 4: (Sc in next 2 sc, 2 sc in next sc) 6 times. (24 sc)
- Rnd 5: (Sc in next 3 sc, 2 sc in next sc) 6 times. (30 sc)
- Rnd 6-10: Sc in each sc around. (30 sc) (5 rounds of no increases)
- Rnd 11: (Sc in next 3 sc, Invisible Decrease) 6 times. (24 sc)
- Begin stuffing the head firmly but not overly stiffly. Continue stuffing as you go.
- Rnd 12: (Sc in next 2 sc, Invisible Decrease) 6 times. (18 sc)
- Rnd 13: (Sc in next sc, Invisible Decrease) 6 times. (12 sc)
- Rnd 14: Invisible Decrease 6 times. (6 sc)
- Finish stuffing.
- Fasten off, leaving a long tail (approx. 12 inches / 30 cm). Use the tail to sew the remaining hole closed, then weave it in.
Part 3: The Bunny Ears (Make 2)
These give your bunny character! Use your Bunny Color yarn, and a small amount of Pink for the inner ear.
- Inner Ear (Pink):
- Ch 6.
- Row 1: Sc in 2nd ch from hook, hdc in next ch, dc in next ch, hdc in next ch, sc in last ch.
- Fasten off, weave in ends securely.
- Outer Ear (Bunny Color):
- Ch 10.
- Row 1: Sc in 2nd ch from hook, hdc in next ch, dc in next 5 chs, hdc in next ch, sc in last ch.
- Row 2 (Working around the back of the chain): Ch 1, turn. Sc in first st, hdc in next st, dc in next 5 sts, hdc in next st, sc in last st. (You’ve now formed a somewhat oval shape).
- Row 3: Ch 1, turn. Sc in first st. Sc in each st across.
- Decrease Rows (to shape ear point):
- Ch 1, turn. Sc2tog, sc across to last 2 stitches, Sc2tog.
- Repeat this decrease row until you have only 2-3 stitches left.
- Fasten off, leaving a long tail for sewing.
- Assembly of Ears:
- Lay the pink inner ear piece on top of the bunny color outer ear piece, centering it.
- Use your yarn needle and the bunny color tail to sew the pink inner ear onto the outer ear. Weave in the pink ends.
- Fold the bottom of the ear slightly and stitch a small fold to give it a cupped shape, if desired.
6. Assembly & Finishing Touches
This is where your blanket comes to life!
- Weave in All Ends: Before assembly, use your yarn needle to neatly weave in any loose yarn tails from the blanket body and bunny parts. For baby items, make sure they are very secure and won’t unravel.
- Attach Bunny Head to Blanket:
- Position the stuffed bunny head onto one corner of the blanket, about 2-3 inches (5-7.5 cm) in from the edge.
- Using your yarn needle and a new strand of the Bunny Color yarn, securely sew the head to the blanket. Go through both the head and the blanket fabric multiple times to ensure it’s firmly attached and can withstand baby snuggles. A whip stitch works well.
- Attach Bunny Ears to Head:
- Position the ears symmetrically on top of the bunny head.
- Using the long tails left on the ears and your yarn needle, securely sew each ear to the top of the head. Again, ensure they are very firmly attached.
- Embroider Facial Features:
- Using black embroidery floss or thin black yarn and your yarn needle, embroider two small circular or line eyes onto the bunny face.
- Embroider a small “V” or triangle for the nose.
- Embroider small lines for whiskers coming from the nose (optional).
- Using pink embroidery floss or thin pink yarn, embroider small blush circles or lines on the cheeks below the eyes (optional).
- Optional Border (Main Blanket):
- For a super polished look, you can add a simple border around the entire blanket (excluding the corner with the bunny head).
- Join main color yarn at any corner (not the bunny corner). Ch 1. Sc evenly around the entire blanket edge, working 3 sc into each corner stitch for neat turns. Join with sl st.
- Fasten off and weave in ends.
- Blocking (Recommended):
- Blocking helps even out your stitches, sets the shape, and gives your blanket a more polished, professional appearance.
- Wet Blocking (for cotton/wool blends): Gently submerge the blanket in cool water with a little mild soap. Squeeze out excess water without twisting. Lay it flat on a clean towel or blocking mats, shaping it to its final dimensions. Let it air dry completely (this can take 24-48 hours).
- Steam Blocking (for acrylic): Lay the blanket flat. Hover a steam iron (do not touch the iron to the yarn!) over the fabric, allowing the steam to relax the fibers. Gently pat and shape with your hands. Let cool and dry completely.
7. Care for Your Crocheted Bunny Baby Blanket
Always refer to your yarn labels for specific care instructions. For most baby-friendly yarns:
- Machine Washable: Usually machine wash on a gentle cycle in cool water. Place in a mesh laundry bag to protect the delicate details and prevent snagging.
- Drying: Tumble dry on low heat or, ideally, lay flat to air dry to maintain shape and prevent stretching.
- Avoid Bleach: Do not use bleach unless specifically instructed by the yarn label.
Congratulations! You’ve just created an absolutely adorable and incredibly cozy bunny crochet baby blanket. This handmade treasure is more than just a blanket; it’s a hug of love that will bring joy and comfort to any little one for years to come. Enjoy seeing it cherished!
Video tutorial:


