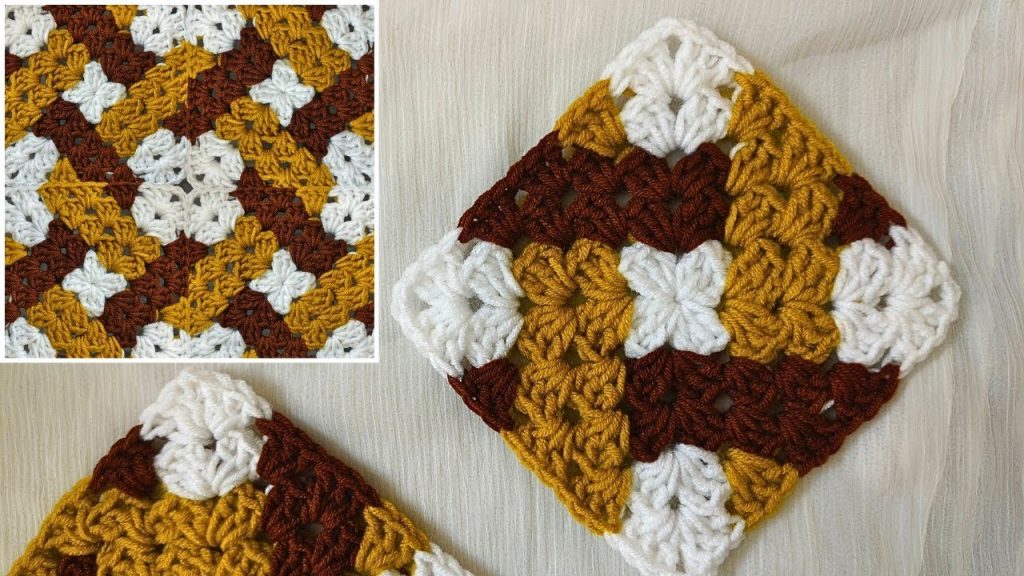
Hello, fellow makers! Are you ready to dive into a project that looks complex but is surprisingly simple to master? I’m excited to share this unique and detailed pattern for the Modern Mosaic Throw. This design is a modern take on colorwork, using a simple technique to create a stunning geometric pattern that looks woven or knitted. This blanket is perfect for adding a touch of contemporary style to your home or for creating a truly unique gift.
The magic of this mosaic pattern lies in its clever use of two different stitch placements: working into the back loop only for single crochet and working into the front loop of a stitch from a previous row for the double crochet. This simple combination creates a beautiful, textured, and reversible fabric that will impress everyone who sees it. Let’s grab our hooks and yarn and get ready to create some beautiful mosaic magic!
Why You’ll Love This Mosaic Blanket:
- Stunning Visuals: The alternating colors and clever stitch placement create a gorgeous geometric pattern that looks intricate and advanced.
- Beginner-Friendly: While it looks complex, the pattern is a simple two-row repeat, making it easy to master.
- Reversible: The pattern is just as beautiful on the back as it is on the front, offering a clean, modern look.
- Skill-Building: You’ll learn the fun and addictive technique of crochet mosaic, which you can apply to countless other projects.
- Versatile: Easily adjust the size to make a baby blanket, throw, or even a full-sized afghan.
What You’ll Need:
- Yarn: Two contrasting colors of medium-weight (Aran/Worsted, Category 4) yarn. A smooth yarn that doesn’t split easily is recommended for a crisp finish.
- Crochet Hook: A 5.0mm (US H/8) hook or the size recommended for your yarn.
- Yarn Needle (Tapestry Needle): Essential for weaving in ends.
- Scissors:
- Stitch Markers (optional): To mark the beginning and end of rows.
Essential Crochet Abbreviations:
- ch: chain
- sl st: slip stitch
- sc: single crochet
- dc: double crochet
- BLO: back loop only
- FLO: front loop only
- st(s): stitch(es)
- FLO dc: front loop only double crochet (this is a regular dc, but worked in the FLO of the stitch two rows below)
- FO: fasten off
The Pattern: The Modern Mosaic Throw
This pattern is worked in rows, with a color change at the beginning of each row.
Starting Chain: Using your first color (Color A), make a foundation chain with a multiple of 10 stitches plus 6.
- For a small throw, you might chain 106 stitches (10 x 10 + 6).
- For a wider blanket, simply chain more, ensuring it’s a multiple of 10 + 6.
Row 1 (Color A – Foundation Row):
- Sc in the second ch from hook, and then
sc BLOin each ch across. - Do not turn. Leave Color A attached at the end of the row.
Row 2 (Color B):
- Attach Color B to the first st of the previous row.
- Ch 1. Sc in the first 6 stitches (
sc BLO). FLO dcin the st two rows below.sc BLOin the next 9 stitches.- Repeat from * across the row until you have 5 stitches remaining.
sc BLOin the last 5 stitches.- Do not turn. Leave Color B attached.
Row 3 (Color A):
- Pick up Color A.
- Ch 1. Sc in the first 5 stitches (
sc BLO). FLO dcin the st two rows below.sc BLOin the next 9 stitches.- Repeat from * across the row until you have 6 stitches remaining.
sc BLOin the last 6 stitches.- Do not turn. Leave Color A attached.
Row 4 (Color B):
- Pick up Color B.
- Ch 1.
sc BLOin the first st. FLO dcin the st two rows below.sc BLOin the next 9 stitches.- Repeat from * across the row until you have 9 stitches remaining.
FLO dcin the st two rows below.sc BLOin the next 7 stitches.- Do not turn. Leave Color B attached.
Row 5 (Color A):
- Pick up Color A.
- Ch 1. Sc in the first 2 stitches (
sc BLO). FLO dcin the st two rows below.sc BLOin the next 9 stitches.- Repeat from * across the row until you have 8 stitches remaining.
FLO dcin the st two rows below.sc BLOin the last 6 stitches.- Do not turn. Leave Color A attached.
Row 6 (Color B):
- Pick up Color B.
- Ch 1. Sc in the first 3 stitches (
sc BLO). FLO dcin the st two rows below.sc BLOin the next 9 stitches.- Repeat from * across the row until you have 7 stitches remaining.
FLO dcin the st two rows below.sc BLOin the last 5 stitches.- Do not turn. Leave Color B attached.
Row 7 (Color A):
- Pick up Color A.
- Ch 1. Sc in the first 4 stitches (
sc BLO). FLO dcin the st two rows below.sc BLOin the next 9 stitches.- Repeat from * across the row until you have 6 stitches remaining.
FLO dcin the st two rows below.sc BLOin the last 4 stitches.- Do not turn. Leave Color A attached.
Row 8 (Color B):
- Pick up Color B.
- Ch 1. Sc in the first 5 stitches (
sc BLO). FLO dcin the st two rows below.sc BLOin the next 9 stitches.- Repeat from * across the row until you have 5 stitches remaining.
FLO dcin the st two rows below.sc BLOin the last 3 stitches.- Do not turn. Leave Color B attached.
Row 9 (Color A):
- Pick up Color A.
- Ch 1. Sc in the first 6 stitches (
sc BLO). FLO dcin the st two rows below.sc BLOin the next 9 stitches.- Repeat from * across the row until you have 4 stitches remaining.
FLO dcin the st two rows below.sc BLOin the last 2 stitches.- Do not turn. Leave Color A attached.
Repeat Rows 2-9 until your blanket reaches the desired length.
Final Steps:
- Weave in All Ends: This is the most crucial (and sometimes tedious!) part of a multi-color project. Use your yarn needle to neatly weave in every single yarn tail. Take your time to ensure they are secure and hidden.
- Blocking (Optional but Recommended): For a professional finish, gently wet block your blanket. This will help to even out your stitches and make the pattern pop even more!
You’ve now got all the tools to create a wonderfully textured and cozy Modern Mosaic Throw! Get ready to snuggle up with your beautiful handmade creation. Happy hooking!
Video tutorial: