
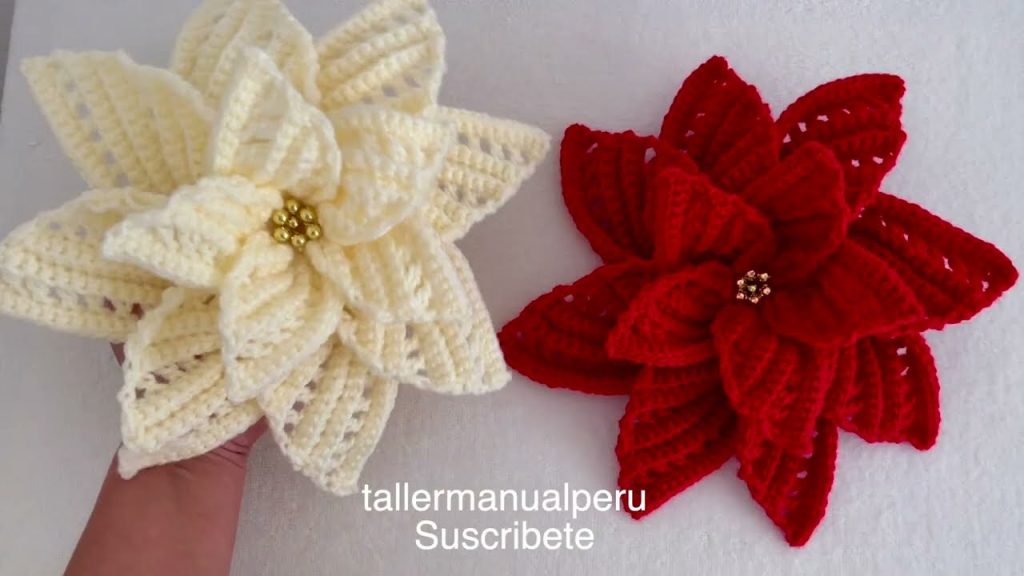
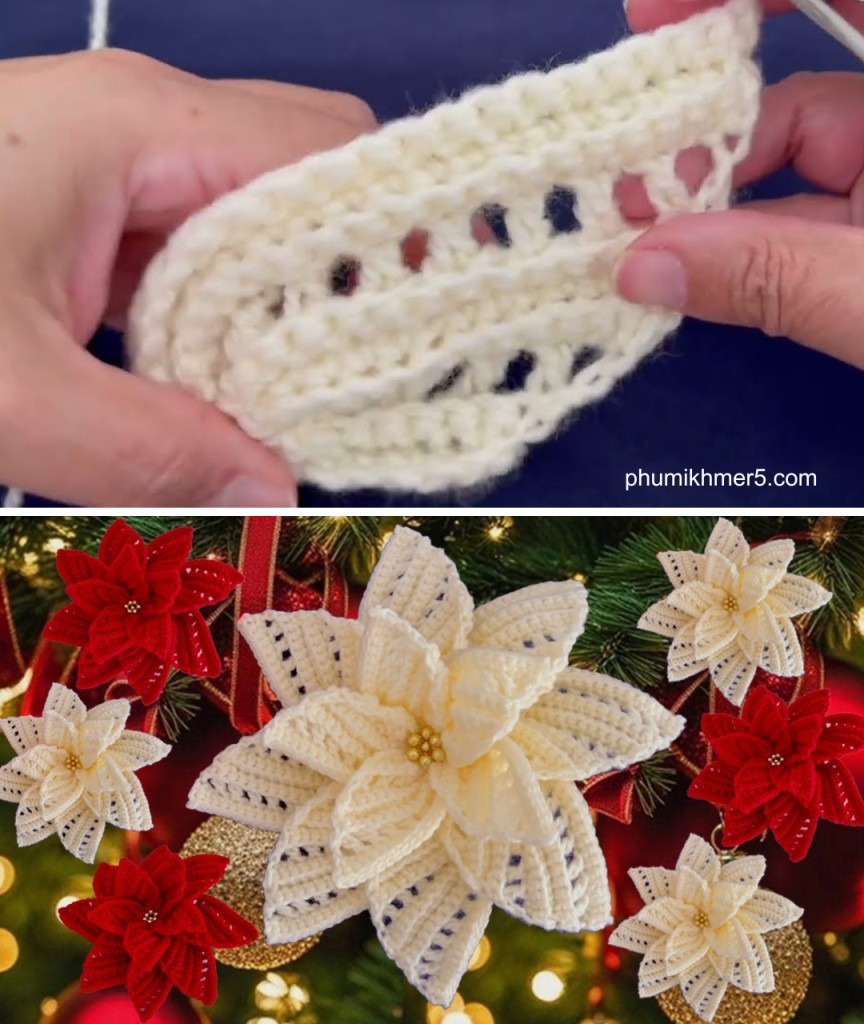
This tutorial presents a truly unique and beautiful method for crocheting a 3D Sculpted Poinsettia (Christmas Flower). Unlike traditional flat crochet flowers, this design creates striking relief and dimension by working each petal individually in rows, using a super-simple combination of only single crochet and chain stitches. The resulting flowers are sturdy, elegant, and perfect for all your holiday decorating needs!
The technique used here allows the petals to naturally curl and hold their shape, giving the finished flower a professional, three-dimensional look that is ideal for wreaths, garlands, gift toppers, or tree ornaments.

Why Crochet the 3D Sculpted Poinsettia?
- Striking 3D Relief: The unique construction of rows worked back and forth gives each petal incredible volume and texture.
- Simple Stitches: The pattern uses a combination of single crochet (sc) and chains, making it accessible even for adventurous beginners.
- Petal-by-Petal Construction: Ensures a uniform, high-quality result for every piece.
- Versatile Decor: Perfect for Christmas tree decorations, garlands, wreaths, or gift wrapping.
1. Materials & Tools You’ll Need
- Yarn: Any yarn of your choice. The video used Pearl White Yarn and showed a version in Red Yarn. Note: Use a yarn with a firm consistency (not too soft) to help the petals hold their shape.
- Crochet Hook: 3.0 mm.
- Embellishment: Gold Beads (size #10) for the center.
- Tools: Tapestry Needle (Yarn Needle) and Needle for sewing the beads (if they have holes).
2. Key Stitches & Abbreviations
| Abbreviation | Stitch Name | Notes |
| ch | Chain | |
| sl st | Slip Stitch (Deslizar el punto) | |
| sc | Single Crochet (Punto Bajo) | |
| dc | Double Crochet (Punto Alto) | |
| Yarn Under | Technique | Work all single crochet rows taking the back loop only to maintain the ribbed texture. |
Export to Sheets
3. Construction Overview
The flower is assembled from two sizes of petals, all worked into a central ring.
- Large Petals: You will make 8 large petals.
- Small Petals: You will make 5 small petals.

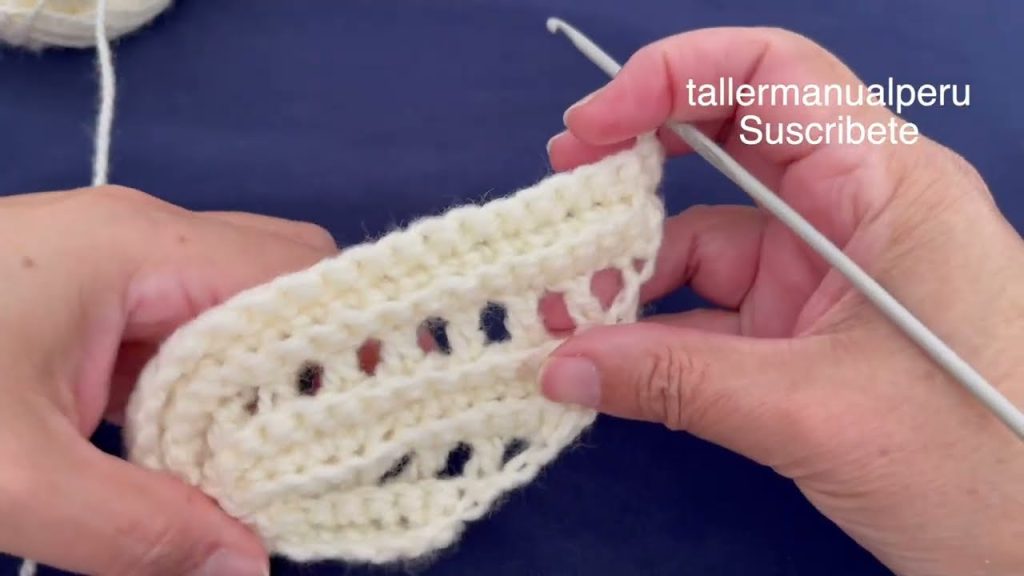
4. Large Petal Pattern (Make 8)
The large petal has three distinct sections, increasing in length.
Section 1: Base
- Foundation: Create a slip knot and Ch 3. Sl st to close the ring.
- Petal Chain: Ch 7.
- Row 1 (SC): Sc in the 2nd chain from the hook and in the next 5 chains. Sc one more time in the end stitch (total 7 sc).
- Row 2 (SC Return): Turn the work. Working in the back loop only, sc in the next 7 stitches.
- Join: Sl st into the center ring. Turn the work.
Section 2: Medium Rib (Increasing Length)
This section creates the ribbing texture and is worked in two steps: first establishing the increase, then working the sc rows.
- Row 3 (Chain Increase): Ch 5. Dc in the immediate next stitch.
- Pattern: *Ch 1, skip 1 stitch, Dc in the next stitch.* Repeat the pattern across.
- End: Ch 3. Sl st into the center ring. Turn the work.
- Row 4 (SC Up): Working in the back loop only, sc up the side, crocheting into the chains and DC posts. You should have 13 sc. Turn the work.
- Row 5 (SC Down): Working in the back loop only, sc back down the side (13 sc). Sl st into the center ring. Turn the work.
- Row 6 (SC Up): Working in the back loop only, sc up the side (13 sc).

Section 3: Large Rib (Final Length)
- Row 7 (Chain Increase): Turn the work. Ch 5.
- Pattern: Dc in the immediate next stitch, *Ch 1, skip 1 stitch, Dc in the next stitch.* Repeat until you reach the end.
- End: Ch 3. Sl st into the center ring. Turn the work.
- Row 8 (SC Up): Working in the back loop only, sc up the side. You should have 19 sc. Turn the work.
- Row 9 (SC Down): Working in the back loop only, sc back down the side (19 sc). Sl st into the center ring. Turn the work.
- Row 10 (SC Up): Working in the back loop only, sc up the side (19 sc).
Final Section: Finishing the Petal
- Row 11 (Chain Increase): Turn the work. Ch 5.
- Pattern: Repeat the chain increase pattern (Dc, Ch 1, skip 1).
- End: Ch 3. Sl st into the center ring. Turn the work.
- Row 12 (SC Up): Working in the back loop only, sc up the side. You should have 25 sc.
- Finish Edging (Sl St): Turn the work. Sl st in the back loop of each of the 25 stitches, sliding the point all the way down to the center.
- Fasten Off: Cut the yarn and secure the end.
5. Small Petal Pattern (Make 5)
The small petal uses the same technique but skips the final section.
- Foundation: Create a slip knot and Ch 4. Sl st to close the ring.
- Petal Chain: Ch 5.
- Row 1 (SC): Sc in the 2nd chain from the hook and in the next 3 chains. Sc one more time in the end stitch (total 5 sc).
- Row 2 (SC Return): Turn the work. Working in the back loop only, sc in the next 5 stitches.
- Join: Sl st into the center ring. Turn the work.
Section 2: Medium Rib (Final Length)
- Row 3 (Chain Increase): Ch 5.
- Pattern: Dc in the immediate next stitch, *Ch 1, skip 1 stitch, Dc in the next stitch.* Repeat until you reach the end.
- End: Ch 3. Sl st into the center ring. Turn the work.
- Row 4 (SC Up): Working in the back loop only, sc up the side. You should have 11 sc. Turn the work.
- Row 5 (SC Down): Working in the back loop only, sc back down the side (11 sc). Sl st into the center ring. Turn the work.
- Row 6 (SC Up): Working in the back loop only, sc up the side (11 sc).
Final Section: Finishing the Petal
- Row 7 (Chain Increase): Turn the work. Ch 5.
- Pattern: Repeat the chain increase pattern (Dc, Ch 1, skip 1).
- End: Ch 3. Sl st into the center ring. Turn the work.
- Row 8 (SC Up): Working in the back loop only, sc up the side. You should have 17 sc.
- Finish Edging (Sl St): Turn the work. Sl st in the back loop of each of the 17 stitches, sliding the point all the way down to the center.
- Fasten Off: Ch 1, cut the yarn and secure the end.
6. Assembly & Finishing
- Fold the Petals: Take each large petal and gently fold it in half lengthwise to create a crease and enhance the 3D shape.
- Assemble the Large Petals (Bottom Layer):
- Thread your tapestry needle with a long piece of yarn.
- Take the first large petal and fold it in half. Secure the base with a few stitches.
- Take the second large petal. Overlap the first petal slightly (superponer) and stitch the bases together.
- Continue joining all 8 large petals in a circle, ensuring each petal slightly overlaps the previous one to create a closed, full layer. Secure the final seam to the first petal.
- Assemble the Small Petals (Top Layer):
- Repeat the assembly process with the 5 small petals, overlapping them to form a tighter, smaller flower shape.
- Join the Layers: Place the small petal layer on top of the large petal layer, centering it carefully.
- Stitch the two layers together at the center using your tapestry needle, securing them firmly.
- Embellishment: If using gold beads, you can either sew them into the center or use hot glue to attach continuous beads, as shown in the video.
Your beautiful 3D Sculpted Poinsettia is complete, ready to add a festive touch to your holiday decorations!
Video tutorial:


