
I. The Unveiling: Introducing Your Next Lightweight Wearable
| Section | Description & Key Focus |
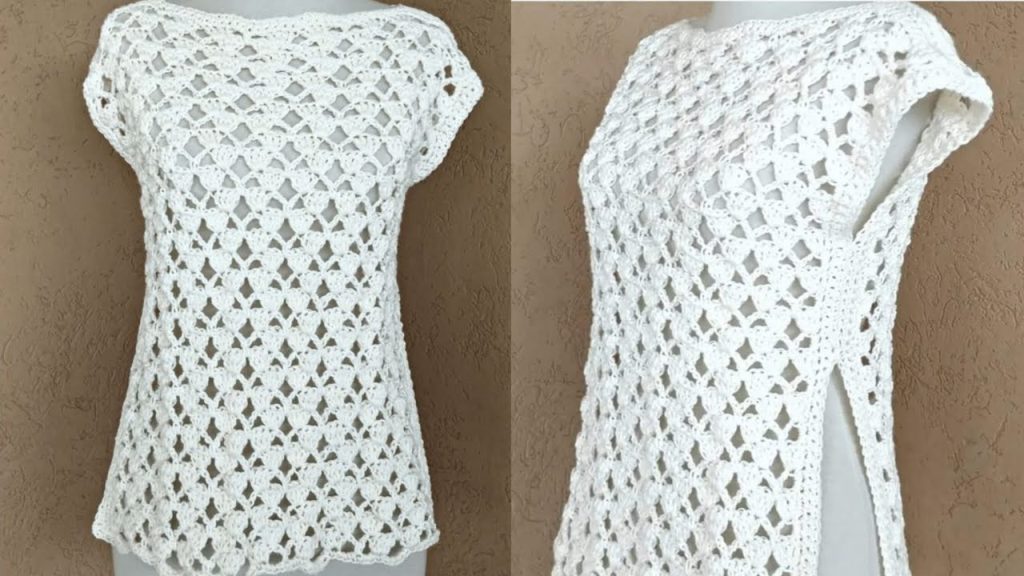
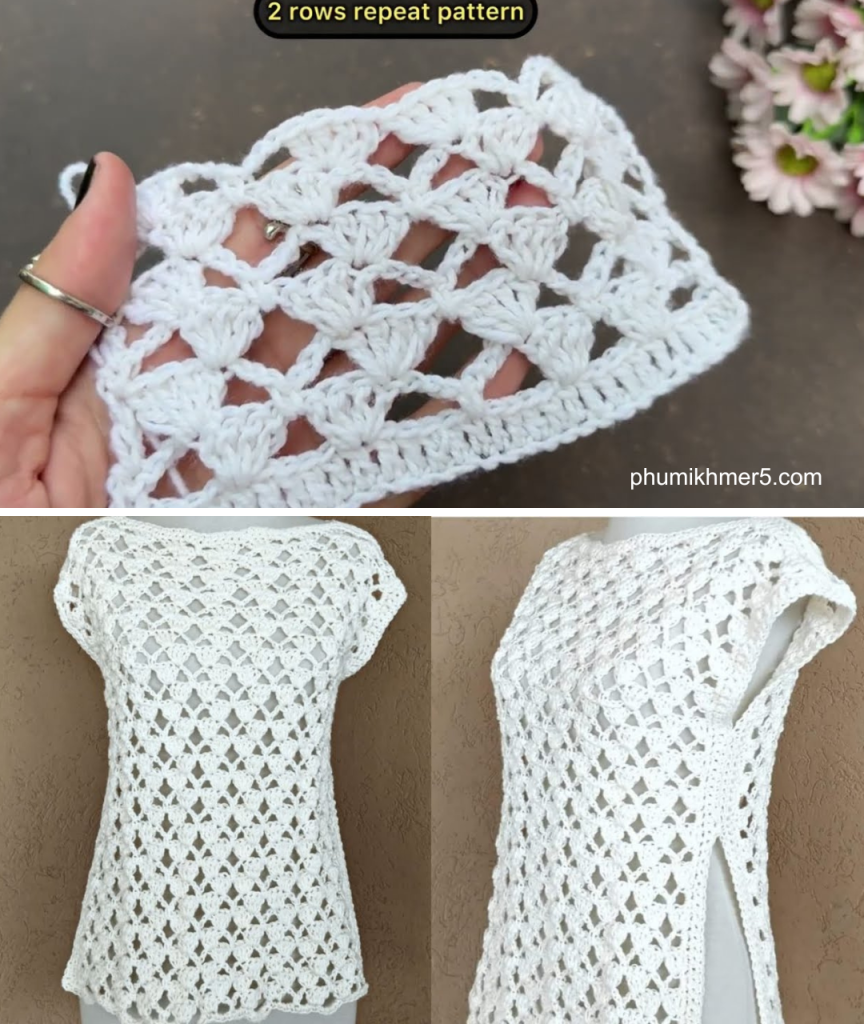
| A. Engaging Introduction | Say hello to your new favorite warm-weather staple! The Celestial Cluster Blouse is a delicate, airy top defined by a beautiful repeating lace stitch. The resulting fabric is light, breathable, and features a subtle, almost star-like cluster texture that drapes beautifully. This pattern is worked up in two flat panels (Front and Back) and seamed, making it a surprisingly straightforward project for a garment of this elegance. |
| B. Project Snapshot & Skill Level | – Finished Garment: Short-sleeved, scoop-neck, semi-fitted top. |
| – Key Feature: The 4-Row Celestial Cluster Repeat creates a strong, yet lacy, diamond motif. | |
| – Skill Level: Intermediate (Requires confidence with V-stitches, clusters, and chain counting). | |
| C. Why This Stitch is Perfect for a Blouse | Unlike dense stitches, the open-work structure ensures it remains cool and comfortable for summer layering. The cotton yarn recommendation also enhances the drape, allowing the fabric to fall effortlessly without being bulky. |
II. The Blueprint: Materials, Sizing, and Gauge
A. Essential Supplies
| Item | Details | Notes |
| Yarn | Fingering or Light Sport Weight (Category 2) cotton or linen blend yarn. | Recommended: Mercerized cotton for shine and drape. (Approx. 800 – 1500 yards, depending on size). |
| Hook | US Size E/4 (3.5 mm) or F/5 (3.75 mm) | Use the larger size if you tend to crochet tightly, to maximize the airy quality. |
| Notions | Stitch markers, yarn needle (tapestry needle), measuring tape, and scissors. |
B. Sizing & Custom Fit Guide
Measurements are for the finished garment flat. Choose the size closest to your actual bust measurement for a comfortable fit.
| Size | Bust Circumference (Finished) | Finished Length (Shoulder to Hem) |
| S | 34 inches (86 cm) | 20 inches (51 cm) |
| M | 38 inches (96 cm) | 21 inches (53 cm) |
| L | 42 inches (107 cm) | 22 inches (56 cm) |
| XL | 46 inches (117 cm) | 23 inches (58 cm) |
C. Gauge: The Celestial Cluster Repeat
Gauge is absolutely essential for a wearable item. Swatch for at least 6 inches square.
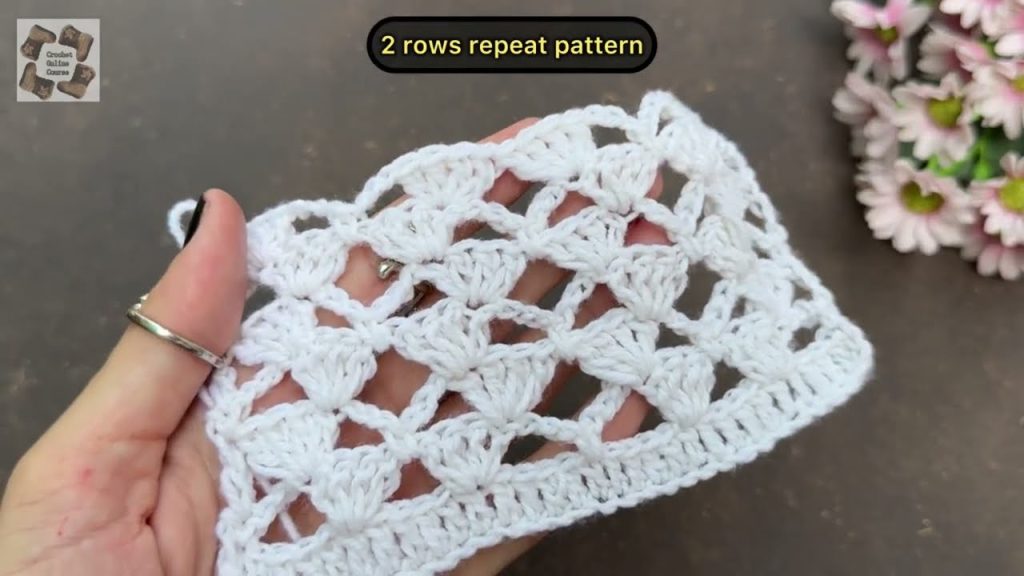
- Pattern: Celestial Cluster (Rows 1-4 repeat).
- Target: 1 pattern repeat (1 V-Stitch + 1 Cluster) = 1.5 inches wide.
- Starting Chain Rule: The total starting chain length must be a Multiple of 6 + 1.

III. The Celestial Cluster Stitch Tutorial
This is a 4-Row Repeat.
Abbreviations (US Terms)
| Abbreviation | Stitch |
| CH | Chain |
| SC | Single Crochet |
| DC | Double Crochet |
| SK | Skip |
| PM | Place Marker |
| CC | Celestial Cluster (defined below) |
Special Stitch: The Celestial Cluster (CC)
CC (3-DC Cluster): Yarn over, insert hook into the specified stitch/space, yarn over and pull up a loop, yarn over and pull through 2 loops (2 loops remain on hook). Yarn over, insert hook into the same stitch/space, yarn over and pull up a loop, yarn over and pull through 2 loops (3 loops remain on hook). Yarn over, insert hook into the same stitch/space, yarn over and pull up a loop, yarn over and pull through 2 loops (4 loops remain on hook). Yarn over, pull through all 4 loops on hook.
The 4-Row Repeat
Work your foundation chain based on the Multiple of 6 + 1 rule for your chosen size.
| Row | Instruction | Notes |
| Foundation | Row 1 (Set-up): CH 3 (counts as DC), DC in first St. *CH 1, SK 1, DC in next 2 Sts*; repeat from * to last St. DC in last St. CH 1, turn. | This is the mesh base. End with DC in the turning chain. |
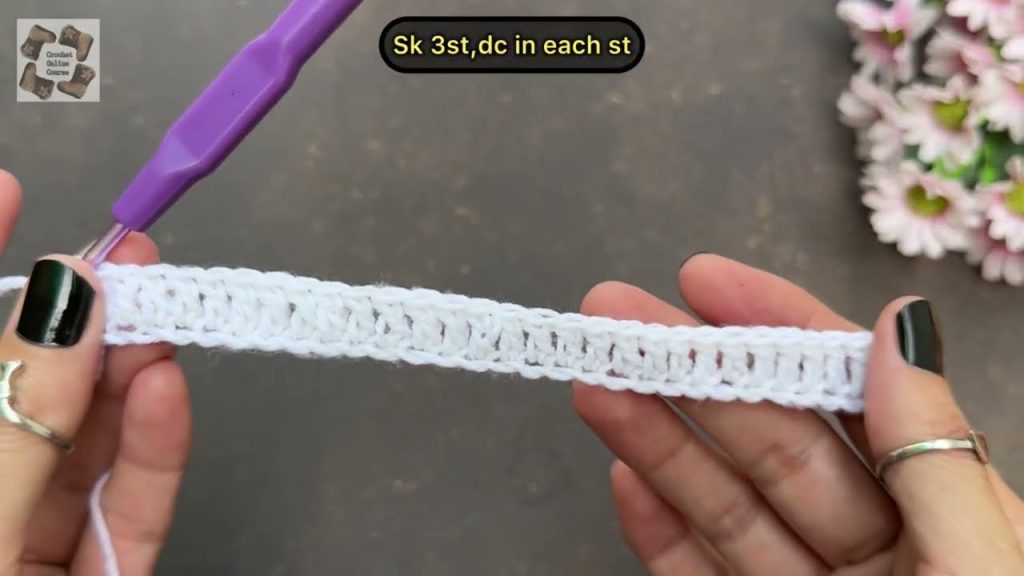
| Row 2 | SC Anchor Row: SC in the first DC. SC in the next CH-1 space. *SC in the next 2 DC, SC in the next CH-1 space*; repeat from * to last DC. SC in the last DC (the turning chain). CH 3 (counts as DC), turn. | This row stabilizes the mesh and sets up the V-Stitches. |
| Row 3 | V-Stitch Row: DC in the first SC. *CH 2, SK 3 SC, V-Stitch (DC, CH 1, DC) in next SC*; repeat from * until 4 SC remain. CH 2, SK 3 SC, DC in the last SC. CH 3 (counts as DC), turn. | The V-Stitches start defining the lace diamonds. |
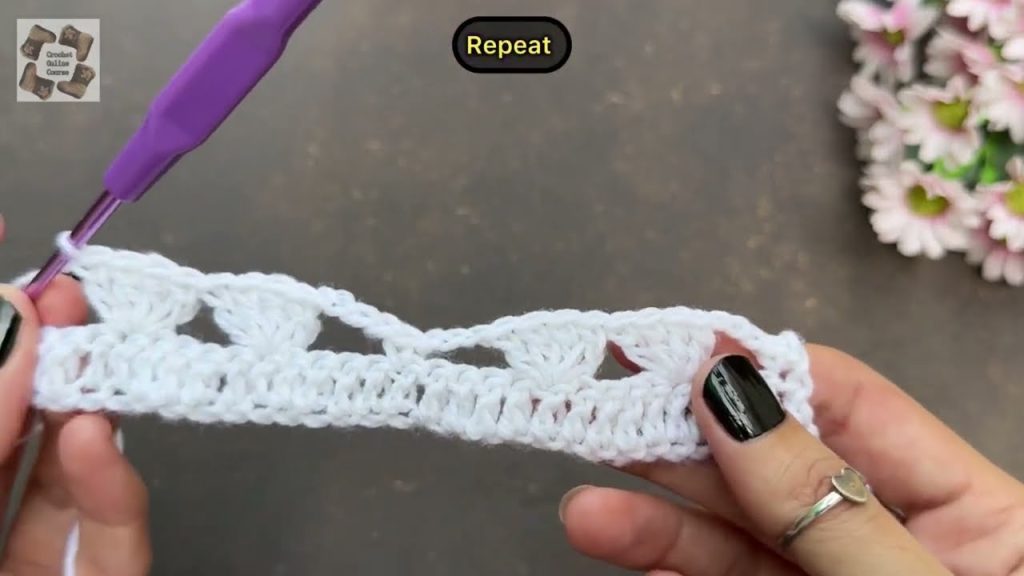
| Row 4 | Cluster Row: DC in the first DC. *CH 1, work CC (Celestial Cluster) into the CH-1 space of the V-Stitch below, CH 1, DC in the top of the next DC*; repeat from * to end, working the last DC into the turning chain. CH 3 (counts as DC), turn. | The CC stitch creates the star point within the diamond shape. |
| Row 5 | Mesh Prep: DC in the first DC. *CH 1, DC in the top of the CC, DC in the next DC*; repeat from * to end, ending with DC in the turning chain. CH 1, turn. | This row re-establishes the Row 2 mesh pattern, preparing to repeat from Row 2. |
| Pattern Repeat | Repeat Rows 2-5 until the panel reaches the length required before the armhole shaping (e.g., 10-12 inches). |
IV. Construction Part 4: Shaping the Panels
A. The Back Panel (Straight Shaping)
Work the pattern repeat (Rows 2-5) until the panel measures approximately 10-12 inches from the hem (or your desired length to the underarm).
- Armhole Start: Continue the pattern, but decrease one full pattern repeat (6 stitches) at the beginning and end of the next two rows.
- Decrease Method (Simple): At the start of the row, Sl St over the first 6 stitches. At the end, stop 6 stitches short.
- Straight Up: Continue working straight up in the pattern until the total panel length reaches the Finished Length specified in the chart.
- Fasten Off.
B. The Front Panel (Neckline Shaping)
Work the pattern repeat until the panel length matches the back panel length to the underarm shaping. Implement the armhole shaping exactly as done on the back panel.
- Define Neckline: Work the pattern straight up from the armhole for 4 inches. At this point, you will divide the panel for the neck.
- Center Split: On the next row, work across until you reach the center (use a stitch marker for accuracy). Work only one side, leaving the center 4-6 inches unworked. This forms the scoop neck.
- Shoulder Slope (Reduction): Work each side separately for the remaining 2-3 inches of length. Decrease 1 stitch (Sl St) at the neckline edge every other row to create a subtle slope.
- Finish: Work until the front panel matches the total back panel length at the shoulder points. Fasten Off.
V. Final Assembly and Edging
A. Seaming the Shoulders
- Place the Front and Back panels together with the Right Sides Facing.
- Align the shoulder points. Use the Single Crochet Seam Method to join the shoulders together, creating a strong, structured seam. Leave the neck opening unseamed.
B. Seaming the Sides
- Using the Mattress Stitch Seam (or preferred invisible seam method) and your yarn needle, align the side edges from the hem up to the armhole opening.
- Join the sides, leaving the 8-10 inches defined for the armhole unseamed.
C. Finishing the Edges
- Hem/Neckline/Armhole Prep: Join yarn at a seam. Work one round of Single Crochet evenly around the entire bottom hem, around the neckline, and around each armhole. This cleans up all edges.
- Optional Final Round (Picot Trim): For a slightly more delicate edge, work the final round as: *SC in next 3 Sts, Picot (CH 3, Sl St into base of CH 3)*; repeat from * around.
D. Final Touches
Weave in all remaining ends securely using a tapestry needle. Gently steam or wet-block the garment to relax the lace pattern and set the final shape and drape.
Congratulations on completing your elegant Celestial Cluster Blouse!
Video tutorial:


