
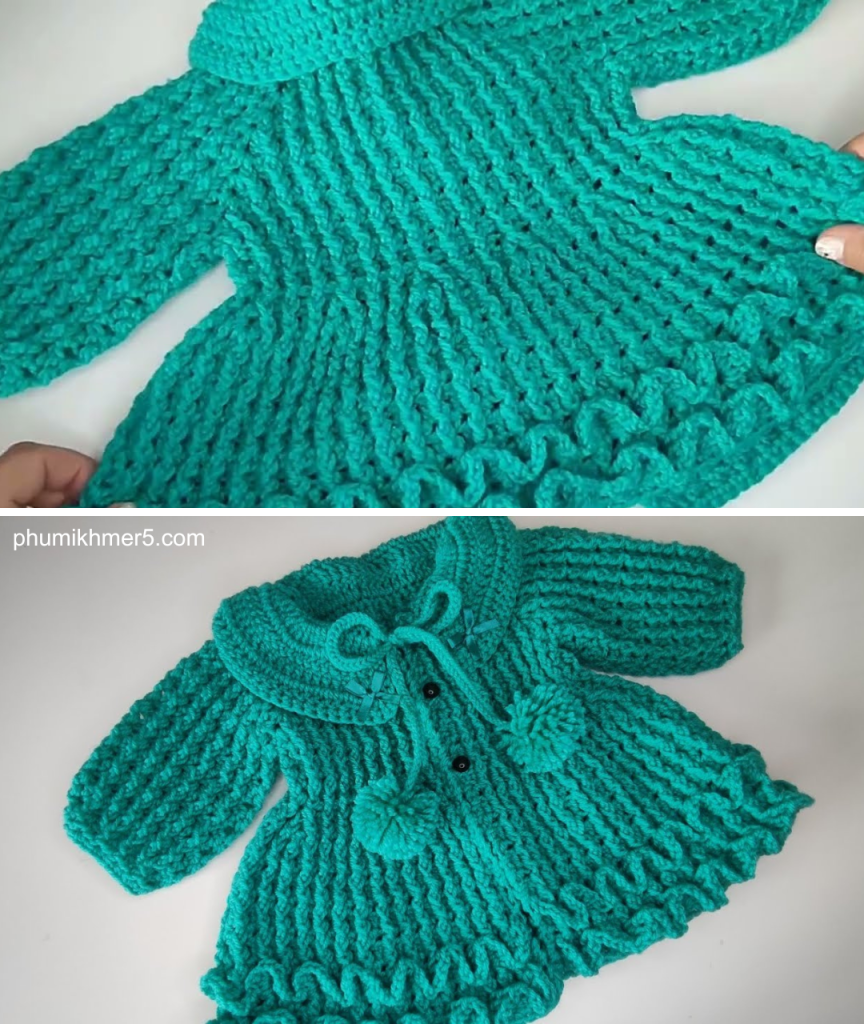
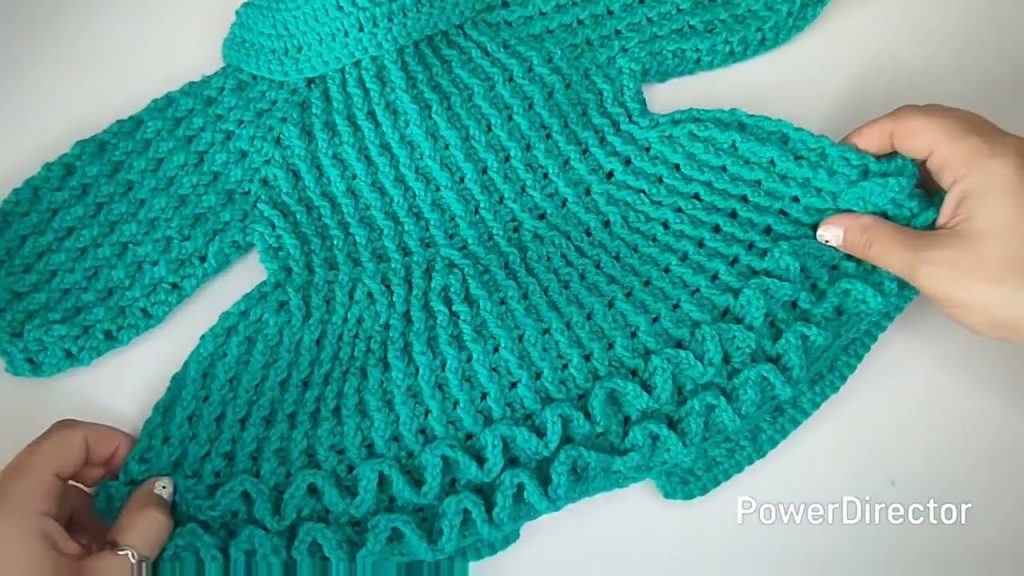
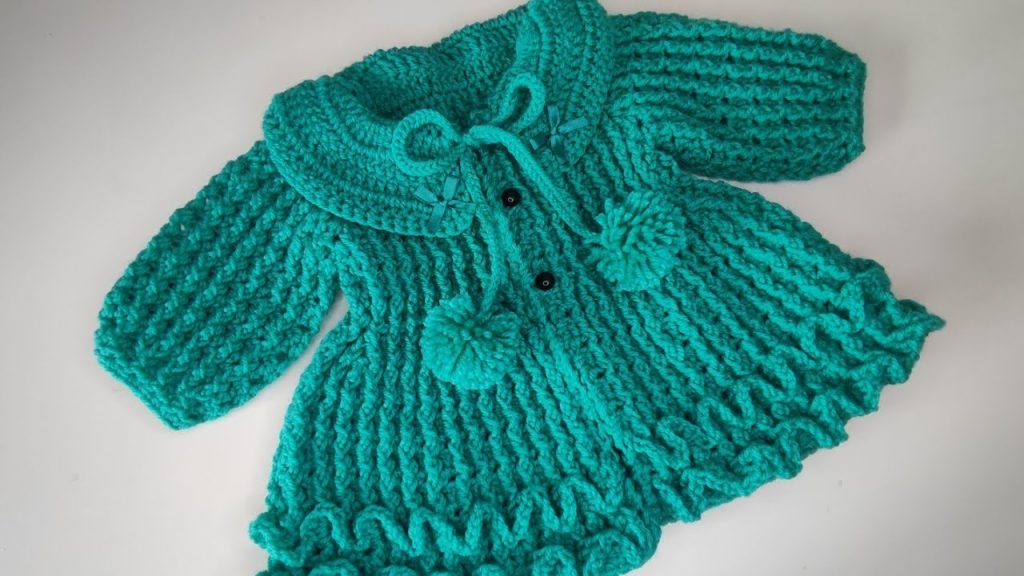
Hey everyone, welcome or welcome back to my channel! Today I am so excited to be showing you how to make The Cloudburst Cardigan, a beautiful, chunky, top-down garment for babies from 0 to 12 months. This pattern is designed to be thick, warm, and cozy—just like wrapping a little one in a cloud!
The Design & Construction
This is a top-down, raglan yoke cardigan, meaning we start at the neckline and work our increases evenly to form the shoulders and chest before separating for the sleeves.
- Key Stitch: The main body features a modified Shell and Post Stitch repeat that creates a plush, dense texture, but remains soft.
- Repeat: It is a two-row repeat, so once you get the hang of it, the rest of the body flies by!
- Sizing: I will provide starting chain counts and measurements for three common baby sizes, allowing you to customize your coat to fit perfectly.
- Finishing: We’ll finish with a simple rolled collar and a clean, straight edge, giving it a classic look.
If you’re interested in making this warm little Cloudburst Cardigan with me, let’s go and have a look at what we’re going to need for this project!

Materials & Tools Checklist
| Item | Details |
| Yarn (Main Color – MC) | Approximately 300g–450g of Bulky Weight (Size 5) yarn. A soft acrylic or acrylic blend is highly recommended. |
| Yarn (Contrasting Color – CC) | Approximately 50g of Bulky Weight yarn for the collar/edging. |
| Hook (Main) | 6.0 mm (US J/10) or size needed to obtain gauge. |
| Hook (Edging) | 5.5 mm (US I/9) or a size smaller than your main hook, used to create a tighter, neater edge. |
| Notions | Measuring tape (with centimeters), scissors, darning needle for weaving tails, 4-6 stitch markers (you’ll need 4 for the yoke), and 4–6 small buttons (approx. 15mm-18mm). |
| Alternative Closure | You may also choose to use a simple ribbon or cord instead of buttons for a bow closure. |
Estimated Yarn Requirements (Bulky Weight)
| Size | MC (grams) | CC (grams) | Total (grams) |
| 0-3 Months | 300g | 50g | 350g |
| 3-6 Months | 350g | 50g | 400g |
| 6-12 Months | 400g | 50g | 450g |
Sizing and Gauge Chart
To achieve the correct fit, please confirm your measurements against this chart. We will be using centimeters for accuracy.
| Size | Age | Yoke Depth (A) | Half Chest Width (B) | Body Length (C) | Sleeve Length (D) |
| S | 0-3 Months | 10 cm | 22 cm | 18 cm | 15 cm |
| M | 3-6 Months | 11.5 cm | 24 cm | 20 cm | 17 cm |
| L | 6-12 Months | 13 cm | 26 cm | 23 cm | 20 cm |
Gauge (Measured in MC with 6.0 mm hook): 10 DC x 6 Rows = 10 cm x 10 cm square. (Note: You must block your swatch to get an accurate measurement.)
Part 1: The Yoke (Top-Down Raglan)
We’ll begin by chaining our starting row. Remember, you want your starting chain to be an even number for the pattern to work correctly.
| Size | Starting Chains (Ch) |
| S (0-3 Months) | 38 Ch |
| M (3-6 Months) | 42 Ch |
| L (6-12 Months) | 46 Ch |
I will be making the Large (L) size, so I’ll start with 46 chains.
Row 1: Foundation Row (HDC)
Using your 6.0 mm hook and MC:
- Chain the number of stitches for your chosen size (e.g., 46 Ch for size L).
- Add an extra chain (Ch 1). This does not count as a stitch.
- Skip the first Ch from the hook. Start in the second Ch and work 1 Half Double Crochet (HDC) in each chain across.
- You should have the exact number of HDC as your starting chain count (e.g., 46 HDC).
- Ch 2 and Turn. (The Ch 2 counts as your first Double Crochet for all subsequent rows).

Row 2: Raglan Increase Row (Sets up the Yoke)
In this row, we establish the four raglan corner spaces where all increases will happen.
- Count your stitches and determine your sections:
- Size S: 6 (Front) – 7 (Sleeve) – 12 (Back) – 7 (Sleeve) – 6 (Front)
- Size M: 7 (Front) – 8 (Sleeve) – 12 (Back) – 8 (Sleeve) – 7 (Front)
- Size L: 8 (Front) – 9 (Sleeve) – 12 (Back) – 9 (Sleeve) – 8 (Front)
- Work the First Front Section (e.g., 8 DC for size L): The starting Ch 2 counts as your first DC. Work 1 DC into the next stitch, and continue until you have the correct number of stitches for your first front section.
- Corner 1: Into the next stitch (the corner stitch), work: (DC, Ch 1, DC). Place a stitch marker in the Ch-1 space.
- Work the First Sleeve Section (e.g., 9 DC for size L): Work 1 DC into the next stitch, and continue across for the required number of stitches.
- Corner 2: Into the next stitch, work: (DC, Ch 1, DC). Place a stitch marker in the Ch-1 space.
- Work the Back Section (e.g., 12 DC for all sizes): Work 1 DC into the next stitch, and continue across for the required number of stitches.
- Corner 3: Into the next stitch, work: (DC, Ch 1, DC). Place a stitch marker in the Ch-1 space.
- Work the Second Sleeve Section: Work 1 DC into the next stitch, and continue across for the required number of stitches.
- Corner 4: Into the next stitch, work: (DC, Ch 1, DC). Place a stitch marker in the Ch-1 space.
- Work the Second Front Section: Work 1 DC into the next stitch, and continue to the end, making sure to work your last DC into the top of the turning Ch 2 from the previous row.

Row 3: Pattern Repeat – Row A (Front Post/Shell)
This is the first row of our main body pattern.
- Ch 2 and Turn. (Counts as your first DC).
- Work the Front Section: Work 1 DC into the next stitch. Now, start the texture: (FPDC around next st, DC in next st). Repeat this bracketed pattern across the first front section.
- Corner 1 (Increase): Into the Ch-1 space (where the marker is), work: (DC, Ch 1, DC). Move your stitch marker to the new Ch-1 space.
- Work the First Sleeve Section: Start the texture pattern immediately: (FPDC around next st, DC in next st). Repeat this bracketed pattern across the sleeve section.
- Corner 2 (Increase): Into the Ch-1 space, work: (DC, Ch 1, DC). Move your stitch marker.
- Work the Back Section: Repeat the texture pattern: (FPDC around next st, DC in next st).
- Corner 3 (Increase): Into the Ch-1 space, work: (DC, Ch 1, DC). Move your stitch marker.
- Work the Second Sleeve Section: Repeat the texture pattern: (FPDC around next st, DC in next st).
- Corner 4 (Increase): Into the Ch-1 space, work: (DC, Ch 1, DC). Move your stitch marker.
- Work the Second Front Section: Repeat the texture pattern: (FPDC around next st, DC in next st), finishing the last stitch with a DC into the top of the turning Ch 2.
- Ch 2 and Turn.
Row 4: Pattern Repeat – Row B (Back Post/Double Crochet)
This is the second row of our main body pattern.
- Ch 2 and Turn. (Counts as your first DC).
- Work the Front Section: Work 1 DC into the next stitch. Now, start the texture: (BPDC around next post st, DC in next st). Repeat this pattern across the first front section.
- Corner 1 (Increase): Into the Ch-1 space, work: (DC, Ch 1, DC). Move your stitch marker to the new Ch-1 space.
- Work the First Sleeve Section: Start the texture pattern immediately: (BPDC around next post st, DC in next st).
- Corner 2 (Increase): Into the Ch-1 space, work: (DC, Ch 1, DC). Move your stitch marker.
- Work the Back Section: Repeat the texture pattern: (BPDC around next post st, DC in next st).
- Corner 3 (Increase): Into the Ch-1 space, work: (DC, Ch 1, DC). Move your stitch marker.
- Work the Second Sleeve Section: Repeat the texture pattern: (BPDC around next post st, DC in next st).
- Corner 4 (Increase): Into the Ch-1 space, work: (DC, Ch 1, DC). Move your stitch marker.
- Work the Second Front Section: Repeat the texture pattern: (BPDC around next post st, DC in next st), finishing the last stitch with a DC into the top of the turning Ch 2.
- Ch 2 and Turn.
Continue repeating Row A and Row B until your yoke measures the required Yoke Depth (A) or your Half Chest Width (B) measurement is reached.
- A (Yoke Depth): Measure from the initial chain to the bottom of the yoke.
- B (Half Chest Width): Measure across the back section, from one Ch-1 corner space to the other. This is the most critical measurement.
Do not go past the Half Chest Width measurement! If you are slightly short, we will make up the length with the underarm chains.
Part 2: Separating for the Sleeves
Once your yoke is the correct size, you will connect the front and back sections, skipping the sleeve stitches.
Connect Row (Work on the next Repeat Row—A or B):
- Ch 2 and Turn. Continue the stitch pattern (Row A or B) across the First Front Section until you reach the Ch-1 space of the first corner.
- Corner 1 (Underarm):
- Work 1 DC into the Ch-1 space.
- Chain an odd number of stitches for the underarm (this is to maintain the pattern repeat). Ch 3 is a good starting point for all sizes.
- Skip all stitches of the first sleeve section.
- Connect to Corner 2: Work 1 DC into the Ch-1 space of the second corner.
- Work the Back Section: Continue the stitch pattern (Row A or B) across the Back Section until you reach the Ch-1 space of the third corner.
- Corner 3 (Underarm):
- Work 1 DC into the Ch-1 space.
- Chain the same odd number of stitches as before (Ch 3 in this example).
- Skip all stitches of the second sleeve section.
- Connect to Corner 4: Work 1 DC into the Ch-1 space of the fourth corner.
- Work the Second Front Section: Continue the stitch pattern to the end.
- Ch 2 and Turn.
Part 3: The Main Body
Now we are working only on the body stitches (fronts, back, and underarm chains). We will bring the new underarm stitches into the main pattern.
Row 1 (After Connect Row):
- Ch 2 and Turn. Continue the stitch pattern until you reach the First Underarm Chain section.
- Work Underarm: You will now bring the Ch-3 into the pattern. Since we have a DC on either side of the chain, start working the pattern (FPDC, DC, FPDC) across the three chains.
- Continue the pattern across the back, and repeat the (FPDC, DC, FPDC) pattern across the second underarm chain.
- Finish the row with the established pattern.
- Ch 2 and Turn.
Body Repeat: Continue repeating Row A and Row B until the cardigan measures the required Body Length (C) from the armhole down, or until you are one pattern repeat row short of that length.
- You should stop after a Row B (Back Post/DC) row, so that your last row is ready for the finishing Row A (Front Post/Shell).
Final Body Edging Row (Optional): To give the bottom edge a crisp finish, work one row of Single Crochet (SC) across the entire bottom edge.
- Ch 1 and Turn. (Does not count as a stitch).
- Work 1 SC in every stitch across the entire bottom of the cardigan.
- Tie off MC and weave in your tail.

Part 4: Front Edging and Buttonholes
We will now work a simple border up both front sides, creating the buttonholes on the right front panel (for girls’ cardigans) or the left front panel (for boys’ cardigans). I will write this for buttonholes on the right side (Girl).
Button Band (Left Front Panel)
- Using your 5.5 mm hook and CC (Contrasting Color).
- Attach CC at the bottom-left corner of the cardigan.
- Row 1 (Wrong Side Facing): Ch 1. Work SC stitches evenly up the entire length of the left front opening. Aim for approximately 3 SC per 2 DC rows to keep the edge flat.
- Row 2 (Right Side Facing): Ch 1 and Turn. Work 1 SC in every stitch across.
- Row 3 (Wrong Side Facing): Ch 1 and Turn. Work 1 SC in every stitch across.
- Tie off CC and weave in your tail.
Buttonhole Band (Right Front Panel)
- Using your 5.5 mm hook and CC.
- Attach CC at the bottom-right corner of the cardigan.
- Row 1 (Wrong Side Facing): Ch 1. Work SC stitches evenly up the entire length of the right front opening, matching the number of stitches from the left panel. Do not cut yarn. Ch 1 and Turn.
Determine Buttonhole Placement: Mark where you want your buttons. I recommend one near the top, one at the waist, one at the bottom, and the remaining evenly spaced.
- Row 2 (Right Side Facing – Buttonhole Row):
- Ch 1 and Turn.
- Work SC to your first marked button placement.
- Buttonhole: Ch 2 (or Ch 3 for larger buttons) and Skip 2 (or 3) stitches.
- Continue with SC to the next marked button placement.
- Repeat the Ch/Skip for all buttonholes.
- Work SC to the end of the row.
- Ch 1 and Turn.
- Row 3 (Wrong Side Facing – Finishing Row):
- Ch 1 and Turn.
- Work SC to the first buttonhole space.
- Work 2 SC (or 3 SC) into the chain-space to enclose the hole.
- Continue with SC to the next buttonhole space.
- Repeat for all buttonholes.
- Work SC to the end of the row.
- Tie off CC and weave in tail.
Part 5: The Collar
We will work a simple, wide collar using the smaller hook (5.5mm) for a slightly tighter finish that naturally rolls.
- Rejoin CC at the top corner of the buttonhole band (right front panel).
- Row 1: Ch 2 (counts as DC). Work 1 DC into every stitch around the entire neck opening, including the tops of the front edge bands. Increase by working 2 DC into the tops of the front edge rows for every 4 stitches to ensure the collar lies flat.
- Row 2: Ch 2 and Turn. Work 1 DC in every stitch across, placing 2 DC in the first and last stitch for a slight increase at the ends.
- Row 3 – 5: Repeat Row 2 for 3-5 rows (or until desired width). The collar should naturally curl to the outside.
- Tie off CC and weave in your tail.
Part 6: The Sleeves
The sleeves are worked in turned rounds to keep the texture consistent with the body.
- Rejoin MC at the center of the underarm chain.
- Round 1: Ch 2 (counts as DC). Work 1 DC evenly around the armhole opening and into the underarm chains.
- You must have an even number of stitches for the pattern repeat. Adjust with one extra DC or a DC2tog if needed.
- Slip stitch to the top of the starting Ch 2 to join. Ch 2 and Turn.
- Round 2 (Pattern Row A): Ch 2. Continue the pattern from the body: (FPDC around next st, DC in next st). Repeat around. Slip stitch to join. Ch 2 and Turn.
- Round 3 (Pattern Row B): Ch 2. Continue the pattern from the body: (BPDC around next post st, DC in next st). Repeat around. Slip stitch to join. Ch 2 and Turn.
Sleeve Repeat: Continue repeating Round 2 and Round 3 until your sleeve reaches the required Sleeve Length (D), or approximately 2 cm short of the final length.
Cuff Edging (Optional Decrease): To give the cuff a snug fit:
- Decrease Round: Ch 1 (does not count). Work (SC in next 5 stitches, SC2tog over next 2 stitches). Repeat around. Slip stitch to join.
- SC Round: Ch 1. Work 1 SC in every stitch around. Slip stitch to join.
- Tie off MC and repeat for the second sleeve.
Part 7: Finishing
You’re almost done! All that’s left is the final polish:
- Weave in all remaining tails neatly into the back of the fabric. Use the darning needle to secure any loose ends.
- Sew on Buttons: Line up the buttonhole band over the button band. Use your stitch markers or a pin to mark the exact center of each buttonhole onto the opposite panel. Sew your buttons securely onto the marked locations.
- Blocking (Highly Recommended): Pin your finished cardigan to a mat, ensuring the sleeves and body are pulled to their final dimensions. Mist with water (or wash and lay flat). Let it dry completely. Blocking opens up the stitches and evens out the fabric, making the post stitch texture truly pop!
And there you have it—The Cloudburst Cardigan is ready to keep a little one warm! Happy crocheting!
Video tutorial:


