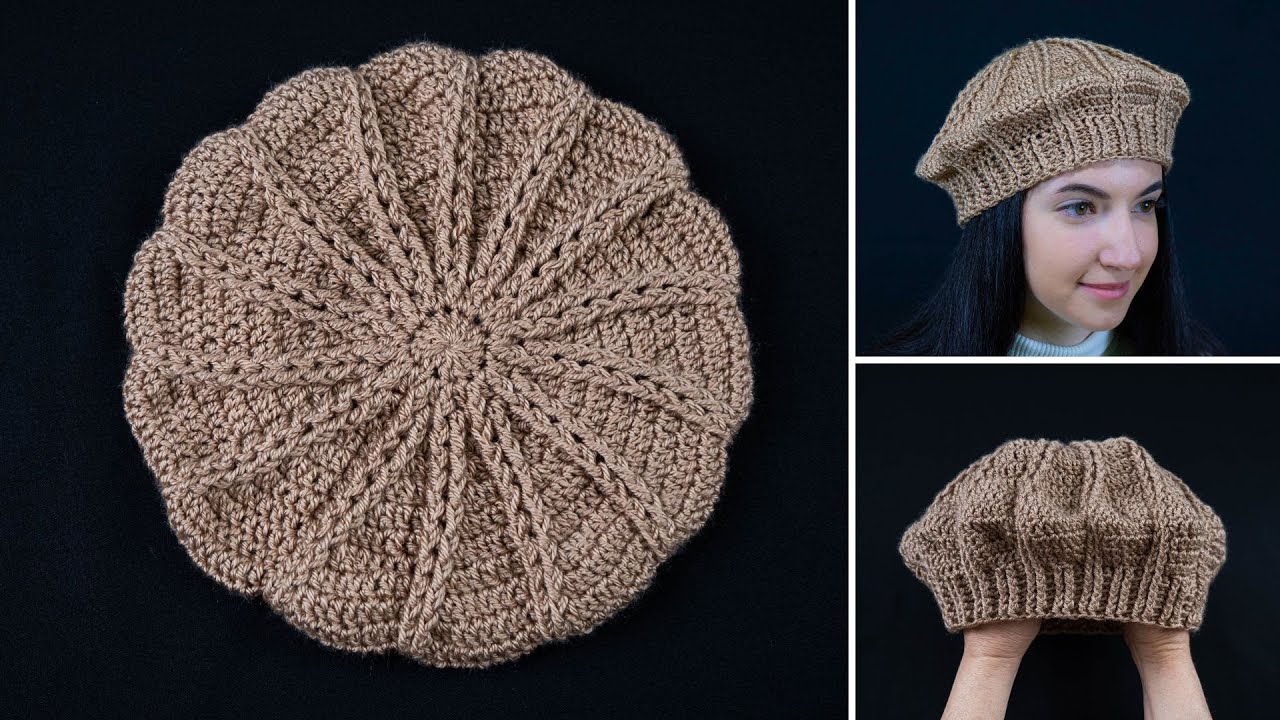
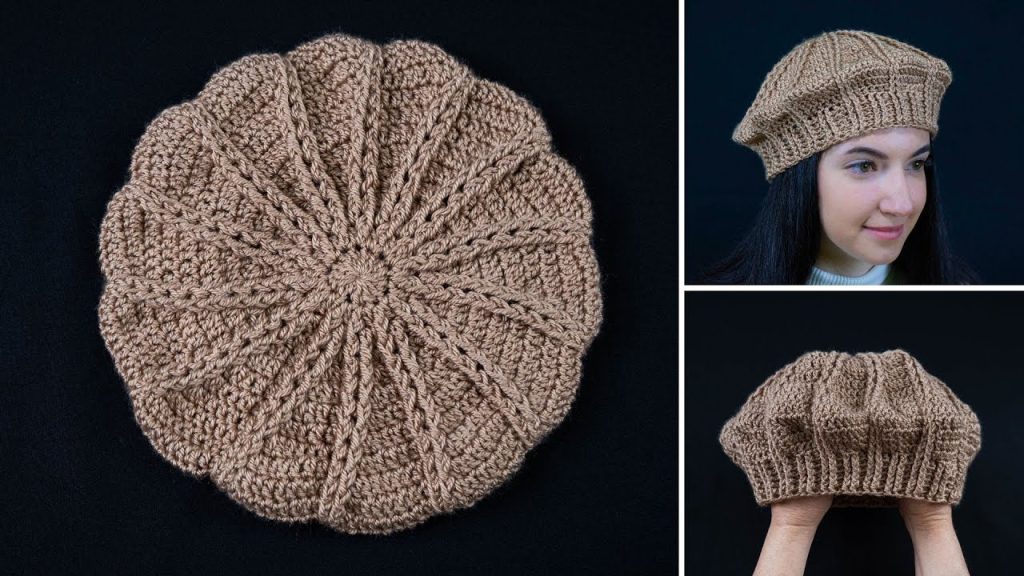
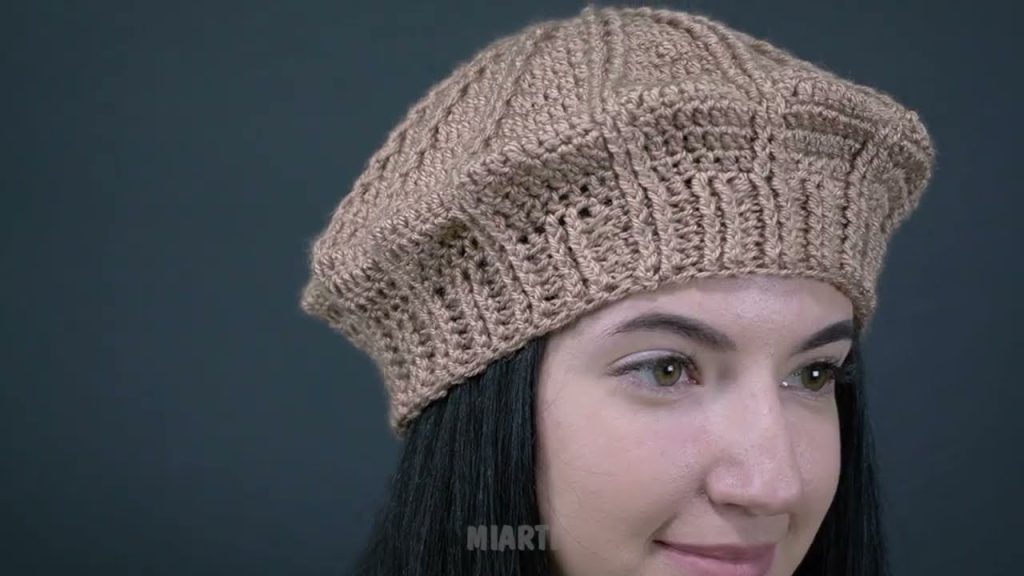
Hello, fiber artists and lovers of classic style! Are you ready to dive into a satisfying project that results in a chic, wearable accessory? I’m excited to share the pattern for the Ribbon Candy Beret—a beautiful hat that marries the elegance of the traditional French beret with a unique, subtle ribbing texture in the crown, finishing with a snug, comfortable band.
Inspired by simple crochet hat constructions, this pattern is perfect for crocheters looking to move past scarves and blankets. It uses basic stitches and the standard top-down beret shaping method (increasing to a large circle, working even, then decreasing into a band).
Grab your favorite wool or acrylic yarn and let’s start shaping this beautiful, textured headwear!
Why You’ll Love Crocheting This Beret:
- Classic Silhouette: Creates the perfect slouchy “pancake” shape characteristic of a true beret.
- Subtle Texture: Uses alternating Double Crochet (DC) and Back Loop Only (BLO) stitches for a gentle ripple effect in the body.
- Snug Fit: The headband utilizes Front Post/Back Post Double Crochet (FPDC/BPDC) for a stretchy, comfortable rib.
- Versatile: Easily adjustable for different yarn weights and sizes.
Materials & Notions
- Yarn: Approximately 200 yards (183 meters) of Worsted Weight (#4) yarn. Wool or acrylic blends recommended for softness and drape.
- Hook: Size H/8 (5.0 mm) crochet hook, or size needed to obtain gauge.
- Notions: Tapestry Needle (for weaving ends), Scissors, Stitch Marker (essential for working in the round).
- Sizing: Pattern is written for an average adult head (21-23 inches circumference).
Essential Crochet Abbreviations
| Abbreviation | Description |
| ch | chain |
| st(s) | stitch(es) |
| sl st | slip stitch |
| sc | single crochet |
| dc | double crochet |
| dc-blo | double crochet in back loop only |
| FPDC | front post double crochet |
| BPDC | back post double crochet |
| inc | increase (work 2 stitches into one stitch) |
| rep | repeat |
| sk | skip |
Gauge
To ensure the correct size and drape, check your gauge:
- After Round 4: Circle should measure approximately 4 inches (10 cm) in diameter.
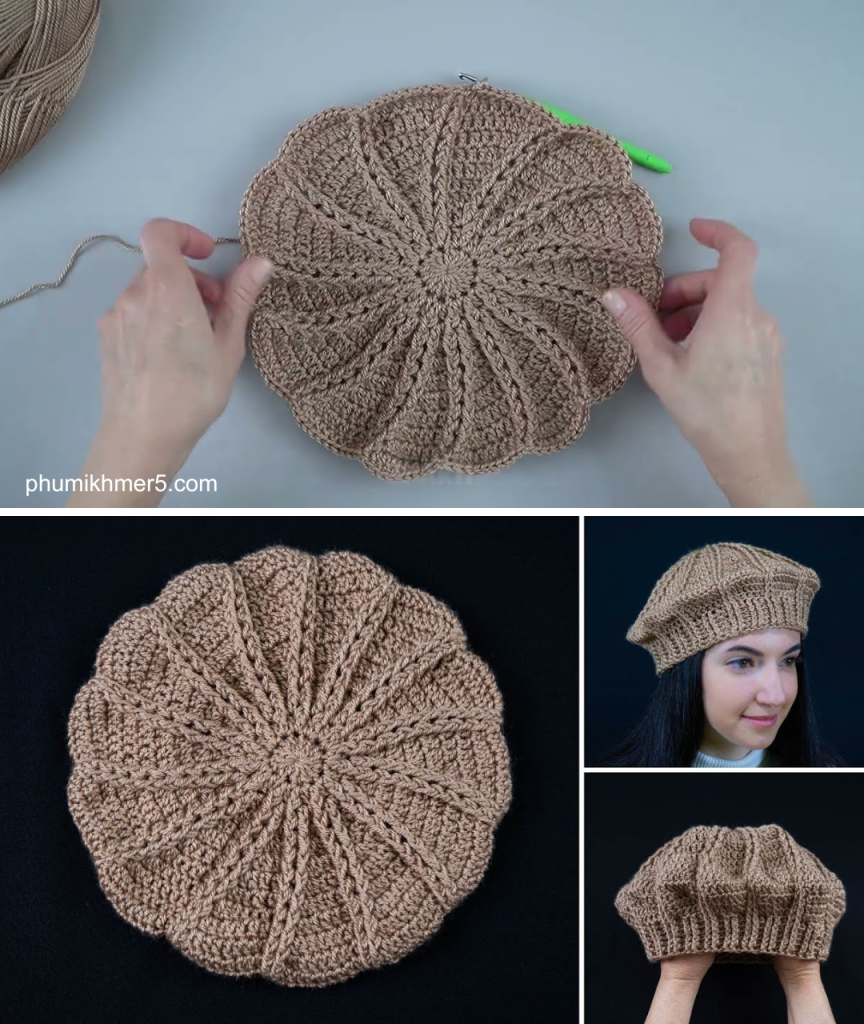
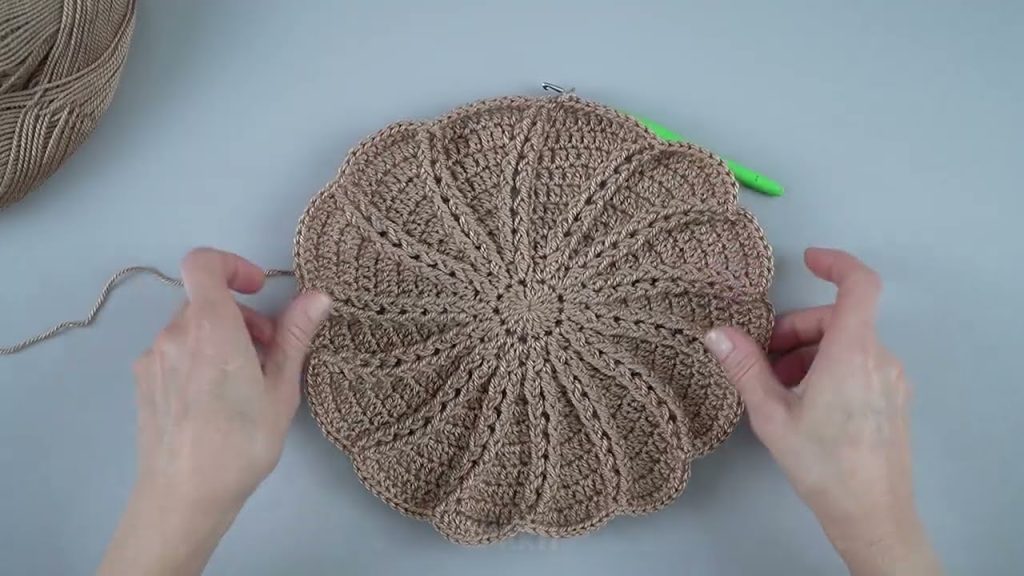
The Pattern: Ribbon Candy Beret
The beret is worked in joined rounds from the top down. Place a stitch marker in the first stitch of each round.
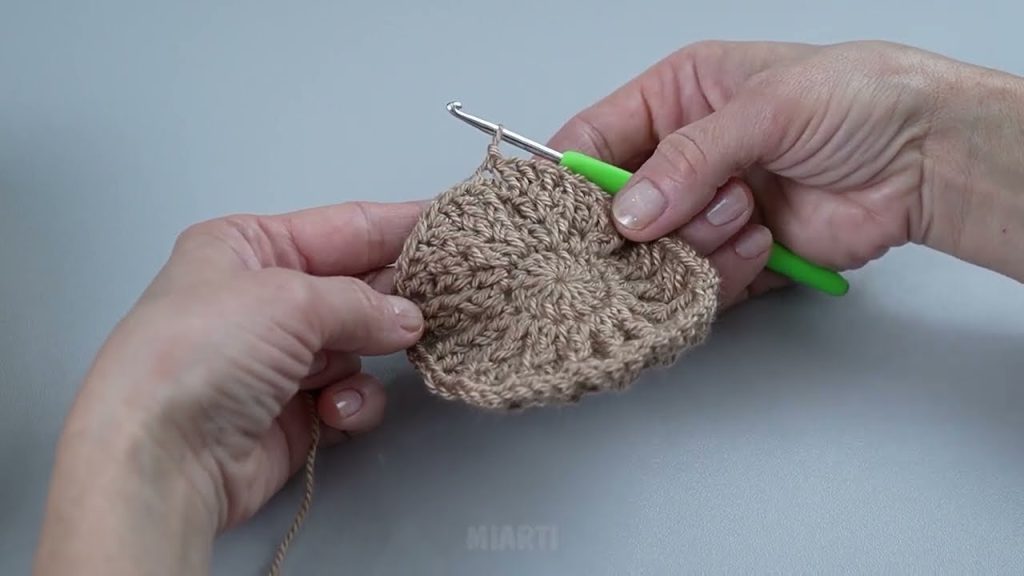
Part 1: The Crown (Increasing for Flat Circle)
Begin with a magic ring (or Ch 4, sl st to join).
R1: Ch 2 (counts as first dc here and throughout). Work 11 dc into the magic ring. Join with sl st to top of starting ch-2. (12 sts)
R2: Ch 2. Dc in the same st (inc). Work [inc] in every st around. Join with sl st. (24 sts)
R3: Ch 2. Dc in the next st. [Inc in the next st, dc in the next st] rep around. Join with sl st. (36 sts)
R4 (Texture Setup): Ch 2. Dc in the next st. [Dc-blo in the next st, dc in the next 2 sts] rep until the last st. Dc-blo in the last st. Join with sl st. (48 sts)
R5 (Increase Round): Ch 2. Dc in the next 2 sts. [Inc in the next st, dc in the next 3 sts] rep around. Join with sl st. (60 sts)
R6 (Texture Round): Ch 2. Dc-blo in the next st. Dc in the next 3 sts. [Dc-blo in the next st, dc in the next 3 sts] rep around. Join with sl st. (60 sts)
R7 (Increase Round): Ch 2. Dc in the next 3 sts. [Inc in the next st, dc in the next 4 sts] rep around. Join with sl st. (72 sts)
R8 (Texture Round): Ch 2. Dc in the next 2 sts. Dc-blo in the next st. [Dc in the next 3 sts, dc-blo in the next st] rep around. Join with sl st. (72 sts)
R9 (Increase Round): Ch 2. Dc in the next 4 sts. [Inc in the next st, dc in the next 5 sts] rep around. Join with sl st. (84 sts)
R10 (Texture Round): Ch 2. Dc-blo in the next st. Dc in the next 4 sts. [Dc-blo in the next st, dc in the next 4 sts] rep around. Join with sl st. (84 sts)
R11 (Increase Round): Ch 2. Dc in the next 5 sts. [Inc in the next st, dc in the next 6 sts] rep around. Join with sl st. (96 sts)
R12 (Texture Round): Ch 2. Dc in the next 2 sts. Dc-blo in the next 3 sts. [Dc in the next 3 sts, dc-blo in the next 3 sts] rep around. Join with sl st. (96 sts)
R13 (Increase Round): Ch 2. Dc in the next 6 sts. [Inc in the next st, dc in the next 7 sts] rep around. Join with sl st. (108 sts)
R14 (Texture Round): Ch 2. Dc-blo in the next st. Dc in the next 6 sts. [Dc-blo in the next st, dc in the next 6 sts] rep around. Join with sl st. (108 sts)
The diameter of your beret should now be approximately 10.5–11 inches.
Part 2: The Slouch (Straight Sides)
In this section, you work straight rounds to add height and create the classic slouch. Continue the texture pattern established in the crown.
R15 – R18 (Work Even): Ch 2. Work 1 dc in every st around, maintaining the established texture (using dc and dc-blo where they fall). Join with sl st. (108 sts)
Tip: If you want a deeper slouch, continue these even rounds for 1-3 more rows.
Part 3: The Headband (Decreasing and Ribbing)
The hat circumference must now decrease significantly to fit snugly around the head.
R19 (Decrease Round 1): Ch 1 (does not count as st). Sc in the same st. Sc in the next 3 sts. [Sk 1 st, sc in the next 4 sts] rep around. Join with sl st to first sc. (90 sts)
R20 (Decrease Round 2): Ch 1. Sc in the same st. Sc in the next st. [Sk 1 st, sc in the next 2 sts] rep around. Join with sl st to first sc. (68 sts)
R21 (Ribbing Setup): Ch 2 (counts as first dc). Dc in every st around. Join with sl st. (68 sts)
R22 (Ribbing Round 1): Ch 2. Work [FPDC around the next st, BPDC around the next st] rep around. Join with sl st. (68 sts)
R23 – R26 (Ribbing Rounds): Ch 2. Work [FPDC around the next FPDC, BPDC around the next BPDC] rep around. Join with sl st. (68 sts)
Tip: For a wider, more secure band, continue these ribbing rounds for 1-2 more rows.
Finishing
- Fasten Off: Cut your yarn, leaving a long tail.
- Weave Ends: Use your tapestry needle to securely weave in all ends, especially the tail at the crown and the final tail at the headband.
- Block: Gently wet or steam block your beret. This is crucial for crochet hats, as it helps even out the stitches, defines the slouch, and sets the shape of the ribbed band. Lay flat to dry, allowing the edges to dry without stretching.
Wear your Ribbon Candy Beret with pride—it’s the perfect blend of handmade texture and timeless style!
Video tutorial: