
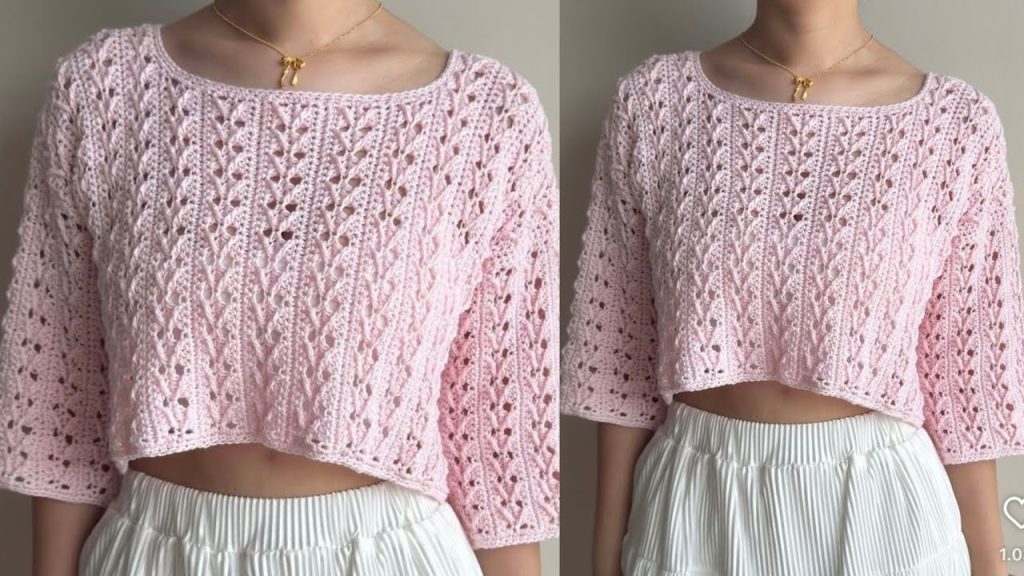
Inspired by the intricate and elegant stitch work demonstrated in the video IMPRESSIVE✨😍Crochet Blouse Pattern, this pattern utilizes a delicate shell-and-V-stitch combination to create a lightweight, draping fabric perfect for a stunning summer top or light sweater. This garment is constructed from two identical rectangular panels (front and back) that are seamed together, allowing the stitch pattern to be the star.

📋 Pattern Details & Materials
| Item | Detail | Notes |
| Project | Starburst Filigree Crochet Top | Sizes S (M, L, XL, 2XL) |
| Skill Level | Intermediate | Requires familiarity with V-stitches and shell stitches. |
| Yarn | Fingering Weight (Category 1) or Sport Weight (Category 2) Cotton/Bamboo blend. | Approximately 800 (950, 1100, 1250, 1400) meters. |
| Hook | 3.5 mm (US E-4) or size needed to obtain gauge. | A slightly larger hook than recommended for the yarn helps with drape. |
| Notions | Stitch markers, Tapestry needle, Scissors. |
Gauge (Measured in Starburst Filigree Stitch, blocked)
1 Starburst Repeat (3 DC and 1 V-Stitch block) and 4 rows = 1.5 inches (4 cm) wide by 1.5 inches (4 cm) tall.
📚 Abbreviations (US Crochet Terms)
| Abbreviation | Meaning |
| Ch | Chain |
| St(s) | Stitch(es) |
| SC | Single Crochet |
| DC | Double Crochet |
| Tr | Treble Crochet |
| Sk | Skip |
| Sp | Space |
| WS | Wrong Side |
| RS | Right Side |
| Sl St | Slip Stitch |
| Rep | Repeat |

✨ Special Stitches
| Stitch Name | Abbreviation | Instruction |
| V-Stitch | V-st | (DC, Ch 1, DC) into the designated stitch or space. |
| Starburst Filigree Shell | SFS | (2 DC, Ch 1, 2 DC) into the designated stitch or space. |
Stitch Multiple: Chain a multiple of 8 + 2.
Part 1: The Main Panel (Make Two: Front & Back)
The front and back panels are worked identically from the bottom up in flat rows.
| Size | Starting Chain (Multiple of 8 + 2) | Approximate Width (Inches) |
| S | Ch 122 | 22.5″ |
| M | Ch 138 | 25.5″ |
| L | Ch 154 | 28.5″ |
| XL | Ch 170 | 31.5″ |
| 2XL | Ch 186 | 34.5″ |
Foundation Row (WS): SC in the 2nd Ch from hook and in each Ch across. Ch 3 (counts as first DC), turn.
Row 1 (RS – Mesh Row): DC in the next St, *Ch 1, Sk 1, DC in the next St; rep from * across, ending with DC in the last St. Ch 3, turn.
Row 2 (WS – Solid Row): DC in each Ch-1 Sp and in each DC across. Ch 1, turn.
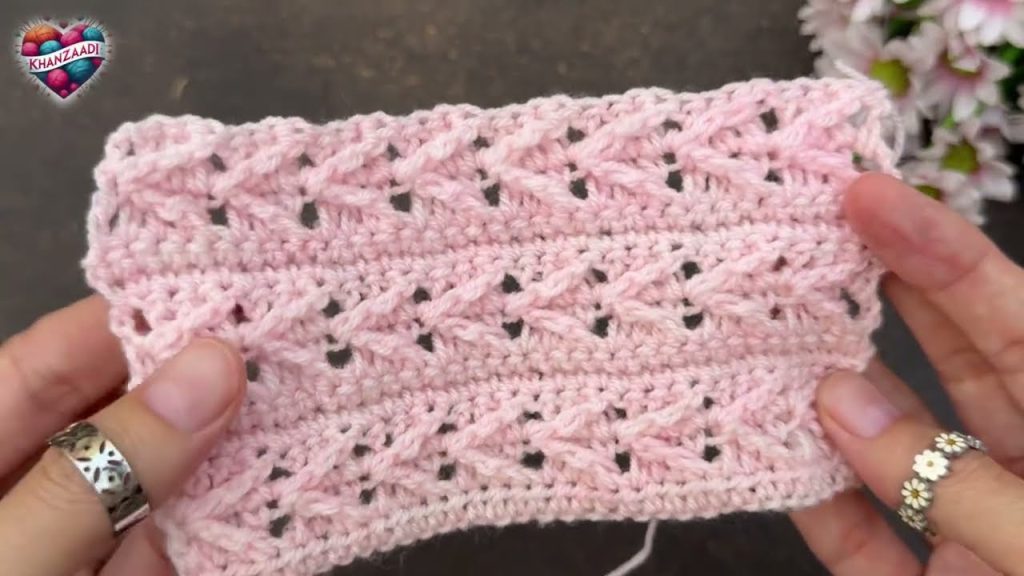
The Starburst Filigree Repeat
This repeat is worked over four rows to create the stunning texture.
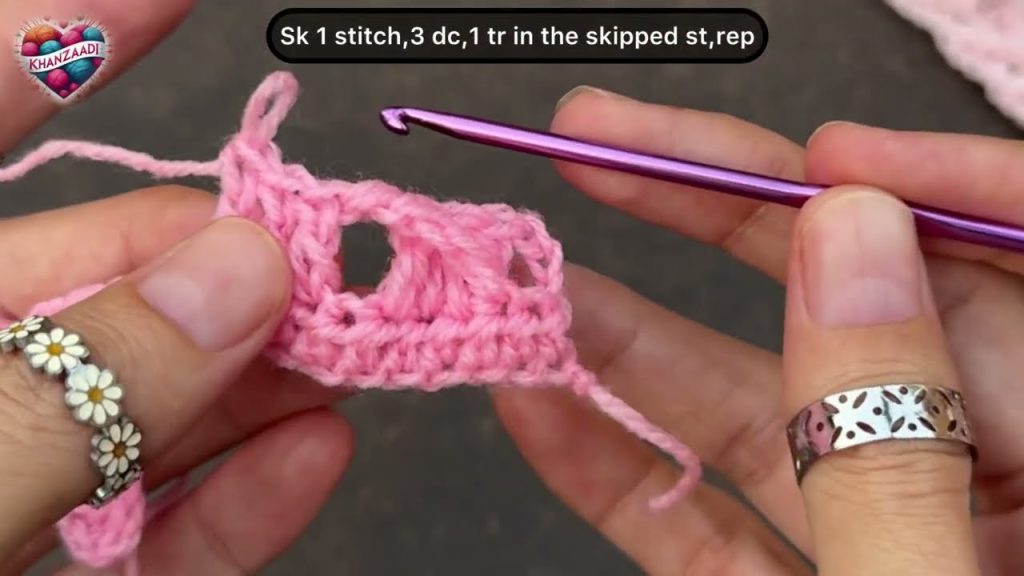
Row 3 (RS – V-Stitch Placement):
- SC in the first St.
- Ch 3, Sk 3 Sts.
- Work V-st in the next St.
- *Ch 3, Sk 3 Sts, SC in the next St, Ch 3, Sk 3 Sts, V-st in the next St; rep from * across, ending with SC in the last St. Ch 3, turn.
Row 4 (WS – Shell Row):
- DC in the first St.
- *Work SFS in the Ch-1 Sp of the V-st, DC in the SC St; rep from * across, ending with SFS in the last V-st Ch-1 Sp, DC in the last SC St. Ch 3, turn.
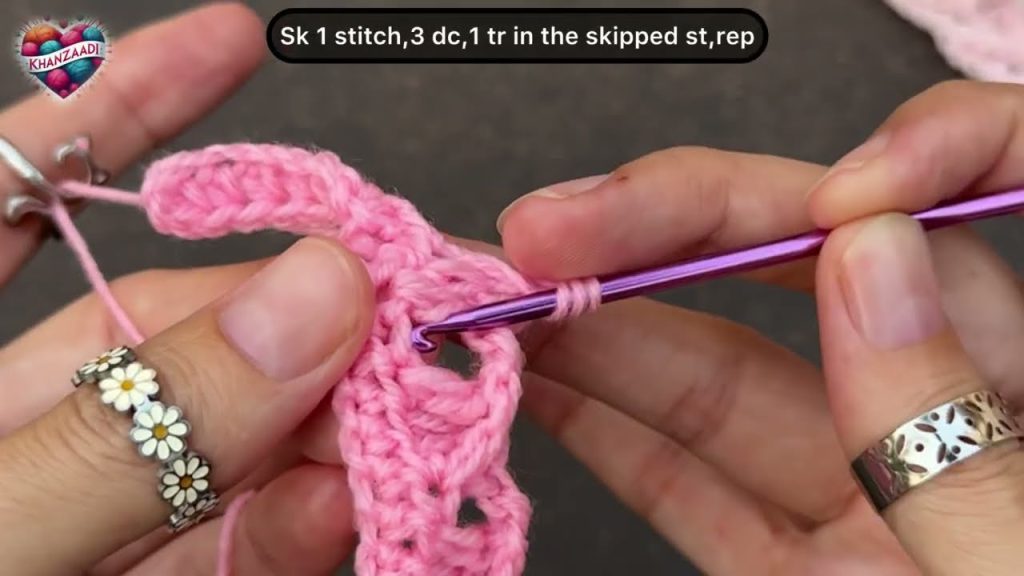
Row 5 (RS – Post Row):
- DC in the next 3 Sts.
- *Ch 3, SC in the Ch-1 Sp of the SFS, Ch 3, DC in the next 4 Sts (the last DC of the shell, the DC in the SC, and the first 2 DCs of the next shell); rep from * across, ending with DC in the last 4 Sts. Ch 3, turn.
Row 6 (WS – Solid Row):
- DC in each DC, DC in each Ch-3 Sp, and DC in each SC across. Ch 1, turn.
Repeat Rows 3–6 until the panel measures approximately 19 (20, 21, 22, 23) inches from the foundation chain, or until the desired length before the neck/shoulder shaping.
Do not fasten off the second panel.
Part 2: Neck and Shoulder Shaping
This top uses a simple drop-shoulder construction, eliminating complex shaping.
Shoulder Seaming
- Place the RS of the Front Panel facing the RS of the Back Panel.
- Using the working yarn from the top corner of the Back Panel, Sl St across the top edge for the first 4.5 (5.5, 6.5, 7.5, 8.5) inches. This forms the shoulder seam.
- Fasten off and weave in the end.
- Rejoin yarn at the outer edge of the opposite side of the top opening.
- Sl St across the top edge for the same length: 4.5 (5.5, 6.5, 7.5, 8.5) inches.
- The unseamed center portion forms the neck opening.
Side Seaming
- Lay the garment flat, ensuring the seams are aligned.
- Starting from the bottom corner, Sl St or SC seam the side edges together for approximately 10 (11, 12, 13, 14) inches up, leaving an armhole opening of 9 (9.5, 10, 10.5, 11) inches unseamed at the top.
- Repeat the side seam on the opposite side.
Part 3: Finishing and Edging
Neckline Edging
- Rejoin yarn at the center back of the neck opening.
- Round 1: SC evenly around the entire neckline opening. Join with Sl St to the first SC.
- Round 2: (Optional) Work one round of crab stitch (reverse single crochet) for a clean, sturdy edge, or simply SC in each St around. Fasten off.
Sleeve Edging and Armhole
- Rejoin yarn at the underarm seam of one armhole.
- Round 1: SC evenly around the entire armhole opening (aim for 68-80 SC, depending on size). Join with Sl St to the first SC.
- Round 2: Ch 2 (does not count as St), DC in each St around. Join with Sl St.
- Round 3: (Optional Cuff) Work in SC, BLO (back loop only) for 3-5 rounds for a ribbed cuff, or simply SC in each St around. Fasten off.
Bottom Hem
- Rejoin yarn at the side seam on the bottom hem.
- Round 1: SC evenly around the entire bottom edge. Join with Sl St.
- Round 2: Ch 2 (does not count as St), DC in each St around. Join with Sl St.
- Round 3: Work in SC, BLO for 5-7 rounds for a comfortable ribbed hem. Fasten off.
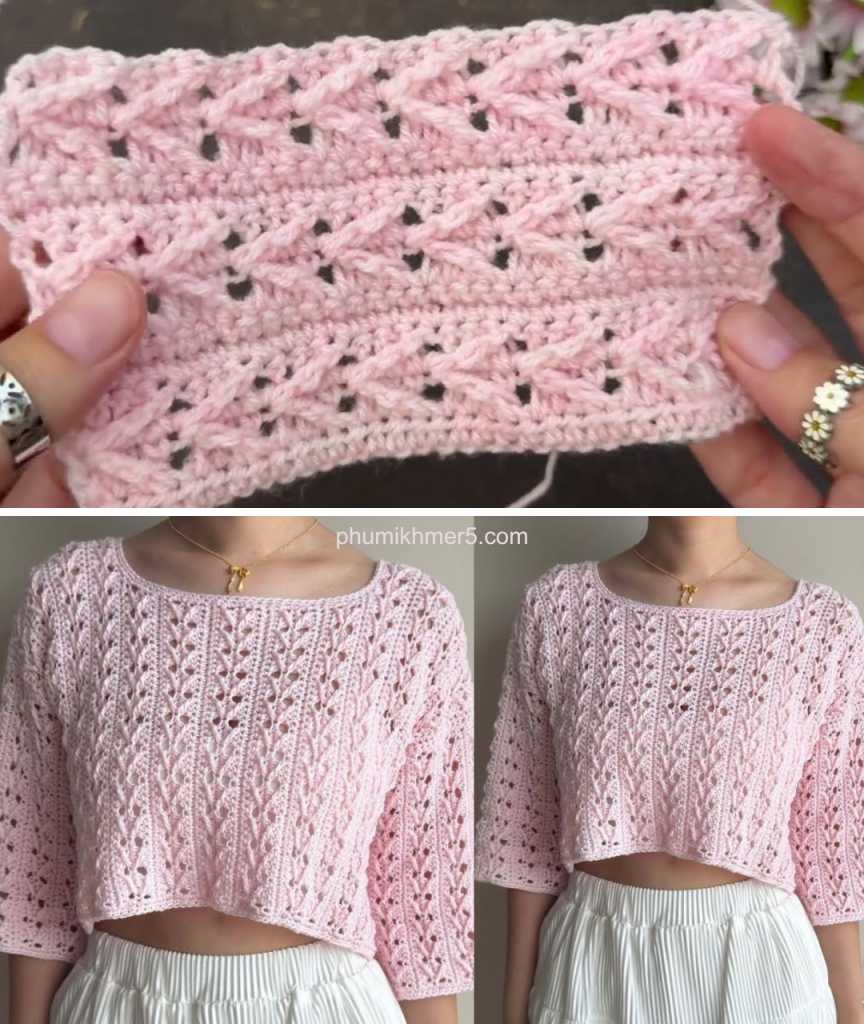
Finishing: Block your top gently to open up the beautiful filigree stitch pattern and ensure an elegant drape. Weave in all remaining ends securely.
Video tutorial:


