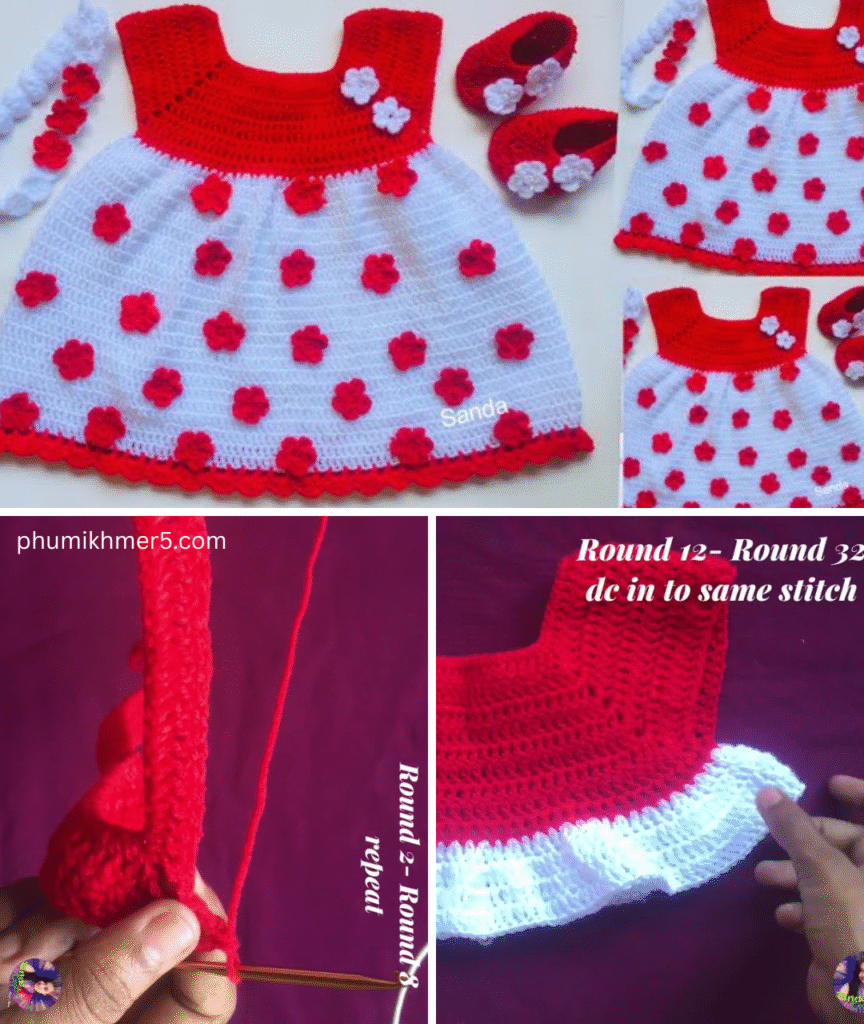
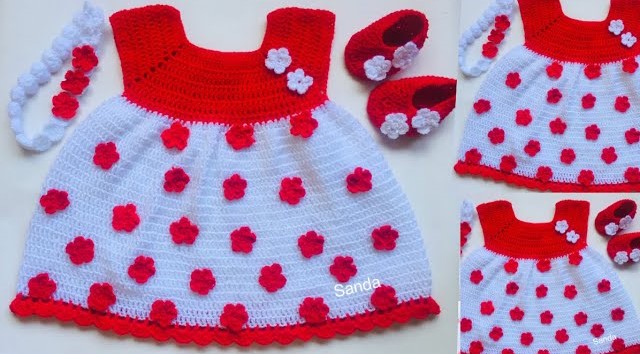
Crocheting a dress for a little one is a truly rewarding experience. Not only do you get to create something beautiful and unique, but it’s also a gift made with love that will be cherished. This pattern is designed to be relatively easy, perfect for those with a basic understanding of crochet stitches, and uses simple shaping to create a lovely garment for a 1-2 year old baby girl.

Skill Level: Easy to Intermediate
Estimated Time: 8-12 hours (depending on your speed and experience)
Finished Chest Measurement (approximate): 19-20 inches (48-51 cm) Finished Length (approximate): 15-16 inches (38-41 cm)
Materials You’ll Need:
- Yarn: Approximately 300-400 yards (275-365 meters) of DK (Double Knitting) weight yarn (also known as Light Worsted or #3 weight). Cotton or a cotton blend is highly recommended for baby garments as it’s soft, breathable, and easy to wash.
- Suggestion: Choose a primary color for the main body of the dress and a contrasting color for the trim or yoke if you like.
- Crochet Hook: 4.0 mm (G/6 US) or size needed to obtain gauge.
- Stitch Markers: A few, to mark the beginning of rounds or important stitches.
- Yarn Needle: For weaving in ends.
- Scissors
- Buttons: 2-3 small buttons (about 0.5 inches / 1.25 cm) for the back closure.
Abbreviations (US Crochet Terms):
- ch: chain
- sl st: slip stitch
- sc: single crochet
- hdc: half double crochet
- dc: double crochet
- st(s): stitch(es)
- sp: space
- BLO: back loop only
- sk: skip
- FO: fasten off
Gauge:
- 18 dc and 10 rows = 4 inches (10 cm)
- Important: Take time to check your gauge. If your swatch is smaller than 4 inches, use a larger hook. If it’s larger, use a smaller hook. Achieving the correct gauge is crucial for the dress to fit as intended.
Pattern Notes:
- The dress is worked from the top down, starting with the yoke, then separating for the armholes, and finally working the skirt.
- Ch 2 at the beginning of a row/round counts as a hdc.
- Ch 3 at the beginning of a row/round counts as a dc.
- Join rounds with a sl st to the top of the beginning ch.
- This pattern is written for a 1-2 year old, but you can adjust the length of the skirt by adding or subtracting rows.
Instructions:
Let’s begin crocheting this adorable dress!
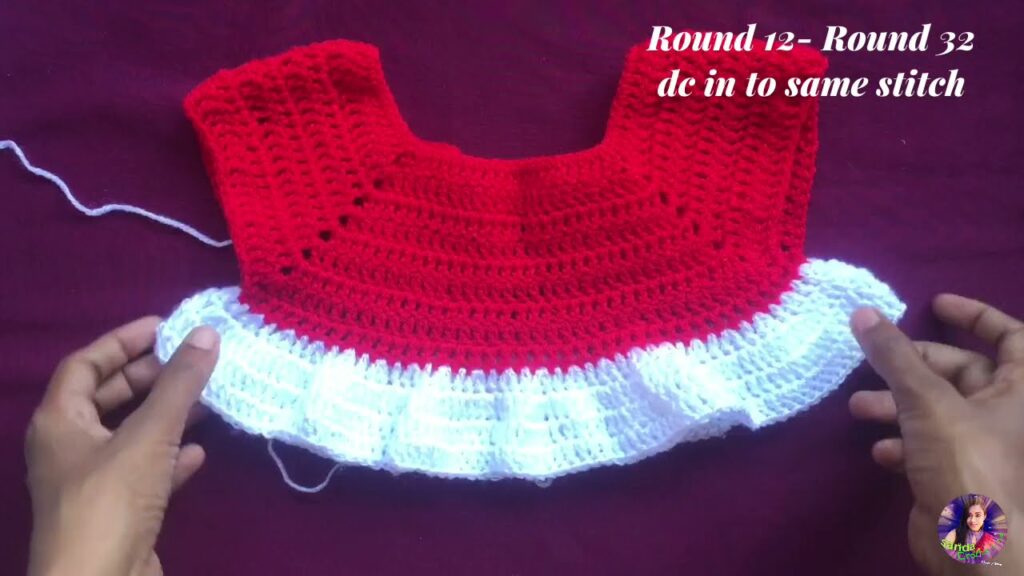
Part 1: The Yoke (Top of the Dress)
The yoke is worked back and forth in rows to create an opening at the back for easy dressing.
Row 1: Ch 62. Hdc in the 3rd ch from hook (counts as 1st hdc), hdc in each ch across. (60 hdc) Turn.
Row 2: Ch 2 (counts as 1st hdc), hdc in each st across. (60 hdc) Turn.
Row 3 (Increase Row): Ch 2, 2 hdc in the first st, hdc in next 2 sts, 2 hdc in next st repeat from * to * across to the last 2 sts, hdc in last 2 sts. (80 hdc) Turn.
- Note: The increases are evenly distributed to start forming the shoulder and chest area.
Row 4: Ch 2, hdc in each st across. (80 hdc) Turn.
Row 5 (Increase Row): Ch 2, 2 hdc in the first st, hdc in next 3 sts, 2 hdc in next st repeat from * to * across to the last 3 sts, hdc in last 3 sts. (100 hdc) Turn.
Row 6: Ch 2, hdc in each st across. (100 hdc) Turn.
Row 7 (Increase Row): Ch 2, 2 hdc in the first st, hdc in next 4 sts, 2 hdc in next st repeat from * to * across to the last 4 sts, hdc in last 4 sts. (120 hdc) Turn.
Row 8: Ch 2, hdc in each st across. (120 hdc) Turn.
Row 9 (Armhole Separation):
- Ch 2, hdc in the next 17 sts (Front Right).
- Ch 4 (this will be the underarm chain).
- Sk 25 sts (this is the first armhole).
- Hdc in the next 35 sts (Back).
- Ch 4 (this will be the underarm chain).
- Sk 25 sts (this is the second armhole).
- Hdc in the next 18 sts (Front Left). (74 hdc + 8 ch = 82 total stitches for the body circumference)
- Do NOT turn. We will now join and work in the round.
Part 2: Joining and First Round of Body
- Join with a sl st to the top of the beginning ch-2 of Row 9. This closes the yoke into a circle.
- From this point forward, the dress will be worked in continuous rounds.
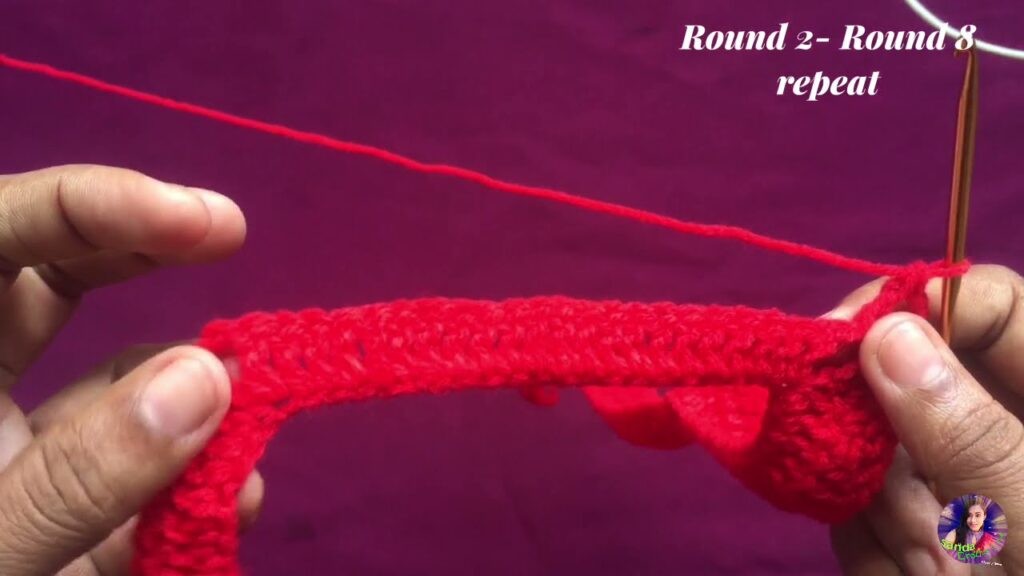
Round 1 (Body): Ch 3 (counts as 1st dc), dc in each hdc and each ch of the underarm chains around. Join with a sl st to the top of the beginning ch-3. (82 dc)
Part 3: The Skirt
Now we’ll work on the skirt, adding some increases to give it a lovely flare.
Round 2: Ch 3, dc in next 2 sts, 2 dc in next st. Dc in next 3 sts, 2 dc in next st repeat from * to * around. Join with a sl st to the top of the beginning ch-3. (102 dc)
Round 3-5: Ch 3, dc in each st around. Join with a sl st to the top of the beginning ch-3. (102 dc)
Round 6 (Increase Round): Ch 3, dc in next 3 sts, 2 dc in next st. Dc in next 4 sts, 2 dc in next st repeat from * to * around. Join with a sl st to the top of the beginning ch-3. (122 dc)
Round 7-9: Ch 3, dc in each st around. Join with a sl st to the top of the beginning ch-3. (122 dc)
Round 10 (Increase Round): Ch 3, dc in next 4 sts, 2 dc in next st. Dc in next 5 sts, 2 dc in next st repeat from * to * around. Join with a sl st to the top of the beginning ch-3. (142 dc)
Round 11-20 (or until desired length): Ch 3, dc in each st around. Join with a sl st to the top of the beginning ch-3. (142 dc)
- Tip: Hold the dress up to your little one (or a similarly sized garment) to determine the ideal length. If you want a longer dress, simply add more rounds of dc.
Last Round of Skirt: Ch 1, sc in each st around. Join with a sl st to the first sc. FO.
Part 4: Finishing Touches
- Back Opening Edging:
- With the right side facing, join your yarn (you can use your main color or contrasting color here) with a sl st to the bottom corner of the back opening.
- Work sc evenly up the first side of the opening, across the top of the yoke, and down the second side of the opening. Aim for about 2 sc per hdc row along the vertical edges.
- At the top of the yoke, you can work a sc in each st across the top.
- At the end, FO.
- Button Loops (Optional, but recommended for a neat finish):
- Along one side of the back opening (choose the side you want the buttons to go on), make 2-3 button loops.
- Method 1 (Chain Loops): Attach yarn at the top edge. Ch 3-4 (adjust chain length to fit your buttons), sl st into the same stitch or next stitch to form a loop. Repeat for other button placements.
- Method 2 (Picot Loops): Sc evenly along the edge. At the desired button placement, (sl st, ch 3, sl st) in the same stitch to create a picot loop.
- Space your button loops evenly. The top loop should be near the top edge, and the others spaced down the opening.
- Attach Buttons: Sew your buttons onto the opposite side of the back opening, lining them up with the button loops.
- Sleeve Edging (Optional):
- Join yarn at the underarm of one armhole.
- Ch 1, sc evenly around the armhole opening. Join with a sl st to the first sc. FO.
- Repeat for the second armhole.
- Variation: For a slightly fancier sleeve, you could do a round of hdc or even a simple shell stitch (e.g., sk 1 st, 5 dc in next st, sk 1 st, sc in next st) around the armhole.
- Weave in all ends: Use your yarn needle to neatly weave in any loose yarn ends. This makes your finished product look professional and prevents it from unraveling.
Caring for Your Crochet Dress:
- Always refer to your yarn label for specific care instructions.
- Generally, cotton and cotton blend garments can be machine washed on a gentle cycle with cold water.
- Lay flat to dry to maintain shape and prevent stretching.
- Do not bleach or iron.
Congratulations! You’ve just crocheted a beautiful and comfortable baby dress. This timeless piece will be perfect for everyday wear or a special occasion. Enjoy watching your little one twirl in her handmade creation!
Video tutorial:


