
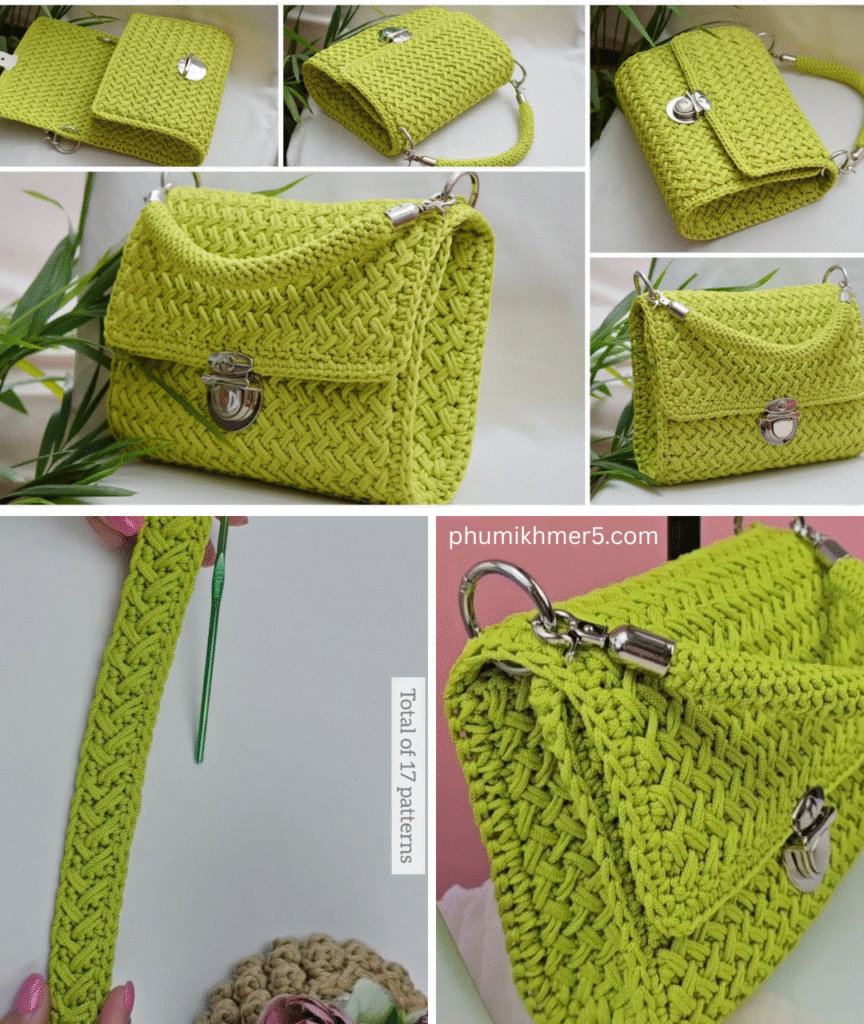
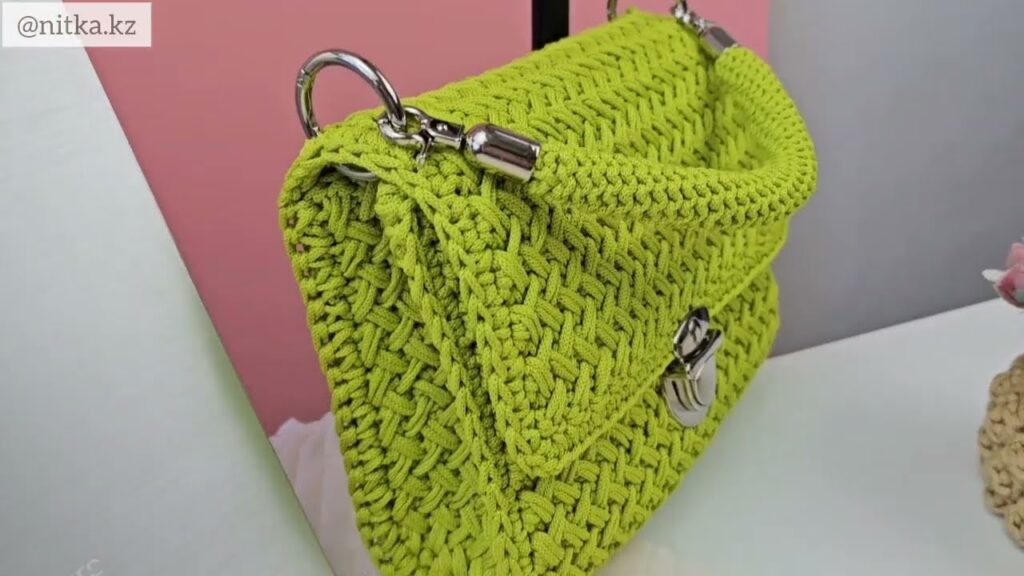
The Herringbone Half Double Crochet (HHDC) stitch is a true star, transforming simple yarn into a fabric that boasts incredible texture, density, and a sophisticated, almost woven appearance. It’s the perfect stitch to create a crossbody bag with clear, defined shapes, avoiding the floppy, shapeless look some crochet bags can have.
This detailed article will guide you through crocheting a structured crossbody bag, emphasizing how to leverage the HHDC stitch to achieve crisp lines and a polished finish. Get ready to create a stunning accessory that’s both stylish and functional!
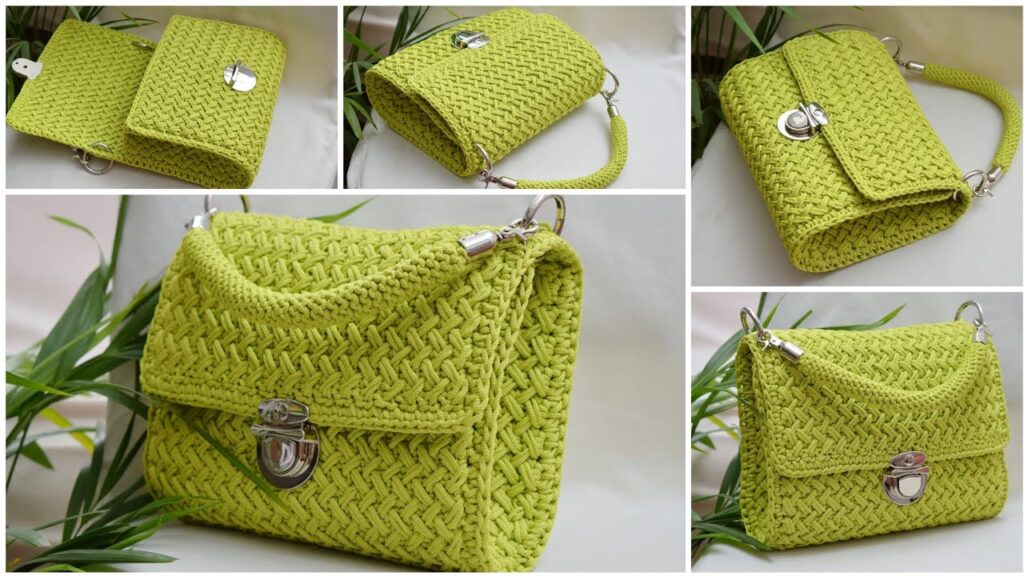
Why the Herringbone Stitch is Ideal for Structured Bags
- Exceptional Stitch Definition: The V-shaped texture of the HHDC creates a fabric that beautifully highlights crisp lines and geometric forms.
- Minimal Stretch & Great Structure: Unlike traditional stitches, the HHDC is dense and has less give, which means your bag will hold its shape much better and won’t sag with use.
- Durability: The interlocking nature of the stitch makes for an incredibly strong and long-lasting fabric, essential for an everyday bag.
- Luxurious Look: It mimics woven or knitted fabric, giving your crochet bag a high-end, artisan feel that stands out.
1. Planning Your Structured Crossbody Bag: Vision & Versatility
Before picking up your hook, a little forethought will ensure your bag meets your expectations.
- Size: This pattern will guide you toward a medium-sized crossbody bag, ideal for essentials like your phone, wallet, keys, and a few small items. We’re aiming for dimensions around 8-10 inches wide, 7-9 inches tall, and 2-3 inches deep.
- To adjust size: You’ll primarily modify your starting chain length for the width, the number of rounds for the depth of the base, and the number of vertical rounds for the height. Keep your initial chain in an odd number for symmetrical HHDC side panels.
- Yarn Choice (Crucial for Structure!):
- Fiber: 100% cotton yarn is your best friend here. It offers excellent stitch definition, minimal stretch, and is very durable. Mercerized cotton can add a slight sheen and extra crispness. You could also experiment with sturdy cotton blends or even lightweight macrame cord for an extra rigid bag.
- Weight: Worsted Weight (#4) or Aran/Heavy Worsted (#4.5/5) yarn is highly recommended. A thicker yarn will naturally create a more rigid and quickly-made bag.
- Quantity: Approximately 300-500 yards (275-450 meters) for a medium crossbody bag, depending on your hook size and tension. Always buy a bit extra!
- Color: Solid colors are perfect for showcasing the unique HHDC texture. Neutrals like black, navy, charcoal, or earthy tones offer timeless appeal.
- Closure: Consider adding a magnetic snap, a zipper, or a button-and-loop closure for security. This tutorial will focus on the crocheted body; closure is an add-on.
- Strap: You’ll crochet a sturdy, adjustable strap for comfort.
2. Materials You’ll Need
- Yarn: Approximately 300-500 yards of Worsted Weight (#4) or Aran Weight cotton yarn.
- Crochet Hook: 4.5 mm (G-7 US) or 5.0 mm (H-8 US). (Choose the smaller hook for your yarn weight that still allows you to work comfortably. A tighter stitch creates better structure.)
- Scissors: For cutting yarn.
- Yarn Needle (Tapestry Needle): A large, blunt-tipped needle for weaving in ends and attaching the strap.
- Stitch Markers (Highly Recommended!): At least 2, to mark the beginning of rounds or corners.
- Measuring Tape: Essential for checking gauge and bag dimensions.
- Optional:
- Magnetic snap, zipper, or button.
- Fabric lining and sewing supplies (for a professional finish and added durability, though HHDC can often stand alone).
3. Essential Crochet Stitches & Techniques (Review & Practice)
Ensure you’re confident with these:
- Slip Knot
- Chain (ch)
- Slip Stitch (sl st): For joining rounds.
Mastering the Herringbone Half Double Crochet (HHDC):
This is the star stitch! Practice it until it feels natural.
- How to make HHDC:
- YO (Yarn Over).
- Insert hook into the indicated stitch.
- YO, pull up a loop AND immediately pull that loop through the first loop on your hook. (You should now have 2 loops on your hook. This immediate pull-through is what creates the “herringbone” slant.)
- YO, pull through both remaining loops on your hook.
- Tip: The HHDC works best when worked in joined rounds. Using a standing HHDC (starting with a Ch 2 and working into the same stitch, then joining at the end of the round) creates a neater seam than continuous spirals for this stitch.
4. Gauge Swatch: The Foundation of Firm Structure
A dense and consistent gauge is paramount for a structured bag. Your goal is a fabric that feels firm, not flimsy.
- Chain 17.
- Row 1: HHDC in the 3rd ch from hook, HHDC in each ch across. (15 HHDC)
- Row 2: Ch 2 (counts as first HHDC), turn. HHDC in the next HHDC and in each HHDC across. Ensure your last HHDC goes into the top of the beginning Ch 2 from the previous row. (15 HHDC)
- Repeat Row 2 until your swatch measures about 4 inches (10 cm) tall.
- Measure: Lay your swatch flat. Count how many HHDC stitches you have in 4 inches (10 cm) horizontally, and how many rows you have in 4 inches (10 cm) vertically.
- Target Gauge (approximate for a firm fabric): Approximately 15-17 HHDC stitches in 4 inches (10 cm) and 12-15 rows in 4 inches (10 cm).
- Adjust:
- If you have more stitches/rows, your tension is too tight; go up a hook size.
- If you have fewer stitches/rows, your tension is too loose; go down a hook size.
- Remake your swatch until you achieve a dense, firm fabric. If it feels floppy, try a smaller hook.
5. Let’s Crochet Your Herringbone Crossbody Bag! (Step-by-Step)
We’ll start with a rectangular base, then build the sides upwards, creating clear corners.
Part 1: The Rectangular Base
This forms the sturdy bottom of your bag. We’ll work in joined rounds to create a seamless look on the side.
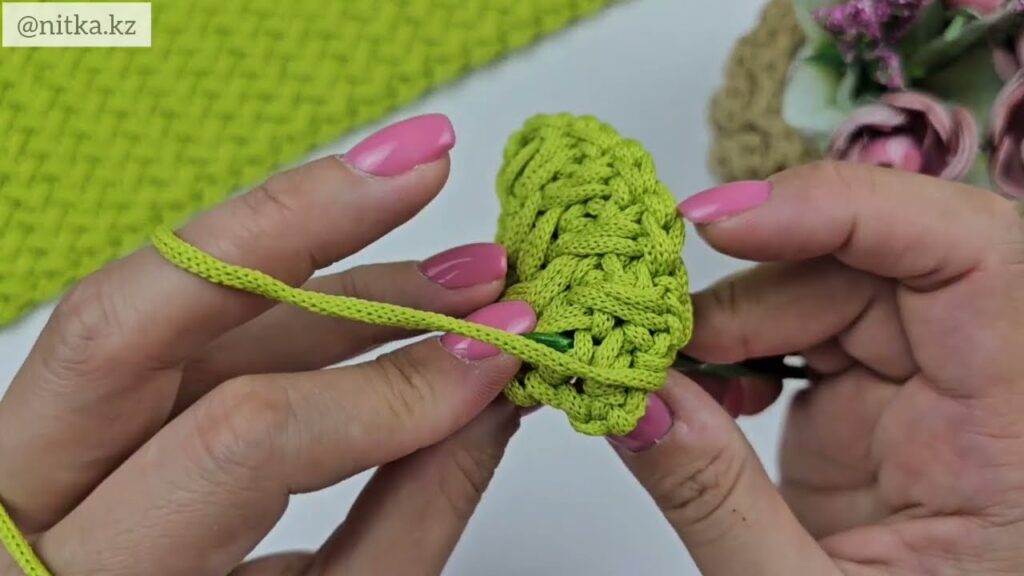
- Foundation Chain: Make a slip knot. Ch 27.
- This chain length (an odd number) will give you a bag approximately 8-9 inches (20-23 cm) wide after the base is complete. Adjust as desired.
- Rnd 1 (Working around the chain):
- HHDC in the 3rd ch from hook.
- HHDC in the next 24 chs.
- 3 HHDC in the last ch. (This turns the corner).
- Now, work along the other side of the foundation chain: HHDC in the next 24 chs (working into the unworked loop of each chain).
- 2 HHDC in the very first ch (the same one where you worked your initial HHDC).
- Join with a sl st to the top of the first HHDC.
- [54 HHDC] (25 HHDC on each long side, 2 HHDC on each end).
- Rnd 2 (Adding Depth): Ch 2 (counts as 1st HHDC).
- Work 2 HHDC in the same st (the first st of the round).
- HHDC in the next 24 sts.
- (2 HHDC in next st) 3 times. (Increases at the corner).
- HHDC in the next 24 sts.
- (2 HHDC in next st) 2 times. (Increases at the last corner).
- Join with a sl st to the top of the first HHDC.
- [60 HHDC]
- Your base should now be a neat, sturdy rectangle. It should be approximately 9 inches wide and 2.5 inches deep.
Part 2: Building the Bag Body (Vertical Sides)
This section creates the height of your bag and defines its upright shape.
- Rnd 3 (First Vertical Wall): Ch 2 (counts as 1st HHDC).
- Crucial for Shape! Work this entire round in HHDC in the back loop only (BLO) of each stitch around. This creates a sharp, defined edge separating the base from the sides, making your bag stand up crisply.
- HHDC in BLO of each of the 60 sts around. Join with a sl st to the top of the first HHDC.
- [60 HHDC]
- Rnd 4 onwards (Main Body): Ch 2 (counts as 1st HHDC).
- Work HHDC in each HHDC around, inserting your hook under both loops as normal.
- Join with a sl st to the top of the first HHDC.
- [60 HHDC]
- Make sure your stitches continue to slant in the same direction for a consistent herringbone pattern.
- Repeat Rnd 4: Continue repeating Rnd 4 until your bag reaches your desired height.
- For a medium crossbody, this might be 12-16 rounds total from the base (including Rnd 3). This will give you a height of 7-9 inches (18-23 cm).
- Regularly check your height against your needs. The HHDC grows relatively quickly!
Part 3: The Top Edge (Optional but Recommended)
A simple, sturdy edge helps maintain the bag’s opening.
- Last Round: Ch 1 (does NOT count as a st). Sc in each HHDC around. Join with a sl st to the first sc.
- [60 sc]
- Fasten Off, leaving a 6-inch (15 cm) tail.
6. Attaching the Strap & Finishing Touches
This brings your beautiful crossbody bag to life!
- Weave in All Ends: Use your yarn needle to neatly weave in all loose yarn tails. For a bag, make sure they are incredibly secure and won’t come undone with use.
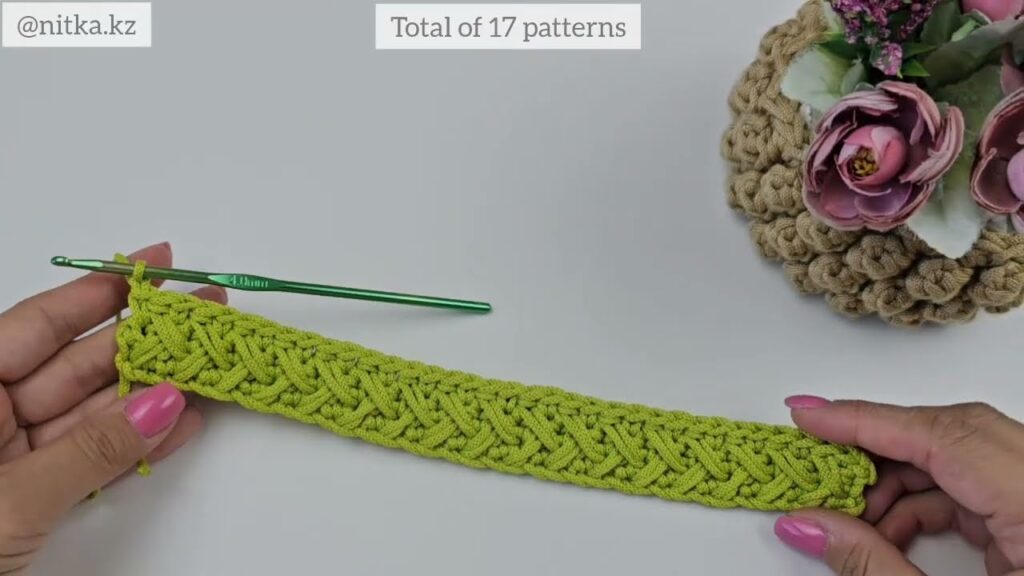
- Crocheted Crossbody Strap:
- Make a Strap: Ch 7 (for strap width).
- Row 1: HHDC in the 3rd ch from hook, HHDC in each ch across. (5 HHDC)
- Rows 2 onwards: Ch 2 (counts as 1st HHDC), turn. HHDC in each HHDC across. (5 HHDC)
- Repeat Row 2 until your strap reaches the desired length for a crossbody fit. This will vary depending on your height and preference, but often around 40-50 inches (100-127 cm).
- Fasten off, leaving a long tail (about 12 inches / 30 cm) at each end for sewing.
- Attaching the Strap: Lay your bag flat. Align the strap ends to the top corners of the bag’s side panels (where the width is). Using your yarn needle, carefully and securely sew each end of the strap to the bag. Go through both the strap and the bag fabric multiple times for extra reinforcement.
- For a truly seamless look, you could sew the strap to the inside top edge of the bag.
- Optional: Add a Closure:
- Magnetic Snap: Sew a magnetic snap closure to the inside top edges of the bag, centering it.
- Zipper: For the most secure closure, you would need to hand-sew a zipper into the top opening (often easier if you add a fabric lining).
7. Care for Your Crocheted Crossbody Bag
Always refer to your yarn label for specific care instructions. For most cotton yarns:
- Hand Wash Recommended: Gently hand wash in cool water with a mild detergent.
- Drying: Reshape the bag and lay flat to air dry. Do not hang when wet, as the weight of the water can cause stretching and distortion of the bag’s shape.
- Avoid Bleach: Do not use bleach.
Congratulations! You’ve successfully crocheted a beautiful, structured crossbody bag featuring the elegant Herringbone Half Double Crochet stitch. This handmade accessory is not just a practical item but a testament to your growing crochet skills, showcasing a refined texture and clear, defined shapes. Enjoy carrying your unique creation!
Video tutorial:


