
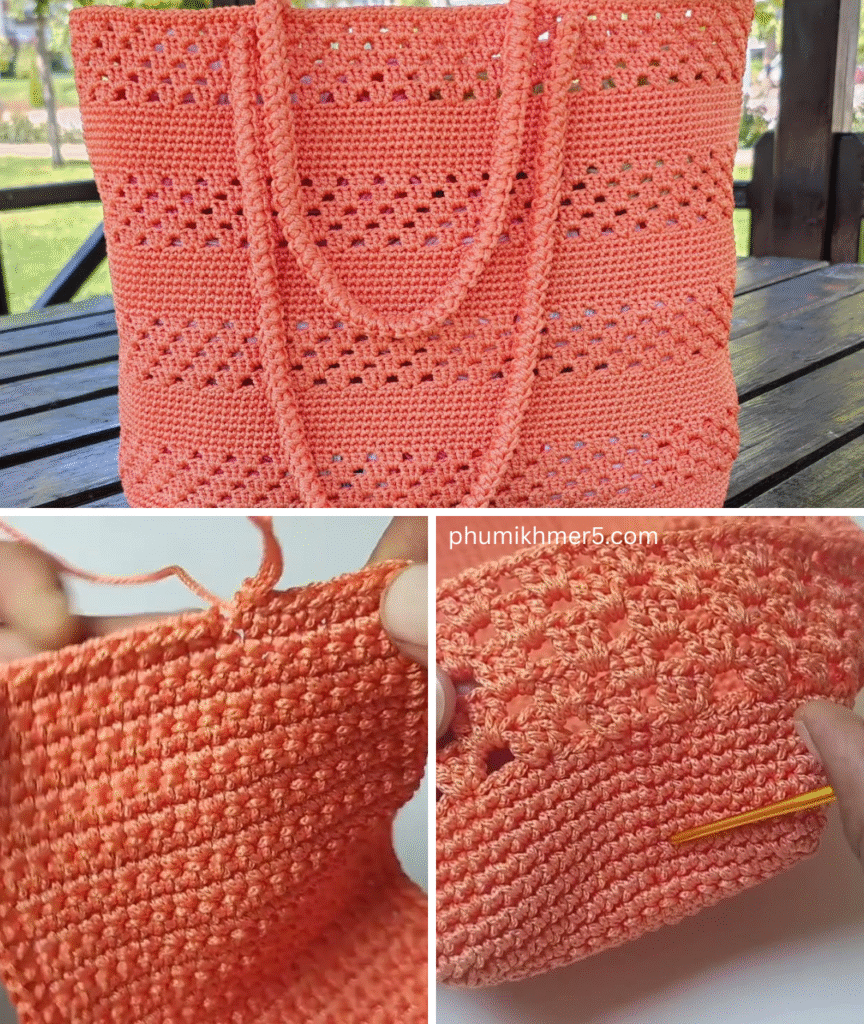
How to Make a Crochet Shoulder Bag: A Step-by-Step Guide to Your New Favorite Accessory
A handmade crochet shoulder bag is more than just an accessory; it’s a statement piece, a practical carry-all, and a testament to your crafting skills. Whether you’re a seasoned crocheter looking for a new project or a confident beginner ready to tackle a slightly more ambitious endeavor, this detailed tutorial will guide you through creating a stylish and sturdy shoulder bag from start to finish.
We’ll cover everything from choosing the right materials to finishing touches, ensuring your bag is not only beautiful but also durable enough for everyday use.
Why Crochet Your Own Shoulder Bag?
- Customization: Choose your exact colors, stitch patterns, and dimensions.
- Unique Style: Create a bag that truly reflects your personality and stands out from mass-produced items.
- Durability: With the right yarn and stitch, a crochet bag can be incredibly strong and long-lasting.
- Skill Building: Practice essential techniques like working in the round, shaping, and adding closures/straps.
- Eco-Friendly: A handmade, reusable bag reduces the need for disposable options.
1. Planning Your Crochet Shoulder Bag: Design & Functionality
Before you begin, visualize your ideal bag.
- Size & Shape:
- Small Pouch (clutch/mini-shoulder): Good for essentials (phone, wallet, keys). Approx. 8-10 inches wide.
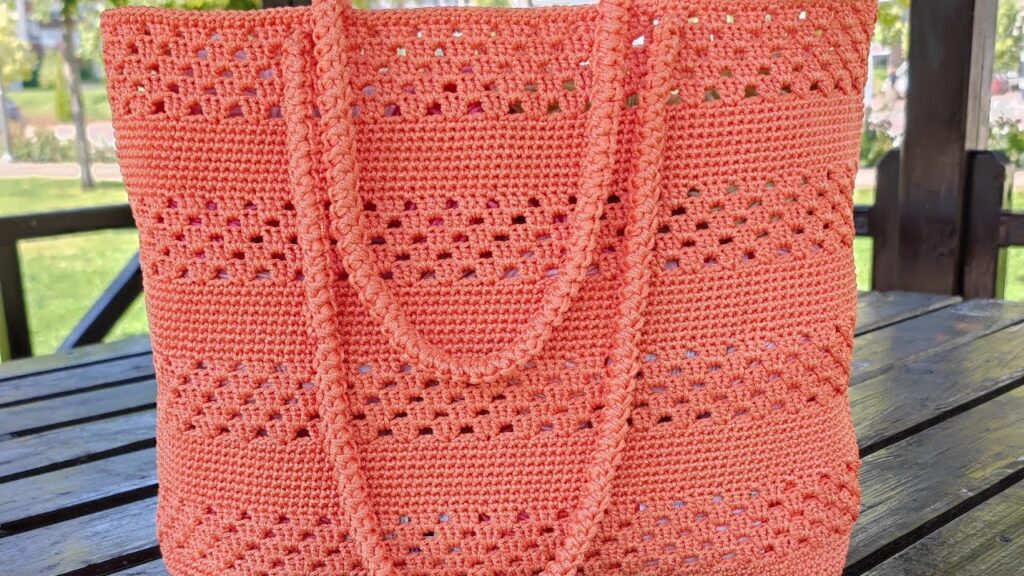
- Medium Everyday Bag: Versatile for daily errands. Approx. 10-14 inches wide, 8-12 inches tall. (This tutorial will focus on this size.)
- Large Tote/Market Bag: For carrying more substantial items.
- Shape: Rectangular (simple to make), square, circular, or even a semi-circle. This tutorial focuses on a rectangular bag with an oval base.
- Yarn Choice (Crucial for Bags!):
- Fiber:
- 100% Cotton: Highly recommended for bags. It’s durable, holds its shape well (especially after blocking), has great stitch definition, and is easy to care for. Mercerized cotton can offer a slight sheen.
- Cotton Blends (e.g., cotton/acrylic): Offer some of cotton’s benefits with added softness or stretch from acrylic.
- Raffia/Paper Yarn: For a true summer or beachy look. Can be a bit harder on the hands.
- Nylon/Polyester Cords: Very durable and water-resistant for heavy-duty bags.
- Avoid very stretchy or flimsy yarns (like some wools or very soft acrylics) unless you plan to line the bag with sturdy fabric.
- Weight: Worsted Weight (#4) or Aran/Heavy Worsted (#4.5/5) yarn is ideal for a sturdy bag. Thicker yarn works up faster and creates more rigid fabric.
- Quantity: For a medium shoulder bag, expect to need approximately 400-700 yards (365-640 meters), depending on your stitch and hook size. Always buy a bit extra!
- Fiber:
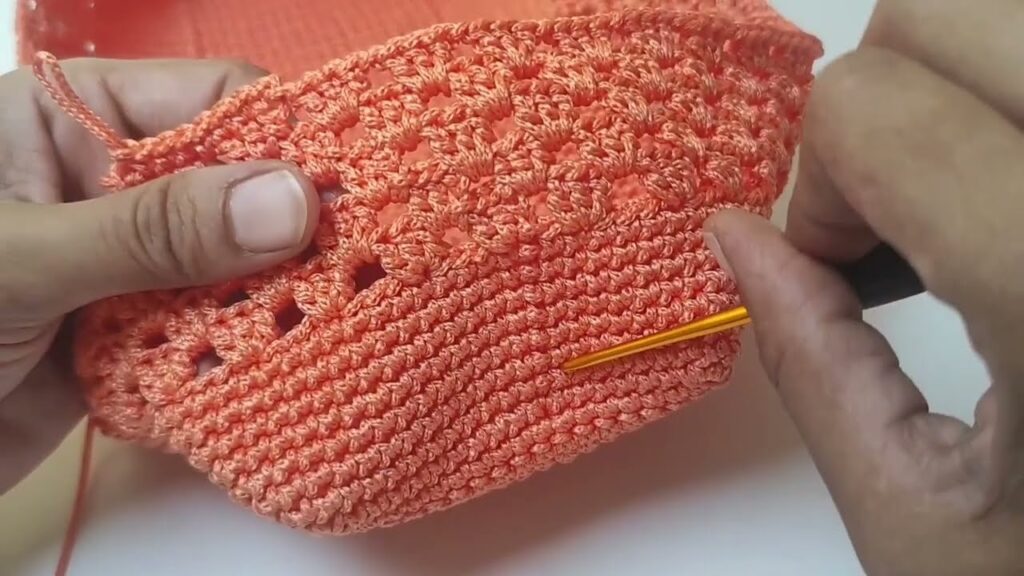
- Stitch Pattern:
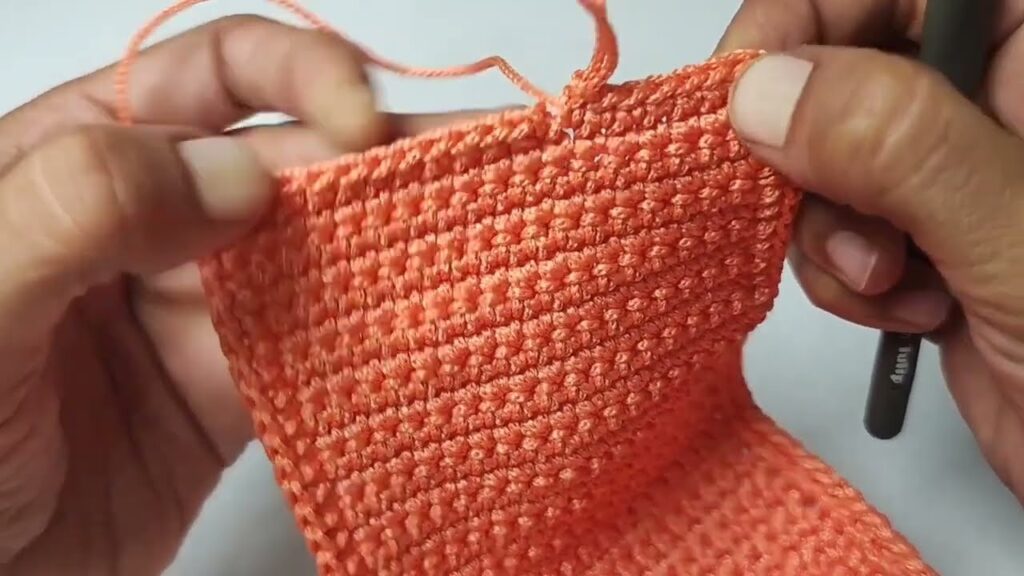
- Dense Stitches: For a sturdy bag that holds its shape, choose dense stitches like single crochet (sc), half double crochet (hdc), or special stitches like the Herringbone Half Double Crochet (HHDC) or the Waistcoat Stitch (Center Single Crochet). These create a firm fabric.
- Textured Stitches: Bobble stitch, puff stitch, or front/back post stitches can add beautiful texture.
- Closure: Zipper, magnetic snap, button loop, or a simple drawstring.
- Strap: Crocheted strap (adjustable or fixed length), pre-made leather/fabric strap, or chain strap.

2. Materials You’ll Need
- Yarn: Your chosen quantity and weight of sturdy yarn (e.g., 500 yards of Worsted Weight cotton).
- Crochet Hook:
- For Worsted Weight yarn, a 4.5 mm (G-7 US) to 5.5 mm (I-9 US) hook.
- Choose a hook size that allows you to create a tight fabric with your chosen yarn. A smaller hook than typically recommended for your yarn weight often works best for bags to ensure firmness.
- Scissors: For cutting yarn.
- Yarn Needle (Tapestry Needle): A large, blunt-tipped needle for weaving in ends and seaming.
- Stitch Markers (Essential!): At least 2-4, to mark the beginning of rounds or corners.
- Measuring Tape: Crucial for checking gauge and bag dimensions.
- Hardware (Optional, depending on closure/strap):
- Magnetic snap, zipper, or button.
- D-rings, swivel clasps (if using a detachable strap).
- Fabric for Lining (Optional but Recommended): Matching fabric, sewing machine or hand-sewing supplies.
3. Essential Crochet Stitches (Review & Practice)
Ensure you’re comfortable with these fundamental stitches. For this tutorial, we’ll use Half Double Crochet (HDC) as the main stitch for its balance of speed and density.
- Slip Knot
- Chain (ch)
- Slip Stitch (sl st): For joining rounds.
- Half Double Crochet (hdc):
- To make a HDC: Yarn over (YO), insert hook into stitch, YO, pull up a loop (3 loops on hook), YO, pull through all 3 loops on hook.
- Working in Joined Rounds: You’ll join each round with a sl st and start with a turning chain. This creates a visible seam, but it’s easier to manage for beginners and results in straighter sides. (Alternatively, you can work in continuous spirals using a stitch marker for a seamless look, but maintain consistent tension.)
4. Gauge Swatch: Your Blueprint for a Sturdy Bag
A tight, consistent gauge is vital for a bag that holds its shape and stands up to use.
- Chain 17.
- Row 1: HDC in the 3rd ch from hook, HDC in each ch across. (15 HDC)
- Row 2: Ch 2 (does NOT count as first HDC), turn. HDC in each HDC across. Make sure to work your last HDC into the top of the beginning Ch 2 from the previous row. (15 HDC)
- Repeat Row 2 until your swatch measures about 4 inches (10 cm) tall.
- Measure: Lay your swatch flat. Count how many HDC stitches you have in 4 inches (10 cm) horizontally, and how many rows you have in 4 inches (10 cm) vertically.
- Target Gauge (approximate for a sturdy bag): Approximately 14-16 HDC stitches in 4 inches (10 cm) and 10-12 rows in 4 inches (10 cm).
- Adjust:
- If you have more stitches/rows, your tension is too tight; go up a hook size.
- If you have fewer stitches/rows, your tension is too loose; go down a hook size.
- Remake your swatch until you’re close to the target gauge. Remember, for a bag, a slightly tighter gauge is better than a looser one.
5. Let’s Crochet Your Shoulder Bag! (Step-by-Step)
We’ll start with an oval base, then build up the vertical sides of the bag.
Part 1: The Oval Base
This creates the sturdy bottom of your bag.
- Foundation Chain: Make a slip knot. Ch 27.
- This will create a base approximately 10-11 inches (25.5-28 cm) long when finished. To adjust width, use a longer/shorter chain (always an odd number works well for symmetry).
- Rnd 1 (Working around the chain):
- Work 2 HDC in the 3rd ch from hook. (This is your first increase for the end).
- HDC in the next 24 chs.
- 5 HDC in the last ch. (This is your increase for the other end, pivoting around).
- Now, work along the other side of the foundation chain: HDC in the next 24 chs (working into the unworked loop of each chain).
- 3 HDC in the very first ch (the same one where you worked your initial 2 HDC).
- Join with a sl st to the top of the first HDC.
- [58 HDC] (25 HDC on each long side, 4 HDC on each end).
- Place a stitch marker in the first HDC of the round to help you keep track of the start/end.
- Rnd 2: Ch 2 (does NOT count as a st).
- 2 HDC in the same st (the first st of the round).
- HDC in the next 26 sts.
- (2 HDC in next st) 3 times.
- HDC in the next 26 sts.
- (2 HDC in next st) 2 times.
- Join with a sl st to the top of the first HDC.
- [64 HDC]
- Rnd 3: Ch 2 (does NOT count as a st).
- 2 HDC in the same st.
- HDC in the next 28 sts.
- (2 HDC in next st) 3 times.
- HDC in the next 28 sts.
- (2 HDC in next st) 2 times.
- Join with a sl st to the top of the first HDC.
- [70 HDC]
- Your base should now be a sturdy oval, approximately 11-12 inches (28-30.5 cm) long and 3-4 inches (7.5-10 cm) wide.
Part 2: The Bag Body (Working Vertically)
Now we’ll stop increasing and build the vertical sides of the bag.
- Rnd 4 (First Wall Round): Ch 2 (does NOT count as a st).
- Crucial for shape! Work this entire round in HDC in the back loop only (BLO) of each stitch around. This creates a distinct, defined ridge that clearly separates the base from the bag’s sides and helps the bag stand up.
- HDC in BLO of each of the 70 sts around. Join with a sl st to the top of the first HDC.
- [70 HDC]
- Rnd 5 onwards: Ch 2 (does NOT count as a st).
- HDC in each HDC around, inserting your hook under both loops as normal.
- Join with a sl st to the top of the first HDC.
- [70 HDC]
- Repeat Rnd 5: Continue repeating Rnd 5 until your bag reaches your desired height.
- For a medium shoulder bag, this might be 18-25 rounds total from the base (including Rnd 4). This should give you a height of 8-12 inches (20-30.5 cm).
- Regularly measure your bag to ensure it reaches your target dimensions.
Part 3: The Top Edge
A simple, neat finishing edge.
- Last Round: Ch 1 (does NOT count as a st). Sc in each HDC around. Join with a sl st to the first sc.
- [70 sc]
- Fasten Off, leaving a 6-inch (15 cm) tail.
6. Creating and Attaching the Shoulder Strap
This is a key element of your shoulder bag!
- Crocheted Strap: (Most common and sturdy)
- Method 1: Simple HDC Strap
- Ch 7 (for strap width, adjust as desired).
- Row 1: HDC in the 3rd ch from hook, HDC in each ch across. (5 HDC)
- Rows 2 onwards: Ch 2 (does NOT count as 1st HDC), turn. HDC in each HDC across. (5 HDC)
- Repeat Row 2 until your strap reaches the desired length. For a shoulder bag, this might be 20-30 inches (50-76 cm). For a crossbody, extend to 40-50 inches (100-127 cm).
- Fasten off, leaving a long tail (about 12 inches / 30 cm) at each end for sewing.
- Method 2: Ribbed Strap (more elastic)
- Follow Method 1, but for Row 2 onwards, work HDC in the back loop only (BLO) of each HDC. This creates a nice ribbed effect.
- Method 1: Simple HDC Strap
- Attaching the Strap:
- Lay your bag flat. Use stitch markers to decide where you want your strap to attach on the top side edges. Aim for a symmetrical placement.
- Using your yarn needle and the long tails, carefully and securely sew each end of the crocheted strap to the bag. Go through both the strap and the bag fabric multiple times for extra reinforcement. A whip stitch or backstitch works well.
- For added strength, you can sew the strap ends down a few rows into the bag body.
- Pre-made Strap (Alternative): If you purchased a leather, fabric, or chain strap, follow its specific attachment instructions. This might involve sewing it directly, or using D-rings and swivel clasps (sew D-rings to the inside top corners of your bag, then clip your strap on).
7. Optional Finishing Touches
These add functionality and a professional look.
- Lining the Bag:
- This is highly recommended for adding durability, preventing stretching, and preventing small items from poking through.
- Measure the dimensions of your finished bag (width, height, depth of base).
- Cut fabric pieces to match, adding seam allowances. Create a simple fabric “box” that fits snugly inside your crochet bag.
- Hand-sew the lining securely to the top inside edge of your crochet bag.
- Adding a Closure:
- Magnetic Snap: Sew a magnetic snap closure to the inside top edges of the bag, centering it.
- Zipper: For the most secure closure, you can hand-sew a zipper into the top opening (often easier if you have a lining).
- Button & Loop: Crochet a small chain loop on one side of the opening and sew a decorative button on the other.
- Blocking (Highly Recommended!):
- Blocking helps even out your stitches, sets the shape, and gives your bag a more polished, professional appearance.
- Wet Blocking (for cotton): Gently submerge the bag in cool water with a little mild soap. Squeeze out excess water without twisting. Stuff the bag with towels or pillows to its desired shape. Lay flat on a clean towel or blocking mats. Let it air dry completely (this can take 24-48 hours).
- Steam Blocking (for cotton/blends): Stuff the bag to shape. Hover a steam iron (do not touch the iron to the yarn) over the fabric, allowing the steam to relax the fibers. Gently pat and shape with your hands. Let cool and dry completely.
8. Care for Your Crocheted Shoulder Bag
Always refer to your yarn label for specific care instructions. For most cotton yarns:
- Hand Wash Recommended: Gently hand wash in cool water with a mild detergent.
- Drying: Reshape the bag and lay flat to air dry. Do not hang when wet, as the weight of the water can cause stretching and distortion.
- Avoid Bleach: Do not use bleach.
Congratulations! You’ve just crocheted a beautiful and functional shoulder bag. This handmade accessory is not just a practical item but a proud display of your crochet artistry. Enjoy using your unique creation!
Video tutorial:


