Crocheting a shoulder bag is a rewarding project, but creating a designer-inspired piece takes a bit more intention. It’s about combining thoughtful planning, premium materials, and precise execution to craft a bag that looks less “homemade” and more “boutique.” Imagine a bag that rivals high-end brands in its unique texture, refined silhouette, and undeniable style.
This detailed guide will show you how to crochet a designer shoulder bag, focusing on elements that elevate its aesthetic and durability. We’ll explore techniques to achieve clean lines, sturdy construction, and a polished finish that will have everyone asking, “Where did you get that bag?!”
What Makes a Crochet Bag “Designer”?
It’s not just about the brand; it’s about the details:
- Premium Materials: The right yarn makes all the difference in look and feel.
- Structured Silhouette: A bag that holds its shape, whether empty or full.
- Refined Stitch Work: Clean, even stitches, often dense for durability.
- Thoughtful Details: Integrated closures, sturdy straps, and optional linings that complete the look.
- Minimalist or Sophisticated Color Palette: Often solid colors or elegant combinations that highlight the texture.
1. Planning Your Designer Shoulder Bag: Vision, Form, & Function
Before you pick up your hook, a clear vision is crucial.
- Inspiration: Look at designer bags you admire. What shapes, textures, or hardware do they feature? Translate those elements into crochet possibilities.
- Size & Shape:
- Rectangular or Square: These shapes are easiest to achieve with crisp lines in crochet. A classic flap-over style or a structured open-top tote are popular choices.
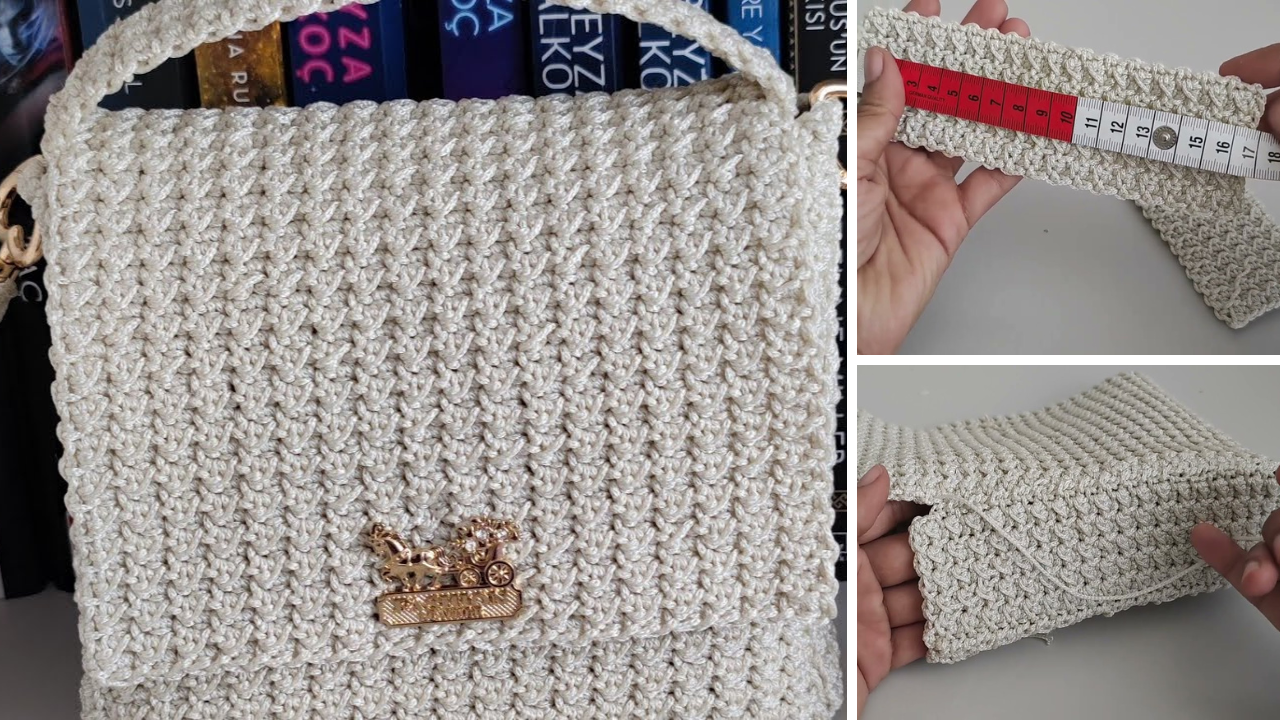
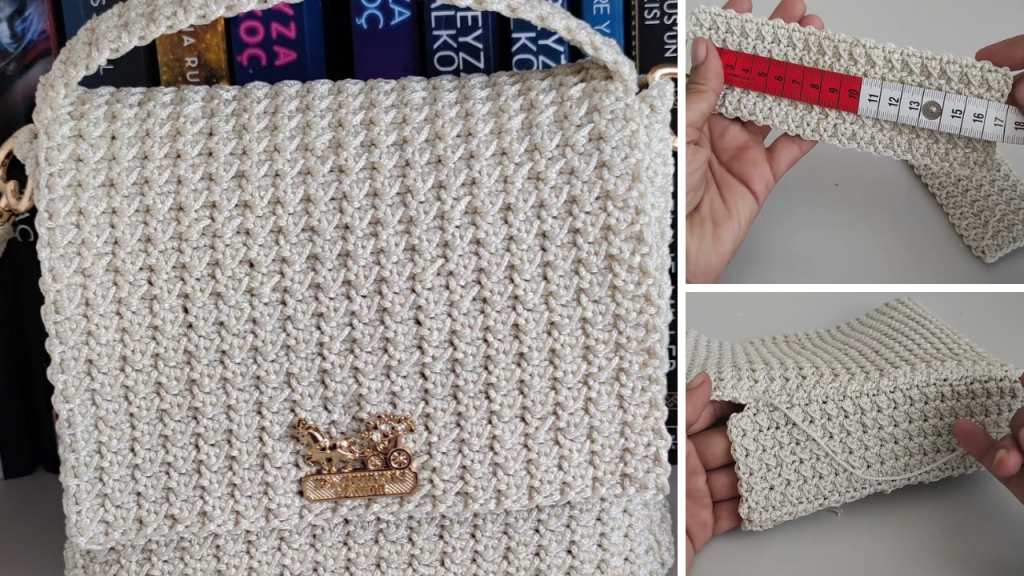
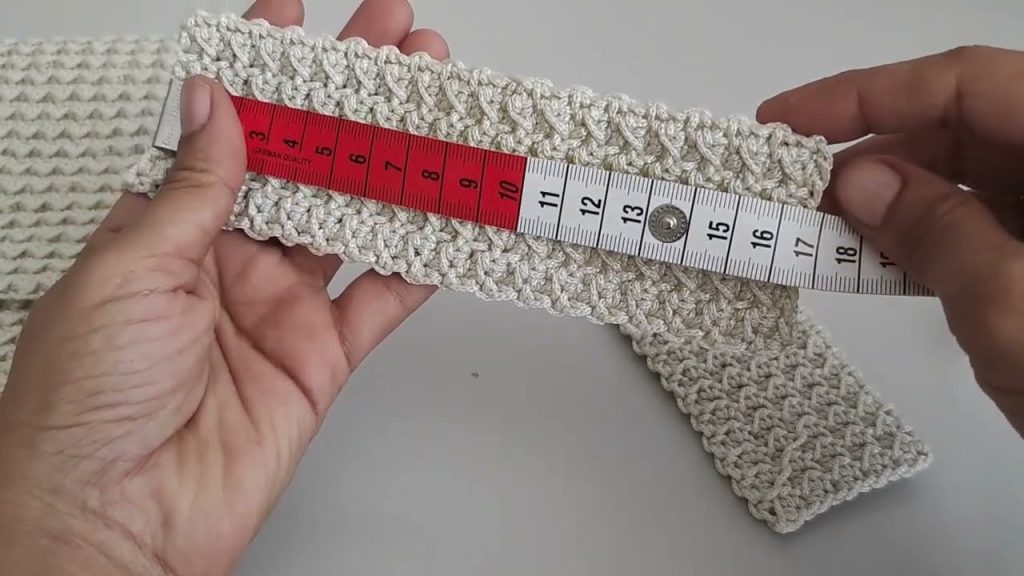
- Dimensions: Think about what you’ll carry daily. A bag that’s 10-12 inches wide, 7-9 inches tall, and 3-4 inches deep is a versatile starting point for a medium shoulder bag. This tutorial will focus on a structured rectangular flap bag.
- Yarn Choice (The Foundation of “Designer”):
- Fiber: Mercerized cotton, cotton cord, T-shirt yarn, or sturdy raffia/paper yarn are excellent. These fibers offer superb stitch definition, minimal stretch, and a crisp hand. Avoid super soft, drapey acrylics or wools unless you plan on extensive internal stiffening.
- Weight: Aran (Heavy Worsted / #4.5/5) or Bulky (#5) yarn will create a dense, substantial fabric quickly. DK (#3) can work for a more delicate bag but requires tighter tension and possibly more rounds.
- Quantity: For a medium bag (as described), anticipate 400-800 yards (365-730 meters), depending on yarn weight and stitch density. Always purchase extra!
- Color: Solid, sophisticated colors (black, white, cream, tan, deep jewel tones, or rich earthy hues) often best highlight the stitch pattern and structural integrity.
- Stitch Pattern (Texture & Structure):
- Dense & Low-Relief: Stitches that create a tight, compact fabric are key. Examples include:
- Herringbone Half Double Crochet (HHDC): Creates a beautiful, subtle V-shaped texture that looks woven.
- Waistcoat Stitch (Center Single Crochet): Mimics knitting, very dense and sturdy.
- Simple Single Crochet (SC) or Half Double Crochet (HDC) in BLO/FLO: Can create subtle ribbing or defined lines.
- Tapestry Crochet: Allows for intricate colorwork and creates a very dense fabric.
- This tutorial will use Herringbone Half Double Crochet (HHDC) for its elegant texture and robust nature.
- Dense & Low-Relief: Stitches that create a tight, compact fabric are key. Examples include:
- Closure: A magnetic snap is often the cleanest and most secure for a designer look. Zippers require more advanced sewing.
- Strap:
- Crocheted Strap: Needs to be exceptionally sturdy and non-stretching (e.g., a tightly worked single crochet strap, or one reinforced with fabric webbing).
- Pre-made Strap: Leather, chain, or fabric straps with metal hardware elevate the look significantly. This is often the quickest way to achieve a “designer” feel. Consider a detachable strap for versatility.
- Lining (Highly Recommended): A fabric lining is paramount for a professional finish, preventing stretching, containing small items, and adding luxury.
2. Materials You’ll Need
- Yarn: 400-800 yards of your chosen Aran or Bulky weight mercerized cotton, cotton cord, or sturdy blend.
- Crochet Hook: 5.0 mm (H-8 US) or 5.5 mm (I-9 US). (Select a hook that creates a very firm, dense fabric with your yarn. You might even go down a hook size from the yarn label’s recommendation.)
- Scissors: For cutting yarn.
- Yarn Needle (Tapestry Needle): A large, blunt-tipped needle for weaving in ends and seaming.
- Stitch Markers: At least 2, essential for marking rounds and critical points.
- Measuring Tape: Crucial for precise gauge and dimensions.
- Hardware (for closure & strap):
- 1-2 Magnetic Snaps (18mm or 14mm, sew-on type is easiest).
- Pre-made Shoulder Strap: (E.g., leather strap with swivel clasps, metal chain strap).
- 2 D-rings (to attach a detachable strap, if using).
- Lining Fabric: Matching or contrasting cotton canvas, twill, or similar sturdy fabric (approx. 1/2 to 1 yard).
- Sewing Machine (or Hand-sewing Supplies): Needle, matching thread, pins.
- Optional: Bag feet, bag stiffener (e.g., plastic canvas, firm interfacing).
3. Essential Crochet Stitches & Techniques (Master These!)
Achieving a designer look relies on clean, consistent stitches.
- Slip Knot
- Chain (ch)
- Slip Stitch (sl st): For joining rounds or inconspicuous seaming.
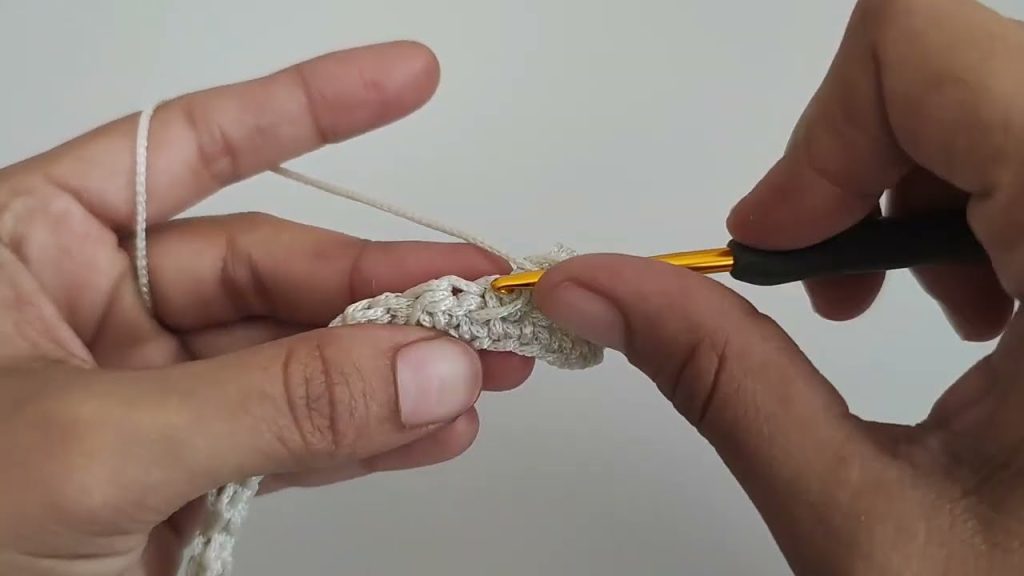
- Herringbone Half Double Crochet (HHDC):
- YO (Yarn Over).
- Insert hook into the indicated stitch.
- YO, pull up a loop AND immediately pull that loop through the first loop on your hook. (This is the “herringbone” part – you’ll now have 2 loops on your hook).
- YO, pull through both remaining loops on your hook.
- Practice this until it’s smooth and consistent. HHDC creates a beautiful, dense fabric that resists stretching.
- Working in Joined Rounds: Each round will typically end with a
sl stto the beginning chain or first stitch. This creates a neat seam (which can be hidden at the back of the bag). - Working in Back Loop Only (BLO) or Front Loop Only (FLO): Used for creating defined ridges or seams.
4. Gauge Swatch: Non-Negotiable for Precision
A precise gauge is paramount for a structured bag that holds its intended shape and dimensions.
- Chain 17.
- Row 1: HHDC in the 3rd ch from hook, HHDC in each ch across. (15 HHDC)
- Row 2: Ch 2 (does NOT count as 1st HHDC), turn. HHDC in the next HHDC and in each HHDC across. (15 HHDC)
- Repeat Row 2 until your swatch measures about 4 inches (10 cm) tall.
- Measure: Count how many HHDC stitches you have in 4 inches (10 cm) horizontally, and how many rows you have in 4 inches (10 cm) vertically.
- Target Gauge (approximate for a firm fabric): Approximately 14-16 HHDC stitches in 4 inches (10 cm) and 12-14 rows in 4 inches (10 cm).
- Adjust:
- If you have more stitches/rows, your tension is too tight; go up a hook size.
- If you have fewer stitches/rows, your tension is too loose; go down a hook size.
- The key is a very dense, firm fabric that stands on its own. If your swatch feels flimsy, go down a hook size.
5. Crocheting Your Designer Shoulder Bag! (Step-by-Step)
We’ll create a structured rectangular bag with an integrated flap.
Part 1: The Rectangular Base
This forms the sturdy bottom of your bag. We’ll work in joined rounds to create a seamless side.
- Foundation Chain: Ch 35.
- This will create a base approximately 11-12 inches (28-30.5 cm) long when finished. Adjust this chain for your desired bag width. Keep it an odd number for symmetrical HHDC side panels.
- Rnd 1 (Working around the chain):
- HHDC in the 3rd ch from hook.
- HHDC in the next 32 chs.
- 3 HHDC in the last ch. (This turns the corner neatly).
- Now, work along the other side of the foundation chain: HHDC in the next 32 chs (working into the unworked loop of each chain).
- 2 HHDC in the very first ch (the same one where you worked your initial HHDC).
- Join with a sl st to the top of the first HHDC.
- [70 HHDC] (33 HHDC on each long side, 2 HHDC on each end).
- Rnd 2 (Adding Depth): Ch 2 (does NOT count as 1st HHDC).
- 2 HHDC in the same st (the first st of the round).
- HHDC in the next 33 sts.
- (2 HHDC in next st) 3 times. (Increases at the corner).
- HHDC in the next 33 sts.
- (2 HHDC in next st) 2 times. (Increases at the last corner).
- Join with a sl st to the top of the first HHDC.
- [76 HHDC]
- Your base should now be a neat, sturdy oval/rectangle, approximately 12 inches wide and 3-4 inches deep.
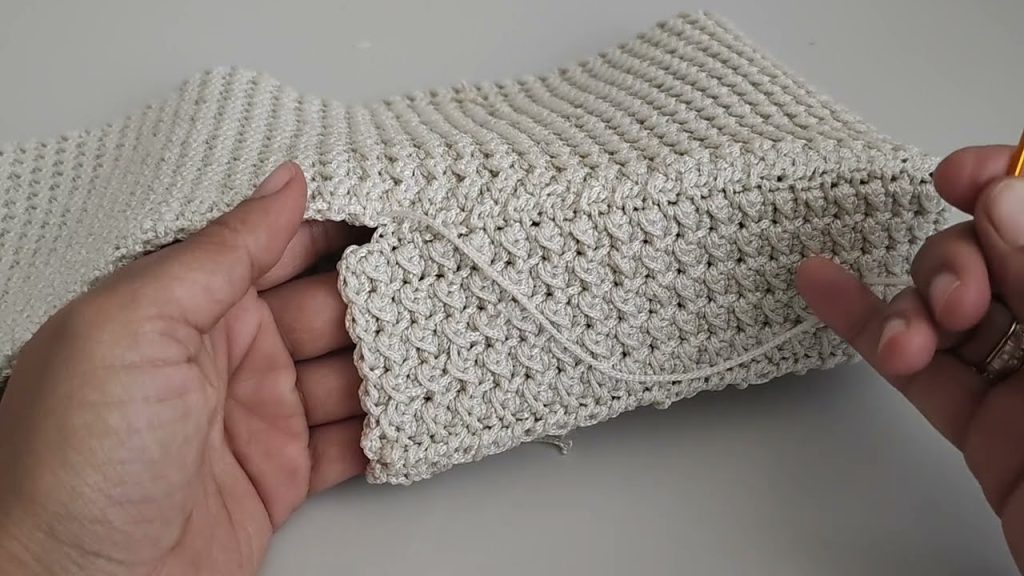
Part 2: Building the Bag Body (Vertical Sides)
This section creates the height of your bag and defines its upright shape.
- Rnd 3 (First Vertical Wall): Ch 2 (does NOT count as 1st HHDC).
- Crucial for Structure! Work this entire round in HHDC in the back loop only (BLO) of each stitch around. This creates a sharp, defined edge separating the base from the sides, making your bag stand up crisply.
- HHDC in BLO of each of the 76 sts around. Join with a sl st to the top of the first HHDC.
- [76 HHDC]
- Rnd 4 onwards (Main Body): Ch 2 (does NOT count as 1st HHDC).
- Work HHDC in each HHDC around, inserting your hook under both loops as normal.
- Join with a sl st to the top of the first HHDC.
- [76 HHDC]
- Maintain consistent tension to ensure straight sides and a beautiful HHDC pattern.
- Repeat Rnd 4: Continue repeating Rnd 4 until your bag reaches your desired height.
- For a medium shoulder bag, this might be 15-20 rounds total from the base (including Rnd 3). This will give you a height of 7-9 inches (18-23 cm).
- Stop at a height that works with your flap design.
Part 3: The Flap (Integrated or Separate)
For a truly cohesive “designer” look, an integrated flap is preferred.
- Crocheting the Flap (Integrated):
- After completing the body rounds, do NOT fasten off.
- Identify Flap Width: Determine the stitches for your flap. It should be centered on one of the long sides of your bag. Count in from the corners. For a 76-stitch circumference, the long sides have about 38 stitches. A flap that covers the entire top would be 38 stitches wide. For a classic shape, use about 30-34 stitches for the flap.
- Row 1 (Flap Start): Ch 2 (does NOT count as 1st HHDC), turn. HHDC in the number of stitches determined for your flap (e.g., 32 HHDC).
- Row 2: Ch 2 (does NOT count as 1st HHDC), turn. HHDC in each HHDC across.
- Repeat Row 2: Continue repeating Row 2 until your flap reaches the desired length (e.g., 5-7 inches / 13-18 cm), enough to fold over the bag opening and provide sufficient coverage.
- Shaping the Flap (Optional, for a rounded or pointed look):
- Rounded: Work HHDC decreases evenly on the last 2-3 rows to create a gentle curve.
- Pointed: Work a series of decreases at the center and edges on the last few rows.
- Fasten Off, leaving a tail for weaving.
6. Assembly & Finishing Touches (The “Designer” Difference)
This is where your bag truly comes to life with precision and refinement.
- Weave in All Ends: Use your yarn needle to neatly and securely weave in all loose yarn tails. For a bag, security is key – you don’t want ends popping out.
- Optional: Add Stiffening:
- Cut plastic canvas or firm fusible interfacing to fit the base of the bag perfectly. Insert it into the lining for extra stability.
- For sides, you can cut strips of stiff interfacing and sew them into the lining panels.
- Create and Install the Fabric Lining: This is essential for a high-quality finish.
- Measure: Measure the interior dimensions of your crocheted bag (width, height, and depth of the base).
- Cut Fabric: Cut fabric pieces for the bottom, front, back, and two side panels, adding a 1/2 inch (1.25 cm) seam allowance on all sides. You can also cut a single piece for the body that wraps around the bottom.
- Sew Lining: Sew the fabric pieces together to create a fabric “box” that fits snugly inside your crocheted bag. Hem the top edge.
- Insert & Sew: Carefully insert the finished fabric lining into your crochet bag. Hand-sew the lining securely to the top inside edge of your crocheted bag using small, neat stitches and matching thread.
- Install Magnetic Snap Closure:
- Determine the placement of your magnetic snap (usually centered on the front of the bag body, just below the opening, and on the underside of the flap).
- Sew-on Snaps: These are easiest. Use a strong needle and matching thread to securely sew each half of the magnetic snap to the designated spots. Go through the crochet fabric and, ideally, the lining for extra strength.
- Attach D-Rings (if using a detachable strap):
- Determine where you want your D-rings to be placed (usually on the inside top corners of the bag).
- Using strong thread or thin yarn, securely sew the D-rings in place. Ensure they are firmly attached, as they will bear the weight of the bag.
- Attach the Shoulder Strap:
- Pre-made Strap: Clip your chosen strap to the D-rings. If the strap is sewn-on, carefully stitch it to the reinforced top edges of the bag.
- Crocheted Strap: Make a very sturdy crocheted strap (e.g., a tightly worked single crochet strap, or a strap reinforced internally with webbing). Securely sew the strap ends to the D-rings or directly to the bag’s top corners.
- Blocking (Highly Recommended!):
- Even if your fabric feels dense, blocking helps to set the stitches, square up the corners, and ensure your bag holds its perfect shape.
- Wet Blocking (for cotton): Gently submerge the bag (without hardware or lining if possible, or dry very carefully) in cool water. Squeeze out excess water. Stuff the bag with towels or pillows to its desired shape. Pin corners sharply if using blocking mats. Let it air dry completely (can take 24-48 hours).
- Steam Blocking (for cotton/synthetics): Stuff the bag to shape. Hover a steam iron (do not touch the iron to the yarn) over the fabric, allowing the steam to relax the fibers. Gently pat and shape with your hands. Let cool and dry completely.

7. Care for Your Crocheted Designer Shoulder Bag
Always refer to your yarn label for specific care instructions, especially if you’ve added a lining or hardware.
- Spot Clean Recommended: For small spills, gently spot clean with a damp cloth and mild soap.
- Hand Wash (if possible without hardware/lining issues): Gently hand wash in cool water with a mild detergent. Remove any detachable straps.
- Drying: Reshape the bag and lay flat to air dry. Stuff it with towels to maintain its form. Do not hang when wet, as the weight of the water will cause stretching.
- Avoid Bleach: Do not use bleach.
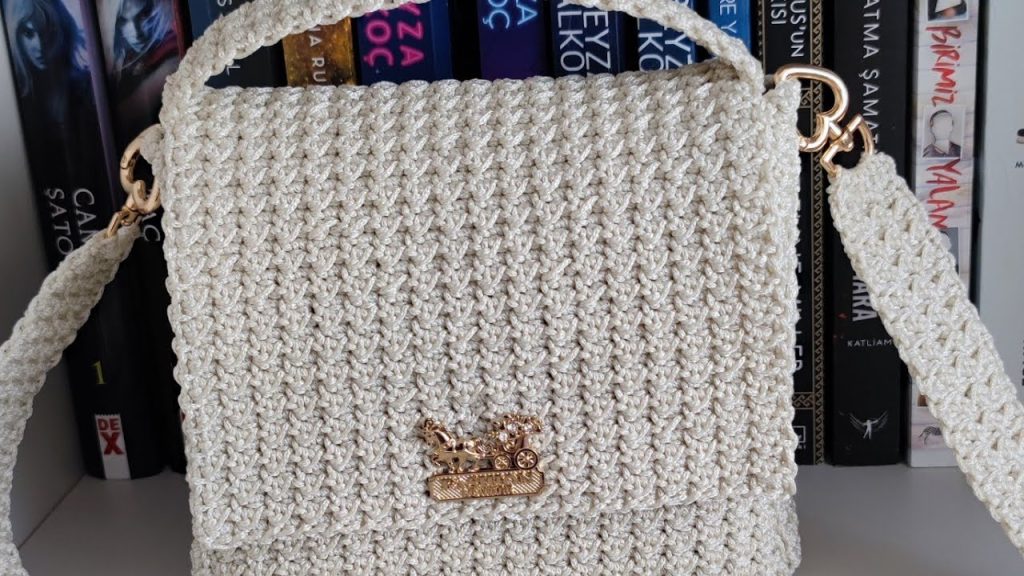
Congratulations! You’ve successfully crocheted a designer-level shoulder bag. With its precise stitching, structured silhouette, and thoughtful finishing, this handmade accessory will be a testament to your skill and a stylish addition to your wardrobe. Enjoy carrying your unique creation!
Video tutorial:


