
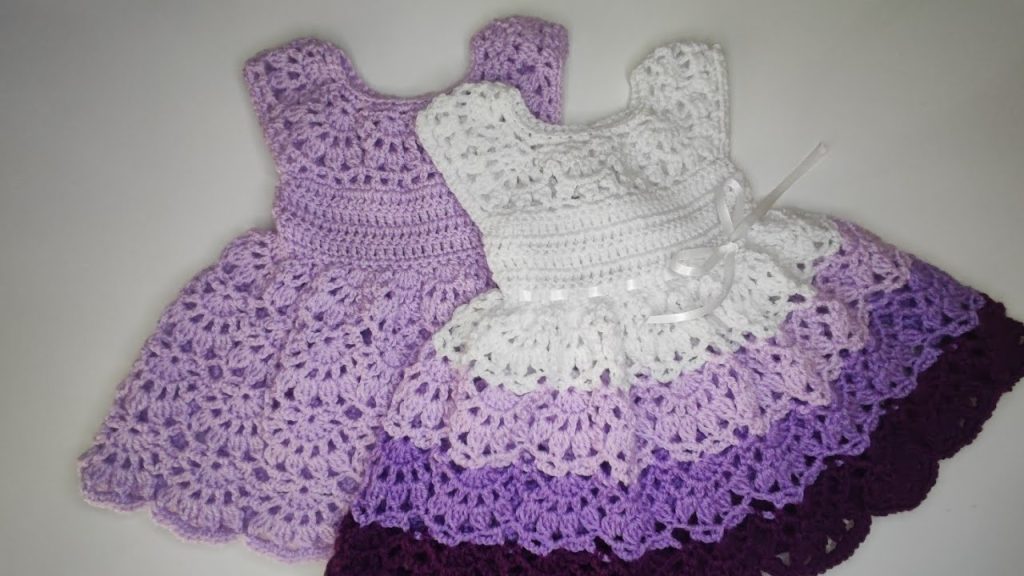
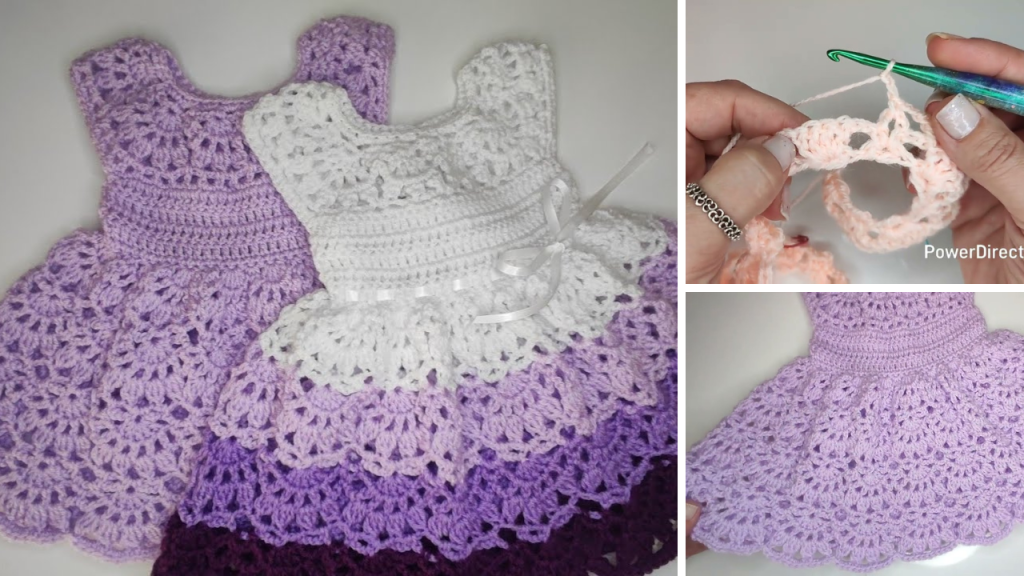
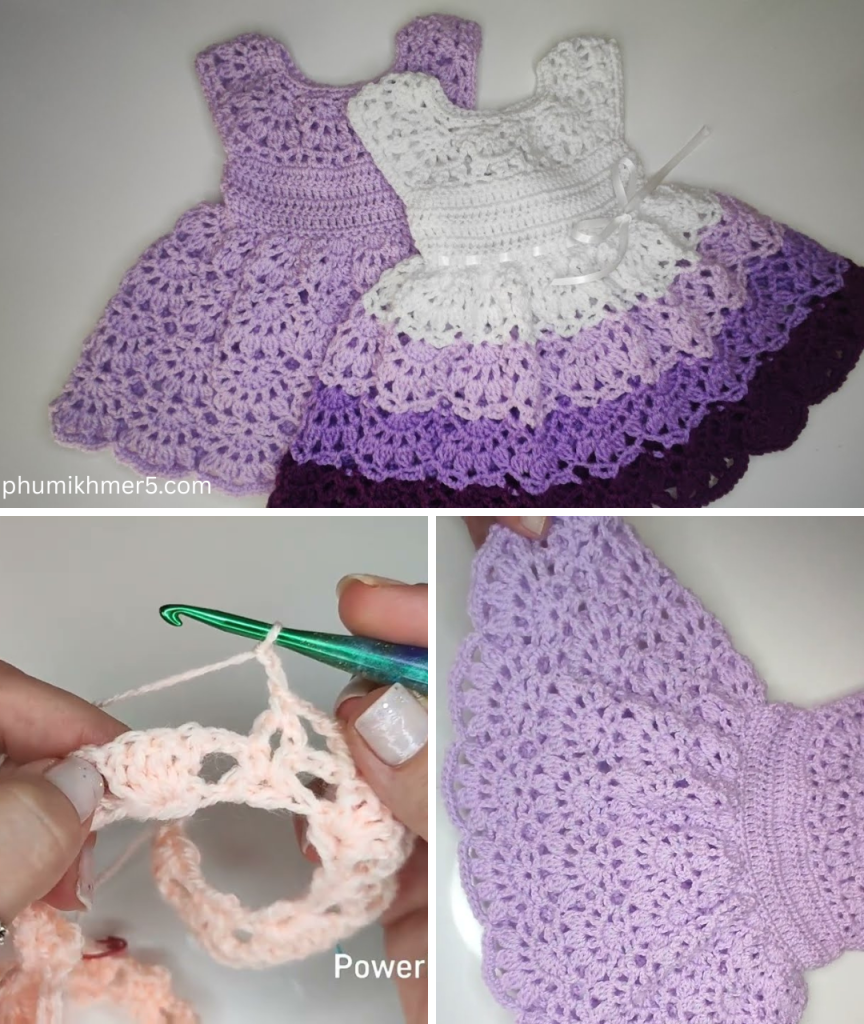
There’s something truly special about a handmade lace dress for a baby. It’s not just an outfit; it’s a delicate garment crafted with love, perfect for special occasions, photoshoots, or even as a cherished heirloom. Crocheting a “pretty lace” baby dress might seem daunting, but by breaking it down into manageable steps and using accessible lace stitches, you can create a stunning and ethereal piece.
This detailed article will guide you through crocheting a beautiful, airy lace baby dress, focusing on a top-down, seamless construction for comfort and a lovely drape. We’ll use simple, repetitive lace patterns that are easy to master, resulting in an elegant and adorable dress for a little one.
Why Crochet a Lace Baby Dress?
- Timeless Beauty: Lace patterns evoke a classic, elegant charm that never goes out of style.
- Lightweight & Breathable: Open lace stitches and delicate yarns are perfect for baby’s sensitive skin, preventing overheating.
- Special Occasions: Ideal for baptisms, blessings, photoshoots, or any memorable event.
- Heirloom Quality: A handmade lace dress can be passed down through generations, holding precious memories.
- Skill Enhancement: Practice working with fine yarns, intricate stitch patterns, and garment construction.
- Customization: Choose your favorite colors, add delicate embellishments, and adjust sizing to fit perfectly.
1. Planning Your “Pretty Lace” Baby Dress: Size & Materials
Careful planning is the foundation of a successful and beautifully fitting garment.
- Size: This pattern will focus on a Newborn (0-3 Months) size, with guidance on how to adjust for other common baby sizes by modifying the initial chain and yoke increases.
- Finished Chest Circumference (approx.):
- Newborn (0-3 Months): 18 inches (46 cm)
- 3-6 Months: 19-20 inches (48-51 cm)
- 6-12 Months: 20-22 inches (51-56 cm)
- Pro Tip: If possible, measure the baby’s actual chest circumference and add 1-2 inches (2.5-5 cm) for positive ease (wiggle room) and comfort.
- Finished Chest Circumference (approx.):
- Yarn Choice (Crucial for Baby & Lace!):
- Fiber: Opt for super soft, hypoallergenic, and breathable yarns.
- Baby-specific Yarn: Often labeled “baby yarn,” these are usually fine acrylics or blends designed to be extra gentle and easy to care for.
- 100% Cotton or Cotton Blends: Excellent for drape, breathability, and stitch definition. Look for mercerized cotton for a slight sheen and crispness.
- Bamboo or Bamboo Blends: Incredibly soft, silky, and drapes beautifully, though sometimes pricier.
- Avoid wools unless they are superwash merino for ultimate softness and easy care.
- Weight: Fingering (#1), Sport (#2), or DK (#3) weight yarn are ideal for a delicate lace dress. Fingering creates the finest, most intricate lace, while DK works up faster for a slightly more substantial but still lacy fabric. This tutorial will use Sport Weight (#2).
- Quantity:
- Newborn: Approx. 250-350 yards (230-320 meters)
- 3-6 Months: Approx. 350-450 yards (320-410 meters)
- 6-12 Months: Approx. 450-600 yards (410-550 meters)
- Always buy a bit extra!
- Fiber: Opt for super soft, hypoallergenic, and breathable yarns.
- Lace Stitch Pattern: We’ll use a variation of the (dc, ch 1, dc) V-stitch combined with simple shell stitches to create a beautiful, open fabric that’s easy to repeat and expands naturally with increases.
2. Materials You’ll Need
- Yarn: Your chosen quantity of Sport Weight (#2) baby-friendly yarn (e.g., soft cotton or acrylic).
- Crochet Hook: 3.0 mm (C-2 US) or 3.5 mm (E-4 US). (Select the hook that yields the correct gauge for your yarn to achieve a delicate yet stable lace fabric.)
- Scissors: For cutting yarn.
- Yarn Needle (Tapestry Needle): For weaving in ends and any light seaming.
- Stitch Markers (Essential!): At least 4, for marking raglan increase points.
- Measuring Tape: Crucial for checking gauge and garment dimensions.
- Small Buttons (Optional): 1-3 small (0.5-0.75 inch / 1.25-2 cm) buttons for the back opening.
- Needle and Thread: For attaching buttons.
3. Essential Crochet Stitches & Techniques (Review & Practice)
Ensure you’re comfortable with these foundational stitches and concepts:
- Slip Knot
- Chain (ch)
- Slip Stitch (sl st): For joining rounds or moving without adding height.
- Single Crochet (sc)
- Double Crochet (dc)
- V-stitch (V-st): (Dc, ch 1, dc) all into the same stitch or chain space. This forms the basis of our lace pattern.
- Shell Stitch: (2 dc, ch 1, 2 dc) or (3 dc, ch 1, 3 dc) all into the same stitch or chain space. (We’ll use a simple shell for the skirt edging.)
- Picot Stitch (Optional for edging): Ch 3, sl st into the 3rd ch from hook.
- Working in Rows: For the yoke and back opening.
- Working in Rounds: For the skirt.
- Turning Chains: Ch 3 at the start of a row/round counts as your first DC. Ch 1 for SC.
- Raglan Increases: A specific increase method to shape the shoulders and sleeves in top-down garments.

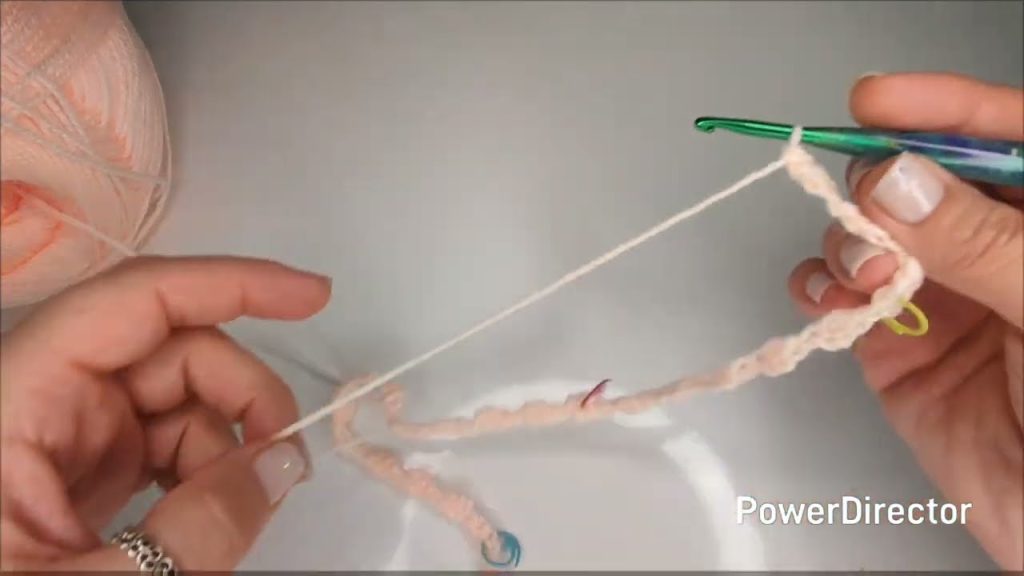
4. Gauge Swatch: The Key to a Perfect Fit
Gauge is absolutely critical for baby garments, especially with lace, to ensure the correct size and drape. A small difference can significantly alter the finished dimensions.
- Make a Gauge Swatch (using the V-stitch pattern):
- Chain 22.
- Row 1: Dc in 4th ch from hook, ch 1, sk 1 ch, dc in next ch. Repeat from * to * across to last 2 ch. Ch 1, sk 1 ch, dc in last ch. (You’ll have 10 dc and 9 ch-1 spaces).
- Row 2: Ch 3 (counts as 1st dc), turn. Dc in first ch-1 sp. Ch 1, sk dc, dc in next ch-1 sp. Repeat from * to * across. Ch 1, sk dc, dc in top of turning chain.
- Repeat Row 2 until your swatch measures about 4 inches (10 cm) tall.
- Measure: Lay your swatch flat. Count how many dc stitches (and their corresponding ch-1 spaces) you have in 4 inches (10 cm) horizontally, and how many rows you have in 4 inches (10 cm) vertically.
- Target Gauge (approximate for Sport Weight): Approximately 16-18 dc + ch-1 sps (or 8-9 V-sts) in 4 inches (10 cm) and 10-12 rows in 4 inches (10 cm).
- Adjust:
- If you have more stitches/rows, your tension is too tight; go up a hook size.
- If you have fewer stitches/rows, your tension is too loose; go down a hook size.
- Remake your swatch until you match the target gauge as closely as possible.
5. Let’s Crochet Your “Pretty Lace” Baby Dress! (Top-Down Construction)
We’ll start at the neckline, work the yoke, separate for body and sleeves, and then crochet the delicate skirt.
Pattern Notes:
- Ch 3 at the start of a row/round counts as 1 DC.
- (V-st) = (dc, ch 1, dc) into the specified space.
Part 1: The Yoke (Neckline & Raglan Shaping)
This section forms the neckline and the increases that create the shoulders and armholes. We’ll work in rows to create a back opening for easy dressing.
- Foundation Chain (Neckline): Ch 56 (60, 64, 68).
- Newborn: Ch 56
- 3-6 Months: Ch 60
- 6-12 Months: Ch 64
- Row 1 (Yoke Setup): Dc in 4th ch from hook (counts as 2 dc).
- [Right Back Panel] Dc in next 6 (7, 8, 9) chs. Total 7 (8, 9, 10) dc.
- [1st Raglan Corner] (Dc, ch 1, dc) in next ch. Place stitch marker in ch-1 sp.
- [1st Sleeve Panel] Dc in next 8 (9, 10, 11) chs. Total 9 (10, 11, 12) dc.
- [2nd Raglan Corner] (Dc, ch 1, dc) in next ch. Place stitch marker in ch-1 sp.
- [Front Panel] Dc in next 14 (16, 18, 20) chs. Total 15 (17, 19, 21) dc.
- [3rd Raglan Corner] (Dc, ch 1, dc) in next ch. Place stitch marker in ch-1 sp.
- [2nd Sleeve Panel] Dc in next 8 (9, 10, 11) chs. Total 9 (10, 11, 12) dc.
- [4th Raglan Corner] (Dc, ch 1, dc) in next ch. Place stitch marker in ch-1 sp.
- [Left Back Panel] Dc in next 7 (8, 9, 10) chs. Total 8 (9, 10, 11) dc.
- Total stitches: 68 (76, 84, 92) dc + 4 ch-1 sps.
- Row 2 (Lace Yoke Increase): Ch 3 (counts as 1st dc), turn.
- Work (V-st) into the first dc of the row (this creates a V-stitch on the edge).
- Ch 1, sk next st, (V-st) into next st. Repeat from * to * across until you reach the 1st marked ch-1 sp.
- (V-st) into the marked ch-1 sp (move marker to new ch-1 sp).
- Ch 1, sk next st, (V-st) into next st. Repeat from * to * across until you reach the 2nd marked ch-1 sp.
- (V-st) into the marked ch-1 sp (move marker).
- Ch 1, sk next st, (V-st) into next st. Repeat from * to * across until you reach the 3rd marked ch-1 sp.
- (V-st) into the marked ch-1 sp (move marker).
- Ch 1, sk next st, (V-st) into next st. Repeat from * to * across until you reach the 4th marked ch-1 sp.
- (V-st) into the marked ch-1 sp (move marker).
- Ch 1, sk next st, (V-st) into next st. Repeat from * to * across. Work the last (V-st) into the top of the turning chain of the previous row.
- This pattern creates new V-stitches within the body sections and at each raglan corner, expanding the yoke.
- Repeat Row 2: Continue repeating Row 2 for a total of 6 (7, 8, 9) increase rows.
- Newborn: 6 rows total
- 3-6 Months: 7 rows total
- 6-12 Months: 8 rows total
- At the end of the final yoke row, your piece should lay relatively flat and the sleeve sections should be wide enough to comfortably fit around the arm.
Part 2: Separating Body and Sleeves
This step defines the armholes and forms the main body of the dress.
- Next Row (Separation): Ch 3 (counts as 1st dc), turn.
- Work (V-st) into the first dc of the row.
- Ch 1, sk next st, (V-st) into next st. Repeat from * to * across the Right Back Panel until you reach the 1st marked ch-1 sp.
- (V-st) into the 1st marked ch-1 sp.
- Skip all stitches and V-stitches of the 1st Sleeve Panel until you reach the 2nd marked ch-1 sp.
- (V-st) into the 2nd marked ch-1 sp.
- Ch 1, sk next st, (V-st) into next st. Repeat from * to * across the Front Panel until you reach the 3rd marked ch-1 sp.
- (V-st) into the 3rd marked ch-1 sp.
- Skip all stitches and V-stitches of the 2nd Sleeve Panel until you reach the 4th marked ch-1 sp.
- (V-st) into the 4th marked ch-1 sp.
- Ch 1, sk next st, (V-st) into next st. Repeat from * to * across the Left Back Panel. Work the last (V-st) into the top of the turning chain of the previous row.
- You will now be working on the main body of the dress, which will be joined into a round.
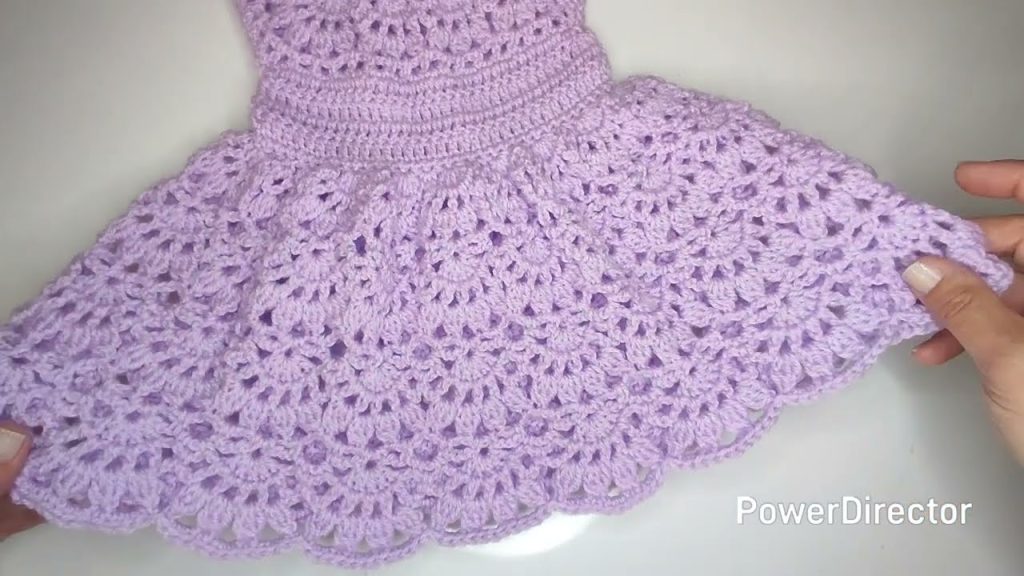
Part 3: The Skirt (Working in Rounds)
Now we’ll join the back panels and work the skirt downwards in continuous rounds.
- Round 1 (Joining & First Skirt Round): Ch 3 (counts as 1st dc).
- Work (V-st) into the first dc of the round.
- Ch 1, sk next st, (V-st) into next st. Repeat from * to * across the entire body, working V-stitches into the center of the V-stitches from the separation row.
- At the end of the round, join with a sl st to the top of the beginning Ch 3. (This closes the back opening for the skirt).
- Total V-stitches in this round will depend on your size and yoke rows. Count your V-stitches, as this number will be important for future rows.
- Round 2 (Lace Skirt): Ch 3 (counts as 1st dc).
- Work (V-st) into the next ch-1 space of the previous round’s V-stitch.
- Ch 1, sk dc, (V-st) into next ch-1 space. Repeat from * to * all the way around.
- Join with a sl st to the top of the beginning Ch 3.
- Repeat Round 2: Continue repeating Round 2 until your dress reaches the desired length.
- For a Newborn, this might be 15-20 rounds of the lace pattern after separation.
- Regularly check the length against a growth chart or the baby to ensure it’s not too long or too short. For a dress, mid-calf or ankle length is common.
Part 4: Skirt Edging (Shell Stitch)
This creates a beautiful, decorative finish for the hem of the dress.
- Edging Round 1: Ch 3 (counts as 1st dc). Dc in the same stitch.
- (2 dc, ch 1, 2 dc) (a simple shell) into the next ch-1 space of a V-stitch.
- Sl st into the next dc (the first dc of the next V-stitch).
- (2 dc, ch 1, 2 dc) into the next ch-1 space. Sl st into the next dc.
- Repeat from * to * around the entire hem.
- Join with a sl st to the top of the beginning Ch 3.
- Fasten Off, leaving a tail for weaving.
6. Finishing Touches: The Pretty Details
These final steps ensure a polished, heirloom-quality garment.
- Sleeves (Optional): For very short cap sleeves or no sleeves, simply create a single row of sc around the armhole opening for a neat finish.
- Join yarn in the armpit area. Ch 1. Sc evenly around the armhole. Join with sl st. Fasten off. Repeat for second sleeve.
- For slightly longer sleeves, you could work 1-2 rounds of (V-st) in the armhole, then finish with an sc or shell edging.
- Back Opening Edging & Buttonholes:
- Join yarn with a sl st at the bottom of the back opening on one side.
- Row 1 (Back Edging): Ch 1 (does NOT count as a st). Sc evenly up the entire back opening edge, around the neckline, and down the other side of the back opening. Make sure your stitch count is even and consistent on both sides of the back opening.
- Buttonhole Row: Ch 1, turn. Sc in the first few sc sts. Ch 2 (or 3, depending on button size), sk 2 (or 3) sts. Sc in next few sts. Repeat for 1-3 evenly spaced buttonholes along one back panel (e.g., at the top, middle, and bottom). Continue sc to the end of the row.
- Final Edging Row: Ch 1, turn. Sc in each sc around, working 2 (or 3) sc into each ch-2 (or ch-3) buttonhole space. Sl st to join at the beginning.
- Fasten Off.
- Weave in All Ends: Use your yarn needle to carefully weave in any remaining loose yarn tails. For baby garments, ensure they are extremely secure and won’t come undone or pose a hazard.
- Attach Buttons: Sew your small buttons onto the back panel opposite the buttonholes, aligning them perfectly. Secure them very well with needle and thread.
- Blocking (Highly Recommended!):
- Blocking is essential for lace garments to open up the stitch pattern, relax the fibers, even out stitches, and set the final shape and drape beautifully.
- Wet Blocking: Gently submerge the dress in cool water with a little mild soap. Squeeze out excess water without twisting. Lay it flat on a clean towel or blocking mats. Gently shape the dress to its ideal dimensions (chest, length, straighten the lace pattern). Pin in place if using mats. Let it air dry completely (this can take 24-48 hours).
- Avoid steam blocking directly on delicate lace unless you are very experienced, as it can flatten the texture.
7. Care for Your Crocheted Baby Dress
Always refer to your yarn label for specific care instructions. For most baby-friendly yarns:
- Hand Wash Recommended: Gently hand wash in cool water with a mild detergent.
- Drying: Reshape the dress and lay flat to air dry. Do not hang when wet, as the weight of the water can cause stretching and distortion of the delicate lace.
- Avoid Bleach: Do not use bleach unless specifically instructed by the yarn label.
Congratulations! You’ve just crocheted a truly exquisite and “pretty lace” baby dress. This handmade garment is a beautiful labor of love, perfect for celebrating life’s precious moments and destined to become a cherished family heirloom. Enjoy the beauty and joy it brings!
Video tutorial:


