
Crochet is a timeless art that allows for the creation of intricate, colorful, and meaningful designs through the simple interlocking of yarn and hook. Among the many patterns that captivate crochet enthusiasts, crochet flower tile square designs stand out for their beauty, versatility, and creative potential. These squares blend the organic elegance of floral motifs with the practicality of tile construction, making them ideal for everything from blankets to wall hangings, table runners, and even garments.
In this article, we’ll dive deep into the world of crochet flower tile square design, exploring its structure, techniques, patterns, color strategies, and applications, along with step-by-step tips to create your own.

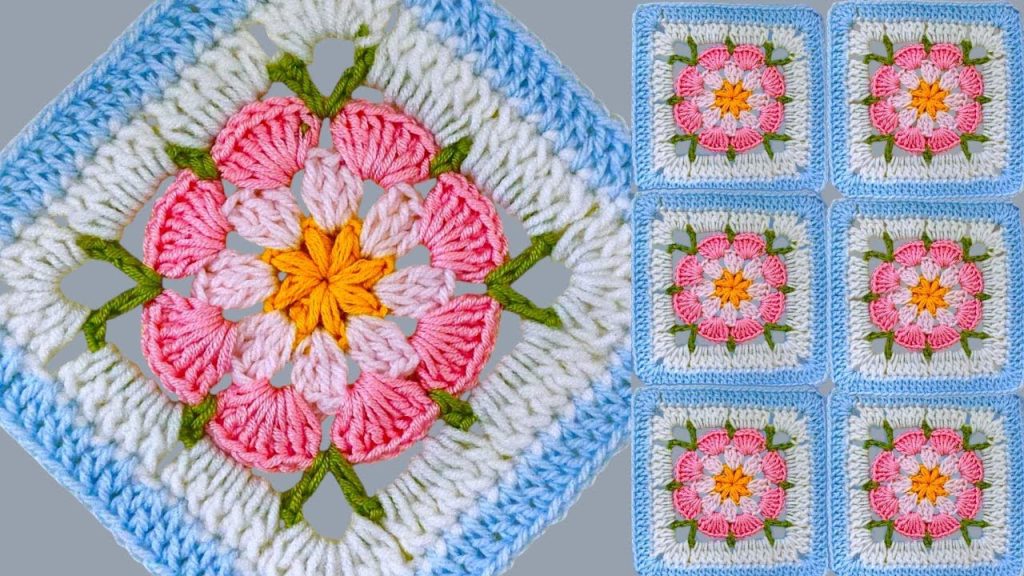
🌼 What Is a Crochet Flower Tile Square?
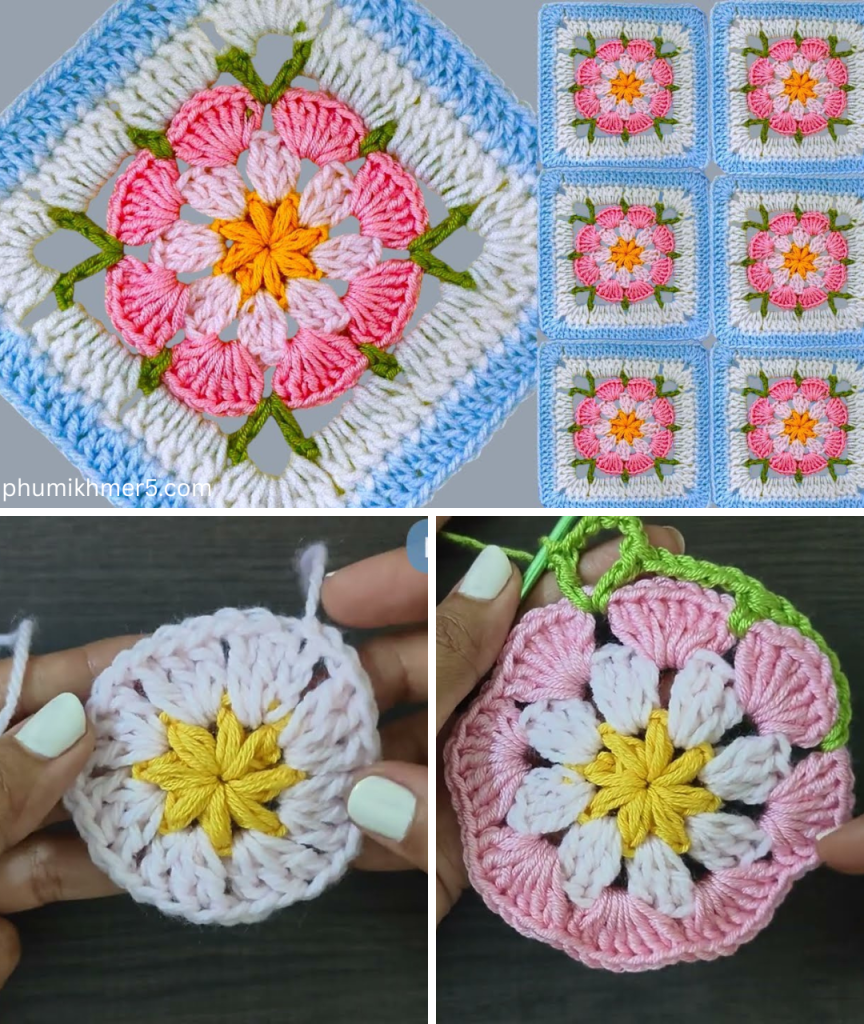
A crochet flower tile square is a type of granny square that features a floral motif at its center, typically surrounded by a square border. These designs merge nature-inspired beauty with geometric form. They may be simple and two-dimensional or textured and three-dimensional with puffed or raised petals.
These flower tiles are not just visually pleasing—they’re also modular. That means you can create several identical or varied squares and join them to form larger projects like throws, shawls, or wearable accessories.
🧶 Key Elements of a Flower Tile Square
Creating a flower tile square involves several foundational crochet elements:
1. The Center Flower
This is the star of the design. Often worked in the round, it can range from a simple five-petal flower to elaborate multi-layered blossoms like roses or daisies. Petals may be flat or raised using techniques like popcorn stitch, bobble stitch, or front post trebles.
2. Transition Rounds
These rounds expand the circular floral center into a square shape. Designers often use strategic increases, chain spaces, and stitch height variations (e.g., single, half-double, double crochet) to turn the flower into a square tile.
3. The Border or Frame
The final rounds stabilize the square and prepare it for joining. This part is often done in a neutral or contrasting color and may include decorative stitches like picots, shells, or lacy motifs.

🧵 Materials You’ll Need
- Yarn: Cotton yarns offer great stitch definition and durability. Acrylic yarn is a softer and more budget-friendly alternative.
- Hook: Choose a hook size compatible with your yarn (usually listed on the label).
- Tapestry Needle: For weaving in ends.
- Scissors
- Blocking Board (optional): For shaping finished squares.
🌹 Step-by-Step: How to Crochet a Basic Flower Tile Square
Let’s walk through a basic example of a 3D flower tile square. This pattern assumes a beginner to intermediate skill level.
🧩 Abbreviations (US terms)
- ch = chain
- sc = single crochet
- dc = double crochet
- tr = treble crochet
- sl st = slip stitch
- sp = space
- st = stitch
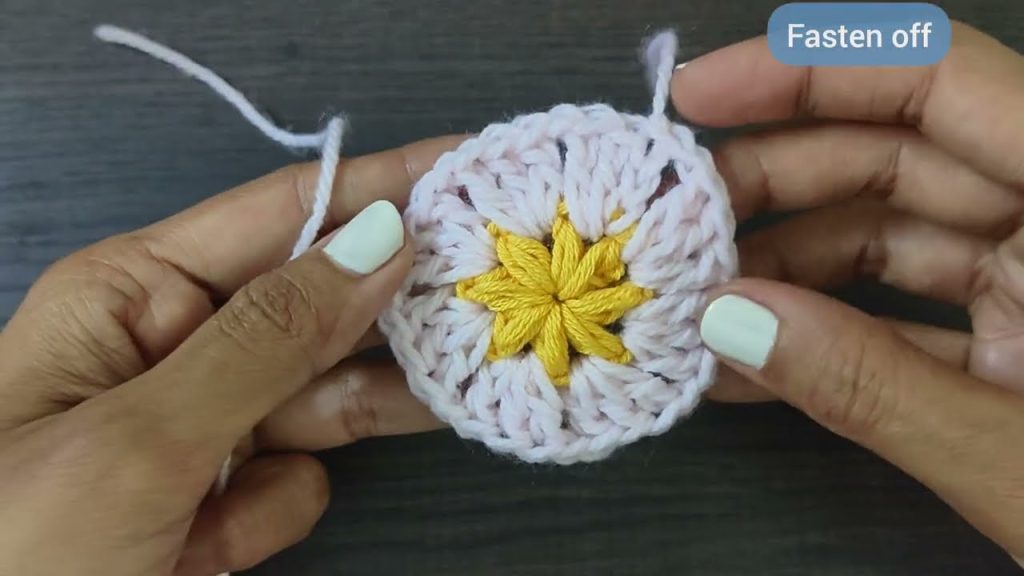
🌸 Round 1: The Flower Center
With color A (yellow):
- Magic ring.
- Ch 3 (counts as dc), make 11 dc into the ring. Join with sl st into top of ch 3. (12 dc)
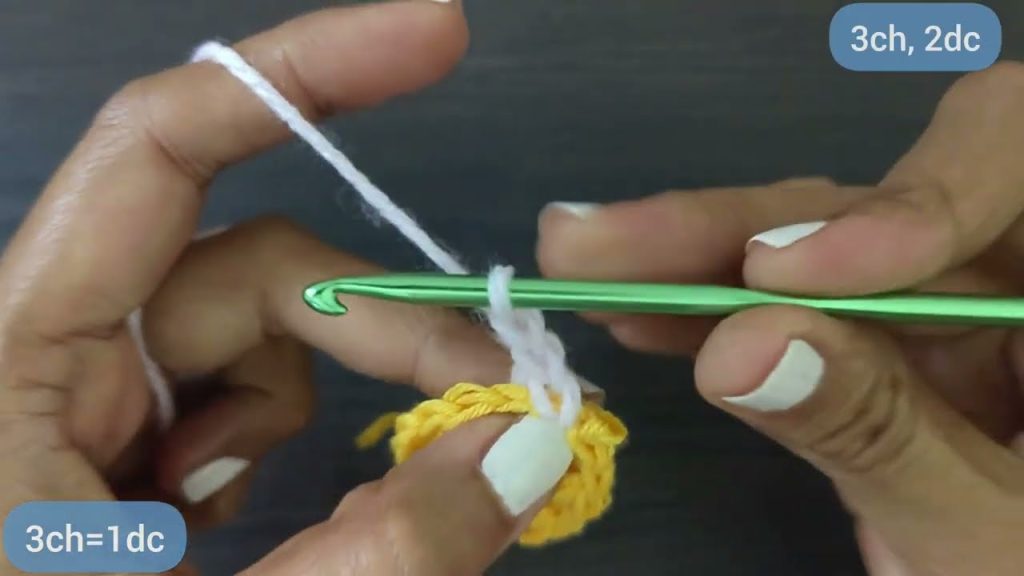
🌺 Round 2: Petals
Switch to color B (pink):
- Ch 2, 3 dc in next st, ch 2, sl st in same st. Repeat in each dc around to form petals.
- You should have 12 small petals.
🌼 Round 3: Second Layer Petals (Optional)
This layer can be worked behind the first:
- Join yarn in the base of any petal with a sl st.
- Ch 3, tr in next st behind petal, ch 3, sl st in same st. Repeat around.
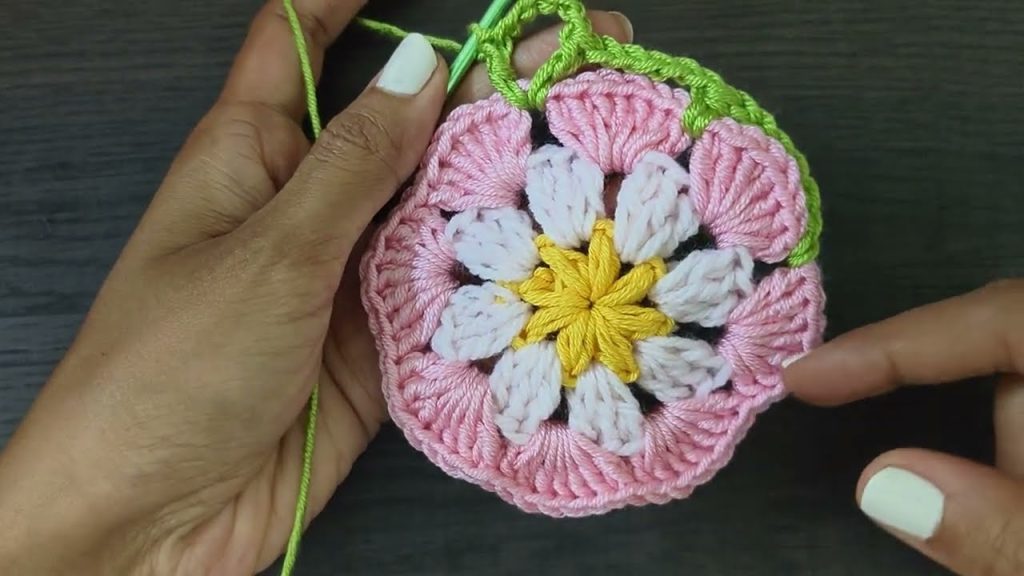
🔷 Round 4: Squaring the Circle
Switch to color C (green or white):
- Work into spaces between petals: dc, hdc, ch 1, dc, hdc to create corners.
- Between corners, work sc or hdc to straighten edges.
- Adjust stitch height as needed to keep square shape.
🔲 Round 5–6: Border Rounds
Continue with same or new color:
- Work dc in each st, with (2 dc, ch 2, 2 dc) in each corner to maintain the square.
- Optional: Add decorative edge like picots or shells.
🎨 Color Strategies
Flower tiles offer endless opportunities for color creativity:
- Realistic Palettes: Use nature-inspired colors like yellows, reds, and greens.
- Vintage Look: Combine muted tones like dusty rose, olive, and cream.
- Bold & Modern: Go with bright, high-contrast shades or gradient yarn.
- Monochrome: Use one color in varying shades to highlight texture.
🧩 Joining Flower Tile Squares
There are multiple techniques to join flower tiles:
- Whip Stitch: Sew squares together using a tapestry needle.
- Join-As-You-Go (JAYG): Connect squares on the last round of each as you crochet.
- Flat Slip Stitch Join: Offers a flat, tidy look.
- Decorative Join: Use puff stitch or lace joins for extra flair.
🏡 Projects to Make with Flower Tile Squares
Here are some inspiring ways to use your finished flower tiles:
| Project | Description |
|---|---|
| Blankets | Combine many squares in a variety of colors to create a cozy, floral throw. |
| Pillows | Sew a few squares together and add a backing for a cheerful cushion cover. |
| Wall Art | Frame a single square or arrange several in a wooden or metal frame. |
| Bags | Make a stylish tote or pouch by sewing squares into panels. |
| Scarves & Shawls | Lightweight cotton squares work beautifully for summer accessories. |
| Garments | Add flower squares as accents or build entire cardigans from them. |
🧠 Tips for Success
- Gauge Consistency: Keep your tension even for uniform squares.
- Block Your Squares: Use a steam iron or blocking board to shape squares before joining.
- Plan Layout: Before assembling, lay out your squares to visualize the final project.
- Secure Ends: Flower tiles have many color changes—securely weave in ends to avoid unraveling.
- Experiment: Try different yarns (like mercerized cotton or wool blends) to achieve various textures.
📚 Resources and Patterns
For those seeking more inspiration or tutorials, try:
- Ravelry – Search for “flower tile square” for thousands of free and paid patterns.
- YouTube – Channels like Bella Coco Crochet, The Crochet Crowd, and Hooked by Robin have visual tutorials.
- Books:
- “100 Flowers to Knit & Crochet” by Lesley Stanfield
- “Granny Square Flowers” by Margaret Hubert
🌟 Conclusion
The crochet flower tile square design is a beautiful fusion of art, geometry, and texture. Whether you’re aiming for a single delicate motif or a grand floral blanket, this design gives you the creative freedom to play with color, stitch, and structure. With a bit of yarn, a hook, and inspiration, you can bring a garden of crochet flowers to life—one square at a time.
Video tutorial:


