
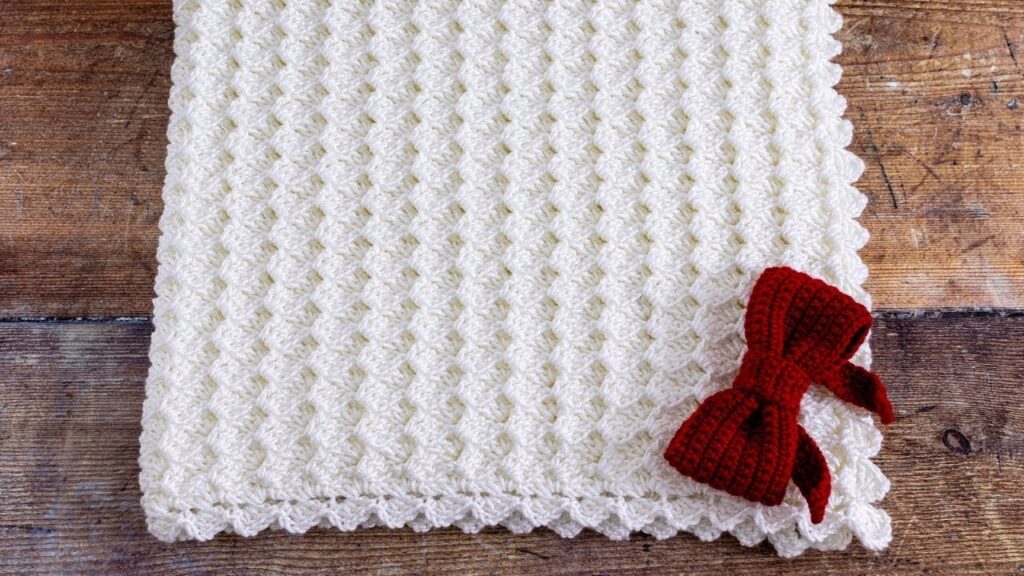
Imagine wrapping a precious little one in a blanket made with your own loving hands, featuring a delicate, lacy texture that looks far more intricate than it actually is. The shell stitch is a timeless crochet classic, and when crafted with a simple 1-row repeat, it becomes the perfect project for even absolute beginners to create a truly beautiful baby blanket.
This detailed tutorial will guide you through crocheting a soft, elegant baby blanket using an incredibly easy, repetitive shell stitch pattern. You’ll be amazed at how quickly this gorgeous texture emerges, making it a satisfying and rewarding experience.
Why the 1-Row Repeat Shell Stitch is Perfect for a Baby Blanket
- Beginner-Friendly: Once you learn the simple sequence, it’s just one row repeated over and over. No complex counting, turning, or stitch variations.
- Beautiful Texture: The shell stitch naturally creates a lovely, delicate, and slightly open fabric that’s perfect for babies. It has a beautiful drape.
- Quick to Work Up: Because it uses taller stitches (like double crochet), your blanket grows relatively fast.
- Versatile: Looks stunning in solid colors, variegated yarns, or with simple stripes.
- Mindful Crocheting: The repetitive nature can be incredibly relaxing and meditative.
1. Planning Your Beautiful Baby Blanket
A little foresight ensures your blanket turns out just right.
- Size:
- Lovey/Security Blanket: Approx. 14×14 inches (35×35 cm)
- Stroller/Receiving Blanket: Approx. 30×35 inches (76×89 cm) – This tutorial will focus on this size.
- Crib Blanket: Approx. 36×50 inches (91×127 cm)
- You can easily adjust the size by changing your starting chain length and the number of rows.
- Yarn Choice (Crucial for Baby Comfort!):
- Fiber: Look for 100% acrylic, superwash merino wool, or soft cotton/bamboo blends.
- Acrylic: Affordable, wide color range, durable, machine washable and dryable (essential for baby items!), and often very soft.
- Superwash Merino Wool: Luxuriously soft, warm, breathable, and machine washable.
- Cotton/Bamboo Blends: Excellent for warmer climates, breathable, and soft.
- Weight: DK (Light Worsted / #3) or Worsted Weight (#4) yarn is ideal. DK will create a lighter, more delicate blanket, while Worsted will yield a cozier, slightly denser one. This tutorial will assume Worsted Weight for a balance of speed and softness.
- Quantity: For a Stroller/Receiving Blanket (approx. 30×35 inches), you’ll need roughly 800-1000 yards (730-915 meters) of worsted weight yarn. Always buy a bit extra to be safe!
- Fiber: Look for 100% acrylic, superwash merino wool, or soft cotton/bamboo blends.
- Color: Pastels are traditional, but modern nurseries embrace vibrant colors, neutrals, or even multi-color cakes.
2. Materials You’ll Need
- Yarn: Approximately 800-1000 yards (730-915 meters) of Worsted Weight (#4) soft baby-friendly yarn.
- Crochet Hook: 5.5 mm (I-9 US). (Or the size needed to obtain your gauge.)
- Scissors: For cutting yarn.
- Yarn Needle (Tapestry Needle): A large, blunt-tipped needle for weaving in ends.
- Stitch Markers (Optional): Helpful for marking your starting chain multiples or the end of rows if you find your edges curling.
- Measuring Tape: Essential for checking gauge and blanket dimensions.
3. Essential Crochet Stitches (Review for Beginners)
Ensure you’re comfortable with these fundamental stitches:
- Slip Knot: The starting knot for your chain.
- Chain (ch): The foundation of your project.
- Single Crochet (sc): Creates a short, dense stitch.
- Double Crochet (dc): A taller, looser stitch, fundamental for the shell.
- Skip (sk): To pass over a stitch without working into it.
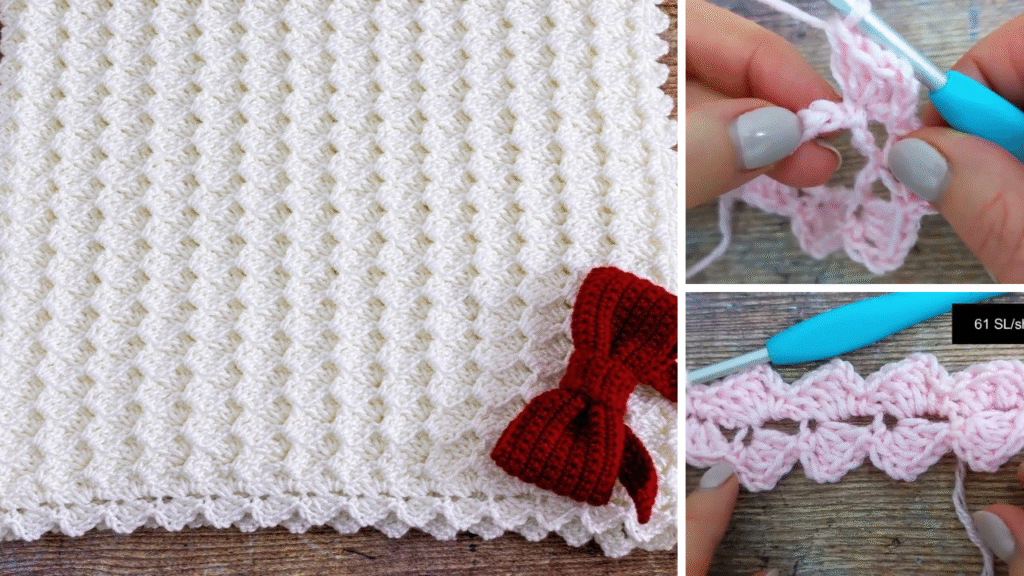
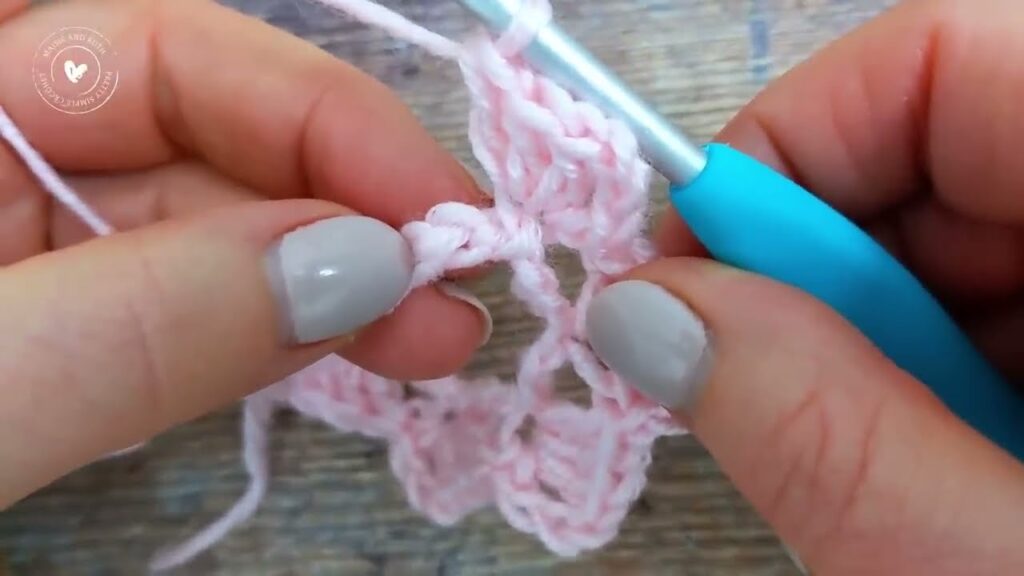
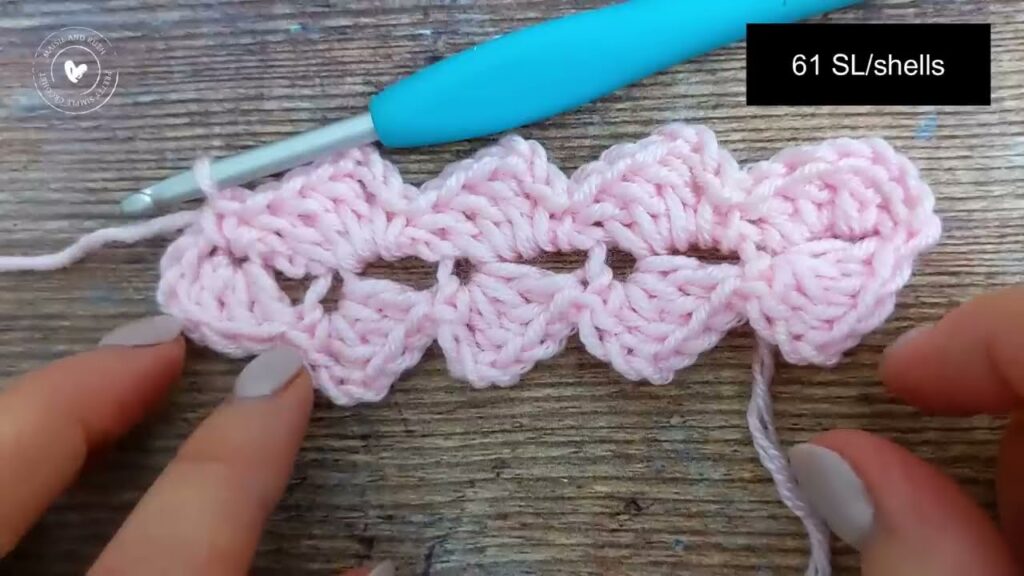
4. Understanding the Shell Stitch (1-Row Repeat)
The beauty of this pattern lies in its simplicity:
- A “shell” is typically a group of stitches (like multiple DCs) worked into a single stitch or chain space.
- We’ll use a (2 dc, ch 1, 2 dc) shell.
- The entire pattern is built on a simple repeat of this shell, separated by skipping stitches.
5. Gauge Swatch: Your Secret to Perfect Size (Highly Recommended!)
While less critical for a blanket than a garment, a gauge swatch helps you determine how large your starting chain needs to be and how much yarn you’ll use.
- Chain 22.
- Row 1 (Foundation Row): Sc in the 2nd ch from hook, sc in next ch. Sk 2 ch, (2 dc, ch 1, 2 dc) in next ch. Repeat from * to * to last 4 chs. Sk 2 ch, sc in last 2 chs.
- Row 2 (Shell Repeat Row): Ch 1, turn. Sc in first sc, sc in next sc. Sk (2 dc, ch 1). (2 dc, ch 1, 2 dc) in next ch-1 space. Repeat from * to * to last 2 sc. Sk last ch-1 sp from shell, sc in last 2 sc.
- Repeat Row 2 until your swatch measures at least 6 inches (15 cm) tall.
- Measure: Lay your swatch flat. Count how many shell repeats (from the start of one shell to the start of the next) you have in 4 inches (10 cm). Note how many rows you have in 4 inches (10 cm).
- Adjust: If you like a looser fabric, go up a hook size. If you want it denser, go down.
6. Crocheting Your Beautiful Shell Stitch Baby Blanket!
This pattern is worked in rows, building up the length of your blanket.
Pattern Notes:
- This pattern requires a starting chain that is a multiple of 6, plus 4 additional chains for the foundation row setup.
- The Ch 1 at the beginning of each repeat row does NOT count as a stitch.
Calculating Your Starting Chain (for a Stroller/Receiving Blanket):
- Desired Width: Let’s aim for approximately 30 inches (76 cm) wide.
- Using Your Swatch: If your gauge swatch showed you get, say, 2 shell repeats in 4 inches, and each shell repeat is 6 chains wide…
- (30 inches / 4 inches) = 7.5 sets of 4 inches.
- 7.5 x (2 shell repeats per 4 inches) = 15 shell repeats needed.
- 15 shell repeats x 6 stitches per repeat = 90 stitches.
- Add the extra 4 chains for the foundation row: 90 + 4 = 94 chains.
- So, for a 30-inch wide blanket, you’ll start with a chain of 94.
- If you want a narrower blanket, use a smaller multiple of 6 + 4. For a wider blanket, use a larger multiple of 6 + 4.
Instructions for the Blanket Body:
- Starting Chain: Make a slip knot. Chain your calculated number of chains (e.g., Ch 94 for a 30-inch wide blanket). Make sure your chain isn’t too tight.
- Row 1 (Foundation Row): Sc in the 2nd ch from hook, sc in next ch.
- *Sk 2 ch, (2 dc, ch 1, 2 dc) in next ch.* Repeat from * to * across the chain until you have 4 chains remaining.
- Sk 2 ch, sc in the last 2 chs.
- You should have a series of shells bordered by two SCs at each end.
- Row 2 (The 1-Row Repeat!): Ch 1, turn your work.
- Sc in the first sc, sc in the next sc.
- *Sk (2 dc, ch 1) from the previous shell (this means skipping the 2 dc stitches and the chain-1 space). (2 dc, ch 1, 2 dc) into the ch-1 space of the next shell.* Repeat from * to * across the row.
- When you reach the end, you’ll have 2 sc stitches remaining from the previous row’s end. Sk the last shell’s 2 dc and ch-1 sp, then sc in the last 2 sc stitches.
- This completes the repeat row. Notice how the shells stack neatly on top of each other, and the two SCs at each end keep your blanket edges straight.
- Continue Repeating Row 2: Keep repeating Row 2 until your blanket reaches your desired length.
- For a Stroller/Receiving Blanket, aim for approximately 35 inches (89 cm) in length.
- Regularly measure your blanket as you go to ensure it’s reaching your target length. The fabric will grow surprisingly fast!
7. Finishing Your Beautiful Baby Blanket
Once your blanket reaches the desired length, it’s time for the final touches.
- Fasten Off: When you’ve completed your final repeat row, cut your yarn, leaving a tail about 6-8 inches (15-20 cm) long. Yarn over your hook and pull the tail completely through the last loop to secure it.
- Weave in All Ends: Thread your yarn needle with the starting tail and the finishing tail. Neatly weave these tails into the stitches of your blanket, going in different directions for a few inches to secure them invisibly. This prevents unraveling and creates a clean look.
- Blocking (Highly Recommended for a Polished Look!):
- Blocking is the process of wetting or steaming your finished crochet piece and shaping it to its final dimensions while it dries. It helps to even out your stitches, open up the lace of the shells, and give your blanket a professional, beautiful finish.
- Wet Blocking (for cotton/wool/most blends): Gently submerge your blanket in cool water with a little mild soap (if desired). Squeeze out excess water without twisting or wringing. Lay it flat on a clean towel or foam blocking mats. Gently stretch and shape it to your desired rectangular dimensions, pinning it in place if using mats. Let it air dry completely (this can take 24-48 hours).
- Steam Blocking (for acrylic): Lay your blanket flat. Hover a steam iron (do not touch the iron to the yarn, as acrylic can melt) over the fabric, allowing the steam to relax the fibers. Gently pat and shape with your hands. Let cool and dry completely.
8. Care for Your Crocheted Baby Blanket
Always refer to your yarn label for specific care instructions, as they can vary by fiber type. For most baby-friendly acrylics or superwash wools:
- Machine Washable: Usually machine wash on a gentle cycle in cool water.
- Drying: Tumble dry on low heat or, ideally, lay flat to dry to maintain shape and prevent stretching.
- Avoid Bleach: Do not use bleach unless specifically instructed by the yarn label.
Congratulations! You’ve just crocheted a beautiful, soft, and easy shell stitch baby blanket. This timeless piece will be a cherished handmade gift or a lovely addition to any nursery. Enjoy the satisfaction of creating something so special with your own hands!
Video tutorial:


